Day 1: Jedediah Sew-Along | Guest Post - How to Save Fabric when cutting out your Jedediah Pants
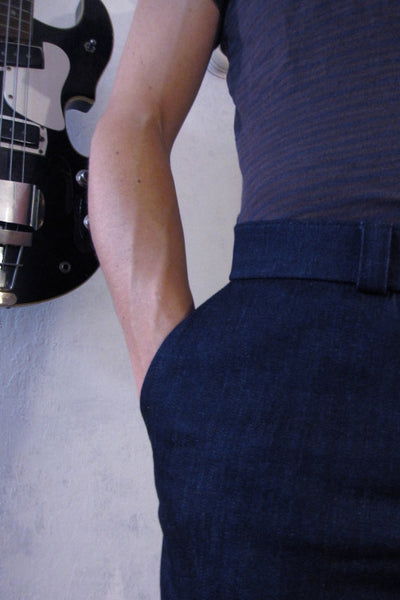
Meg, of Made By Meg was one of the test sewers for our Jedediah Pants pattern. She was the sewer who produced this spectacular pair of denim pants (with musical themed pocket linings!):
Not only is she a thorough and enthusiastic test sewer for us, she has also agreed to write a guest blog post to show you how she improved upon our cutting layouts...and saved a bunch of fabric! Thank you, Meg, for taking the time to do this! Without further ado, here is Meg's very helpful tutorial to save you fabric when cutting out your pants or shorts for the sew-along!:
It's no secret that I don't always follow the rules, and this holds true for the Jedediah Pants...
Testing the pattern for the fabulous Thread Theory, I made sure to follow most of the instructions: I carefully flat felled my seams, cut with the grain, and even followed the exquisite directions to french seam the pockets - and I was glad I did! But there was one area where I differed from protocol: the cutting layout. When I got the A-OK from Thread Theory, I figured I'd share it with you! So, here is an alternate suggestion for a cutting layout:
A bit of background: While it is usually wise to follow pattern instructions (ask me how I know!), cutting layout is one area where you can sometimes take a bit of liberty. For one, manufacturers often have to do a one-size-fits-all approach to the cutting layout, and your smaller or larger pattern pieces may work in a few different ways than suggested. On the user side, you may have to make adjustments for different fabric widths, a directional print, or even need to make do with just barely enough fabric. This is where it may be a good idea to experiment with a few different layouts before cutting.
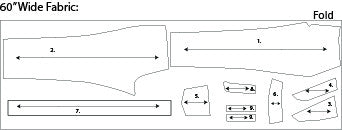
The Jedediah layout: For the Jedediah Pants, the cutting layout places one pant leg above the other, with the waistband running vertically next to the pant leg (illustration below). While this works great to make sure that the pattern pieces in any size will fit on your fabric, it takes up a lot of yardage (3 yards at least)! Furthermore, if your fabric has a one-way print such as pinstripes, a one-way print such as a plaid, or even a 2-way stretch, a vertically cut waistband will not face the same way as the rest of your pants.
The modifications: To save fabric and make sure my waistband stretched in the same direction as the rest of the pants (I used a fabric with 5-10% stretch), I rearranged my pattern pieces, squeezing them on to under 2 yards of fabric! Here's what the new layout looks like, based on how I cut K's pants (left) and what that line drawing might look like (right):
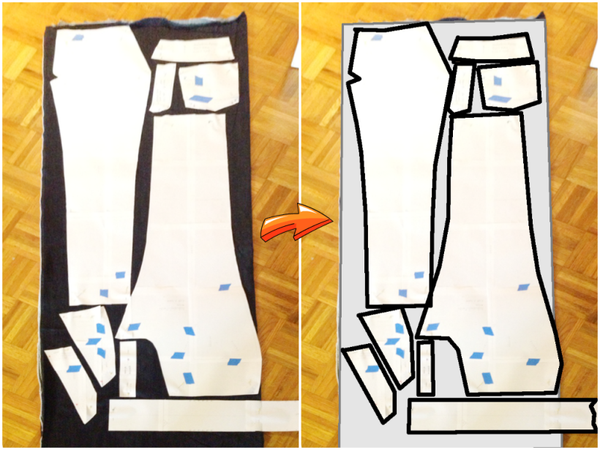
In order to make the waistband modification, I cut the the waistband along the fold of the fabric. As shown above (bottom right-hand corner), half the waistband is placed along the folded edge of the fabric. When the fabric is cut and unfolded, you'll have a full-size waistband facing the same direction as the rest of your pants! Now my waistband will better match the rest of the pants.
You might call me a slacker, but I just love little sewing shortcuts that save me some fabric space!