Strathcona Tee Sew-Along: How to Sew a Men's T-shirt

Here we are, ready to sew a knit t-shirt! This post will go step by step through each moment of sewing a men's knit t-shirt using a basic sewing machine with a zig zag stitch.
Are you ready to sew? It won't take long!
Preparations
- Keep in mind that the Strathcona Henley has 5/8" seam allowances on all seams. Some t-shirt patterns may have smaller seam allowances than this - make sure to check your pattern!
- Insert a ballpoint needle into your machine and test your stitch style (check out this post if you are wondering how to choose a stitch style)
- Reduce the pressure on your presser foot if your sewing machine provides this option - if you are unsure whether it does, make sure to take the time to check your manual. Reducing the pressure will make handling your knit fabric much easier since it will not become stretched out as you sew.
- Whenever you start sewing a seam, start with the needle in the "down position" so that it is lowered into the fabric. This will reduce the risk of the first needle motion punching the fabric into the needle plate of the sewing machine.
Sew the Shoulders
If your knit is quite stretchy, you might like to stabilize the shoulders so that they don't get saggy over time. Stabilizing the shoulders will result in a smart looking fitted t-shirt - this may or may not be your style - you choose!

If you decide to stabilize, you can use rayon seam binding (as seen above), clear swimsuit elastic, a thin woven fabric strip, or even the selvedge of your knit fabric (you will notice that the selvedge isn't as stretchy as the rest of your fabric). The goal here is to choose something that doesn't stretch much and isn't very bulky.

Place the t-shirt front and back with right sides together. Place the stabilizer along the wrong side of the back of the t-shirt. You will notice that the back shoulder is wider than the front shoulder - it is drafted this way to accommodate for men's muscular and rounded shoulders! Stretch the shirt front to match the shirt back at the shoulder seam as you sew.

If you are using a very a stabilizer that does not allow any stretch at all, you might as well use a straight stitch for this seam. The shoulder seams do not need to stretch and they are quite visible so a tidy straight stitch can produce an attractive seam. If you choose to use an elastic or knit selvedge as a stabilizer you will still want to use a stretch stitch since all of your materials contain stretch!

Press the seam allowances towards the back to cover your stabilizer (it is also possible to press your seam allowances open if you would like to reduce bulk).

If you would like, you can finish your seam allowances using another row of zig zag stitching. This will stop any potential fraying (which may or may not occur depending on the style of knit you choose).

Trim the 5/8" seam allowance to reduce bulk.

Sew the Neckline
Now that the shoulder seams are sewn, you will have a neck hole that is ready to finish with binding!

With right sides together, join the narrow edges of the neckline binding. Sew this using a straight stitch (this short seam doesn't need to stretch either).

Trim the seam allowance and press the seam allowances open.

Finish preparing the binding by folding it in half lengthwise so that the raw edges meet. Press along the folded edge.

This is what your finished neck binding will look like:

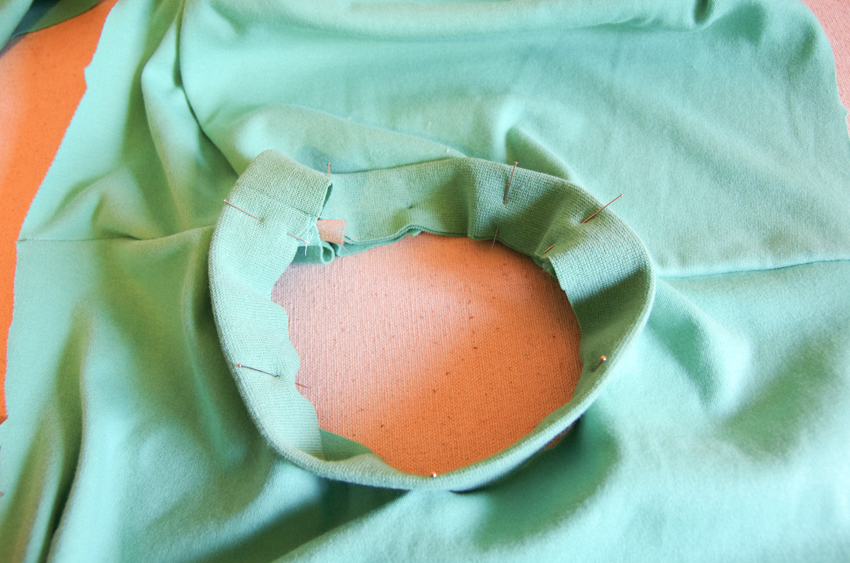
Arrange the t-shirt body with right sides facing you. Place the binding circle on top of t-shirt, alight all of the raw edges. I like to match the binding seam to one of the shoulder seams but you could also align this seam with center back if you prefer.

If you are using the Strathcona Henley pattern, ignore all the notches on the neckline binding (they are intended for the Henley variation of the pattern). Pin the binding to the neckline so that it is stretched evenly around the neckline - it might take some fiddling to get this evenly stretched. I tend to use 8 pins spaced evenly.
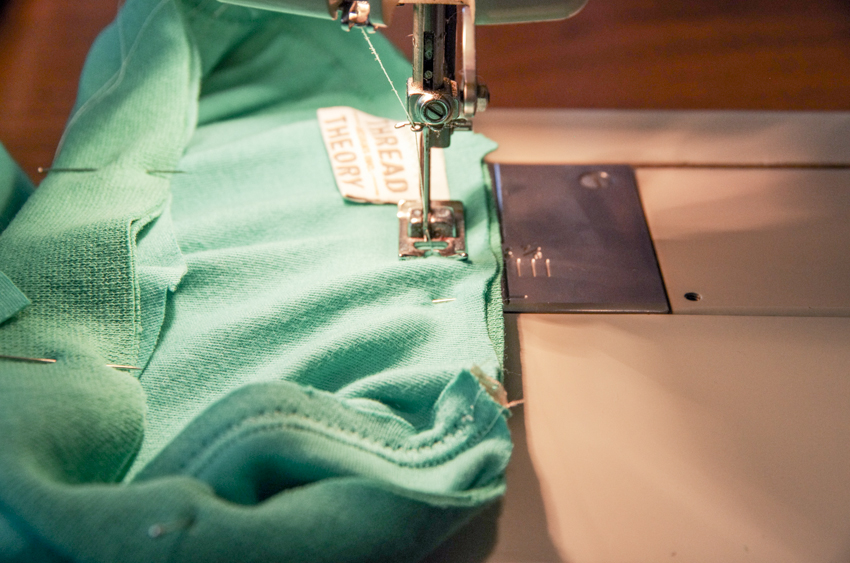
Stitch the binding to the neckline using a zig zag (or other stretch stitch). I used to place the t-shirt with the binding facing up on the sewing machine but recently switched my technique. I now place the t-shirt facing up and stretch the t-shirt with my fingers as I sew. Try out both ways and see what works best for you! I find that my new method reduces the risk of creating little tucks in the t-shirt neckline (they are super annoying to stitch rip!!!).
Press the finished neckline.

If you would like, you can finish the neckline by adding a line of stitching around the shirt 1/8" from the neckline seam to lock the seam allowance in place. I used a zig zag stitch here but you can up your game for really professional results by using a twin needle (or you can skip this step altogether if your fabric presses well and you don't think your seam allowance will tend to flip upwards - I often avoid stitching when I am sewing with crisp and thin cotton jerseys but find it is necessary when sewing with thicker cotton interlocks).

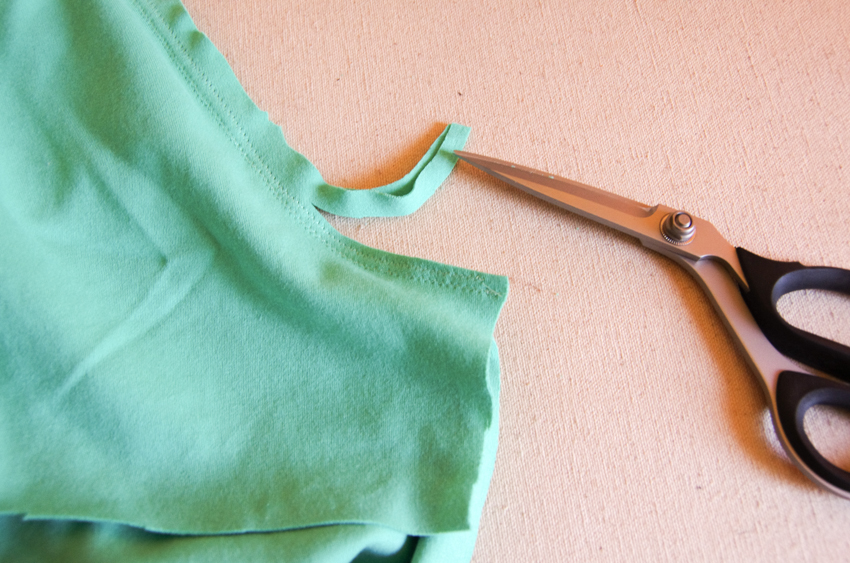
Trim the neckline seam allowance:

I like to trim from the shirt side so I don't risk snipping into the shirt!

Sew the Sleeves
Place the t-shirt and sleeve with right sides together.

Line up the shoulder seam with the middle sleeve notch:

Place a pin where each notch meets.

The double notches indicate the back of the garment.

Sew the sleeve seam using a zig zag stitch (or other stretch stitch). You will need to adjust often (with the needle down so that the fabric doesn't slip out of the way) to avoid creating any tucks and wrinkles.

Finish the sleeve seam allowance with a second row of zig zag stitching and trim.
Press the sleeve seam. In the Strathcona instruction booklet I recommend to press the seam allowance towards the sleeves - this is the classic direction to place sleeve seams (as seen on tailored garments). Lately I have been finding that pressing the sleeve seam allowances towards the garment and away from the sleeve produces a smoother seam more reminiscient of store bought t-shirts. Try both ways to see which way fits best on the recipient's shoulders! Press the sleeve seam on a tailor's ham or on the narrow curve of the end of an ironing board so as to keep the rounded shape of the seam.

Sew the Side Seams

Pin the sleeve and side seams - make sure that the underarm seam meets. Stitch using a zig zag stitch or other stretch stitch.

Finish the seam allowance with another row of zig zag stitching and trim the seam allowance.

Press the seam allowances towards the back - your shirt is almost finished!

Sew the Hems
You can finish the hem as you normally would - by pressing the raw edge up and then pressing upwards again - but you might find that this creates too much bulk for your knit t-shirt to sit nice and casually (it could look fairly stiff with a thick hem). Alternatively, you could finish the edge by pressing up once at the hem notch:

Once pressed and pinned in place, stitch the single layer hem in place using a twin needle, or, as photographed, with a simple zig zag stitch. Try your very best to keep the knit relaxed - refrain from stretching in any way!

Repeat this hemming step for the sleeve hems.

And that's all there is to it! A nice basic, classically shaped crew-neck menswear t-shirt is ready to wear!
I hope your t-shirt has turned out well! I will be sharing a blog post on Friday featuring Matt in his finished t-shirts - he's thrilled to have fresh basics added to his closet!
If you would like to share your Strathcona T-shirts (or any other t-shirts that you sewed while following this sew-along) please use #strathtee so we can see the results!