Camas Blouse Sew-Along: Day 4 - Using a Woven Fabric
Here is the sew-along post that many of you have been waiting for! Ever since we launched the Camas Blouse pattern we have received emails and comments from people who would love to make the Camas in a fabric with no stretch. The pattern is designed for knit fabrics with some stretch but the only pattern piece that actually needs this stretch is the sleeve. It is drafted to be quite slim in the bicep and at the elbow. You will need more room if you would like to be comfortable while moving your arms! Most knit garments do not include enough ease across the shoulder blades to work with woven fabrics. This is not the case with the Camas Blouse because the yoke pieces were drafted to work in woven or knit fabrics. So, if you would like to sew this pattern using a woven fabric, you will not need to change the pattern very much, you will just need to make some small adjustments to the sleeve!
Today I’ve recorded all of the ways that you can adjust the Camas sleeve along with their corresponding advantages and disadvantages. I hope you will find an option or combination of options that suits you! I’ll begin with the simplest solutions and end with some pattern manipulation. I’ve accompanied almost every solution with photos of a Camas Blouse or similar garment sewn by a sewing blogger or by me so that you can see how each solution appears in reality!

Sized up Camas Blouse blogged at Friends Stitched Together
Simply Size Up!
How to Do This: Take your body measurements and select your size from the body measurement chart that we talked about a couple of days ago. Instead of cutting your pattern out using this size, simply cut the next size up! You could grade between sizes if you would like to maintain a neckline and waist/hem that fits you but you will need to use the larger sized armhole and sleeve.
Advantages: This is the easiest option and requires no pattern adjustments. Yay :)
Disadvantages: Using a size bigger than your measurements call for will give you more room in the sleeve and armscye but it will also make the rest of the blouse larger. Even if you grade between sizes, you will be forced to sew a Camas with wider shoulders and a larger chest circumference unless you make pattern adjustments to correct this. If you happen to be between measurements with thin arms and larger shoulders/bust, this solution will be perfect for you because it will lead to the correct fit in every area.

Cotton Spandex Camas Blouse blogged by me and modeled by my Mom
Pick a Woven with Spandex Content
How to Do This: Select a fabric with even the smallest percentage of spandex/lycra contest. All you need is just a slight bit of ‘give’ or stretch in the fabric to allow you to have mobility at the elbow and feel unrestricted around the bicep despite the tight sleeve.
Advantages: There are an increasing number of fabric choices available with a small amount of spandex included – I have seen stretch cottons, stretch silks and stretch suitings at the fabric store lately that would all make lovely Camas Blouses.
Disadvantages: Fabrics with spandex content wear out faster if you do not wash them carefully. A lot of fabrics with spandex content don’t quite have the drape that I am looking for or the prints that I would like to create my ideal woven Camas.

Camas Blouse sewn with 3/8″ seam allowances blogged at Randomly Happy
Sew With Smaller Seam Allowances

How to Do This: Cut out the size that suits you based on the body measurement chart. Determine which areas you will need more mobility and room and sew these areas using a 1/4″ to 3/8″ seam allowance rather than the 5/8″ seam allowance that the pattern calls for. Since the Camas Blouse yokes have been drafted to work well with woven fabrics, the only areas you will need to use a smaller seam allowance are the sleeve and side seam. When sewing step 3 in the “Sleeves and Side Seam” section of the instruction booklet, start at the hem of the sleeve and sew with a 1/4″ seam allowance. Keep sewing with this seam allowance until you have sewn onto the blouse body and then taper back to a 5/8″ seam allowance to complete the rest of the seam.
Advantages: This is also an easy option with the added benefit that you can use the regular seam allowance (5/8″) where you do not need extra width.
Disadvantages: This solution works well for adding a touch more room at the elbow and bicep but it may not be enough room for you if you like a very easy fitting sleeve. Sewing with a smaller seam allowance will also drop the underarm lower which can reduce the ability to raise the arm without the body of the garment also raising (we will be talking about this shortly, keep reading!). This may or may not be a nuisance to you: If you wear your Camas tucked in it will be more likely to untuck itself when you raise your arm.

Camas Blouse with width added to sleeves (using method 2 I believe) blogged at Stitch 56
Increase the Sleeve Width (2 ways)
How to Do This: There are two approaches to adding width to the sleeve.

1. Reduce the sleeve cap height: Cut the sleeve pattern piece in half vertically but leave a paper hing at the top and bottom. Cut the sleeve horizontally leaving a paper hinge at each side. Now spread the t-shape open to add as much width as you will like. You will notice that the sleeve seam does not change in length but it’s shape changes. You will also notice that width is added very high up at the shoulder – this is a great place to add it if you have rounded, full delts like I do!
2. Add width along the Seam: This is an easier adjustment but it is definitely a design change because it leads the sleeve to become more rectangular than tapered. Place your sleeve pattern piece on a large sheet of paper and draw a straight line from the underarm down to the hem to create a wider hem. This adjustment does not add width above the bicep but many people will not need additional width in this area, they will mostly just need extra width at the elbow.
Advantages: Both of these pattern adjustments are fairly simple and do not require you to adjust the armscye.
Disadvantages: Both adjustments makes the sleeve fit in a looser manner. Since the proportions of the Camas are quite fitted in the sleeve and shoulder and quite loose in the body, changing the fitted sleeve to a looser one will change the look of the garment considerably.

Linen dress which I designed at fashion school. If you look closely you can see a light cream band of knit fabric along the sleeve seam (left hand side).
Add a Knit Band to the Sleeve
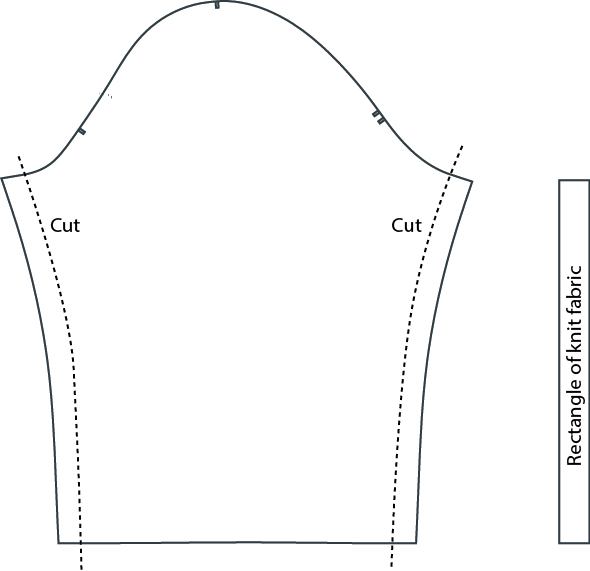
How to Do This: Remove the seam allowances from the main seam of your sleeve pattern piece. Cut off 1/2″ from either side of the sleeve, bicep to hem. Create a rectangle pattern piece that is the length of the sleeve seam. It should measure 1″ wide. Add seam allowances back on to the sleeve and on to the knit band (long edges). You will need to sew the Camas Blouse in a different order now that you have a two piece sleeve. Sew the blouse side seam. Next, sew the sleeve and sleeve band together to form a tube. Ease the sleeve into the armhole.
Advantages: This option will create the most comfortable feeling sleeve without changing the overall silhouette of the garment very much – you lose a little bit of sleeve shaping due to the rectangular knit piece but it is not substantial..
Disadvantages: It is very difficult to find matching knit and woven fabrics unless you dye them yourself. Even if you can find a perfect match, the seamlines themselves might not look as flattering as you would like (unless you view it as design feature!).
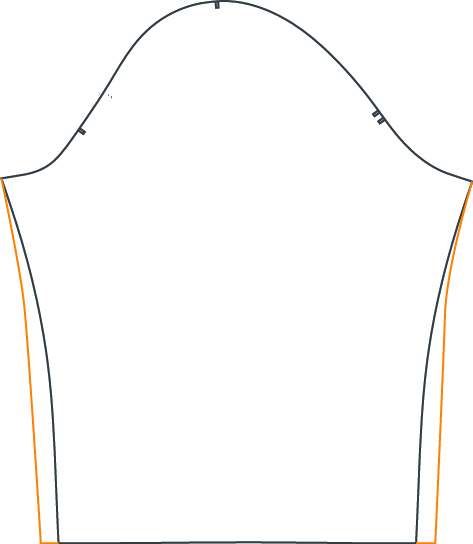
Raise the Armhole

How to Do This: The Camas armhole isn’t especially low but raising the armhole slightly can still help to increase mobility and comfort when sewing the Camas in a woven fabric. While it might seem counter intuitive to create a tighter armhole in order to increase mobility, it really does help! Low armholes, while comfortable and casual feeling (think your favorite cozy loose sweater or batwing tops) actually reduce mobility when sewn in a woven fabric. The whole body of the garment must ride up when the arm is lifted. If you’d like proof or a visual explanation about the differences between high and low armholes, Threads Magazine has come out with a great article by Kenneth D. Kingrecently (Feb/March 2016 issue) and also an excellent video featuring Andrea Schewe that both visually explain how this works. I particularly recommend the video as it really made things clear for me and explains how to make this adjustment step by step.
As I said before, the Camas doesn’t have especially low armholes, so our adjustment to increase mobility doesn’t need to be very big. After watching the video, here are the measurements I think would work nicely to add a bit of extra mobility when sewing the Camas in wovens are as follows:
Raise the armhole by 3/8″ and raise the sleeve by 3/4″. Of course, you can experiment by raising it less or more based on how the Camas Blouse fits your body. I am sewing a woven version of the Camas for the sew-along using this adjustment along with a smaller seam allowance at the elbow so I will report on how this fits me at the end of the sew along!
Advantages: This option emphasizes the slim look of the Camas sleeve while increasing your ability to lift your arm without shifting the rest of the blouse – win, win!
Disadvantages: This adjustment doesn’t give you any more room in the elbow, it will only give you the ability to lift and move your arm comfortably. You will likely want to combine this adjustment with another one such as sewing with smaller seam allowances near the elbow to create the most comfortable sleeve.
