Camas Blouse Sew-Along: Day 6 - Cut into your fabric and sew the yokes
Today we finally start to sew!
I have decided to photograph the woven Camas that I am sewing using a dotted cotton chambray as my main ‘sew-along sample’. I know most people will be following along while sewing a knit Camas (since this is the type of fabric that the pattern calls for) but I thought that the very clear right and wrong side on this fabric would help to make the sew-along photos easy to understand so I couldn’t resist photographing a woven Camas! Even though I am sewing with a woven fabric, I will still include information on stitch types that you should or could use when sewing with a knit. If I mention straight stitching during a sewing step, for example, this is a stitch type suitable for both knits and woven fabrics at that particular point in the sewing process.
Okay, let’s delve right in – cut out your fabric pieces using the fabric layout provided in the instruction booklet. I go into great detail about cutting out knit fabrics in our Comox Trunks sew-along so I haven’t repeated myself here. Be sure to check out this post if you want some tips!
It is important to note that the Camas Blouse pattern includes 5/8″ seam allowances on all seams – while this large allowance is fairly standard for home sewers because it gives you wiggle room to fit the garment as you sew, it means you will need to do a lot of seam trimming (often called grading). We will go over how to do this and where to do this at every single sewing step for the most professional looking results! It is a very important aspect of sewing the Camas Blouse.
Sewing the Front Yokes

Create gathers on your blouse Front by sewing two lines of stitching using your longest stitch length. The first line of stitching is 1/4″ from the fabric edge and the second line of stitching is 1/2″ from the fabric edge. Stitch from the notch towards the neckline. Don’t backstitch when sewing a gathering stitch since you will need to pull your loose threads taught in a moment! You can stop your stitching either 5/8″ from the neckline or continue right to the neckline fabric edge.
Pull the gathers by grabbing hold of the bobbin threads from both stitching lines. Even out the gathers so that they are nicely spread between the notch and the neckline. You should leave the 5/8″ seam allowance along the neckline free from gathers.
Pin the front yokes to your blouse fronts. First, lay down one front yoke so that the right side is facing you, place the blouse front on top of it so that the blouse front right side is also facing you. Finish the sandwich by placing the second yoke on top of the blouse front so that the wrong side is facing you (as pictured above). Pin your layers in place so that the raw edges are even. Note that each yoke edge should be even with the neckline and armhole at the seamline – this is 5/8″ in from the fabric edge. You can see in the photo above that the yoke extends past the neckline and armhole within the seam allowance. The yoke notches match the blouse front notch.
Above is another view of the sandwich you have made – on the left is your front yoke, in the middle is your blouse front, on the right is your front yoke facing. Sew along the 5/8″ seamline using a regular straight stitch and backstitch at both ends.
Here is the first seam we will need to trim/grade! To grade the seam, trim one seam allowance very short (1/4″), trim the middle seam allowance to 1/2″ and leave the third seam allowance at 5/8
“. Trimming in this manner makes a nice transition from the thickness of three seam allowances to no seam allowance at all so that, when you press the yokes, there will not be a ridge where the seam allowances end.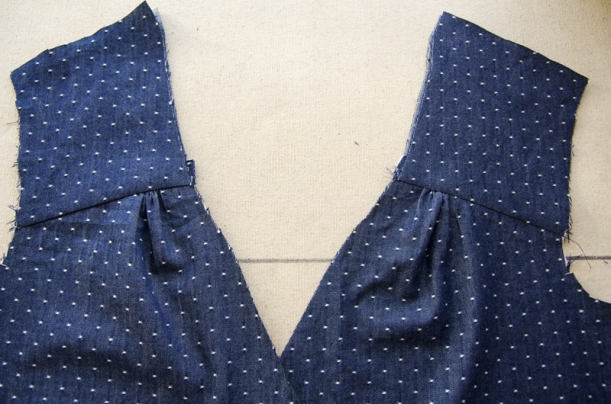
Press both the yoke and yoke facing upwards. Gently press your gathers if you would like (this may or may not be necessary depending on the drape of your fabric). My fabric doesn’t drape very much so I decided to press the gathers down and steam them a little bit so that they sit flat.
Now let’s repeat this process for the back yoke! Sew two lines of long basting stitches again and form your gathers.
You will notice that the back features two notches between which the gathers are quite full – I really like that romantic full look but, if you don’t, you could perform an easy modification as follows: Simply sew your gathering stitches across the entire blouse back. Distribute the gathers as you prefer – you could do small gathers across the entire length of the back or you could do a wider stretch of medium sized gathers across the middle of the blouse.
I’ve photographed the back yoke “sandwich” differently in case you didn’t quite understand the first set of photos or the instructions in the booklet. First, lay one yoke on your work surface so that it is upside down and so that the right side is facing you.
Now place your blouse back on top of the yoke so that raw edges are aligned and the blouse back right side is facing you.
Add your last yoke to the top of this sandwich so that the wrong side is facing you. Carefully in all layers so that your gathers sit flat (it is easy to accidentally push them to the side so that they don’t sit evenly!).
Once you’ve sewn your yoke, you can grade the seam allowances in the same manner that you did for the blouse front. This is especially important for the back yoke because the bulk of the full gathers is considerable.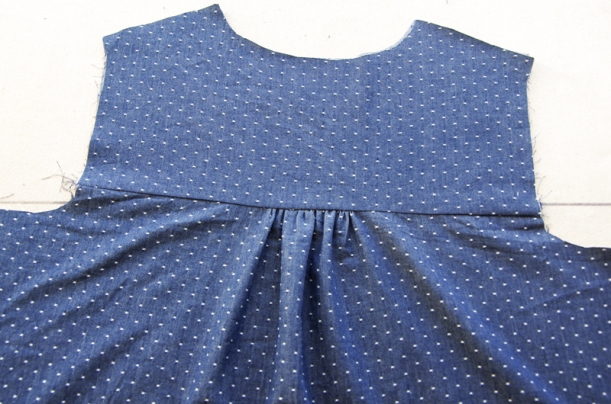
Press the yokes upwards. Now it’s time to finish the yokes by sewing the shoulder seams! In the Camas instruction booklet I illustrated a way to sew this seam that involves a bit of extra sewing but is easier to understand when illustrated. Some of you have emailed me and mentioned that the “burrito method” would work well for this pattern – I agree! You can find great tutorials for sewing the burrito method here:
- Grainline Studio’s Burrito Method Tutorial for the Archer Shirt
- Male Pattern Boldness Burrito Method Tutorial for the Negroni Shirt
We will continue with this sew-along by using the method from the instruction booklet. I prefer this method when sewing with knits because it is less likely to stretch out knits that do not have very good recovery because you do not need to roll up the body of the blouse and stretch the yokes over this roll as you would with the burrito method. Also, I think a knit shoulder seam benefits from the stability added from the extra stitching that we will be doing below:
Begin by pushing your front and back yoke facings (the inner yokes) out of the way so that you can work with only the front and back yokes. Lines up the shoulder seams – you will only be working with two layers of fabric. Sew these shoulder seams using a straight stitch and a 5/8″ seam allowance.
Press the seam allowance open. Now we will sew the same seam on the yoke facings!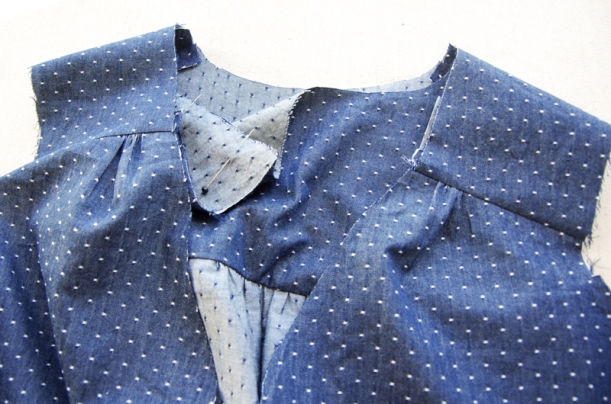
Photographed above is the same view that I illustrated in the instruction booklet. Pin the yoke facings together at the shoulder seam so that the right sides are together – it is easiest to do this if you position the blouse and yokes as they will look when they are finished – that way you eliminate the risk of accidentally twisting the yokes. It is easy to access the whole shoulder seam by pulling it towards the neckline of the blouse – as you can see below: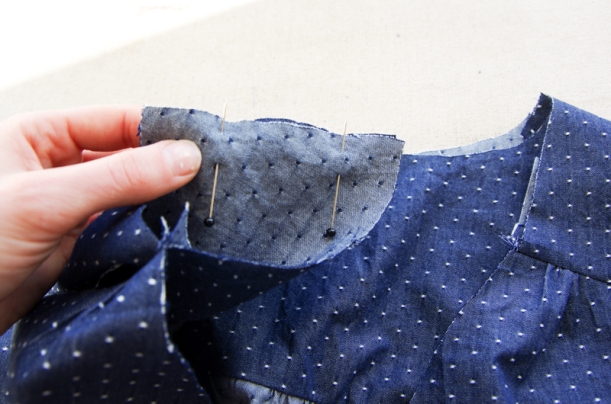
Sew this seam at 5/8″ and press it open. You can trim this seam allowance to 3/8″ to grade it in comparison to the main shoulder seam.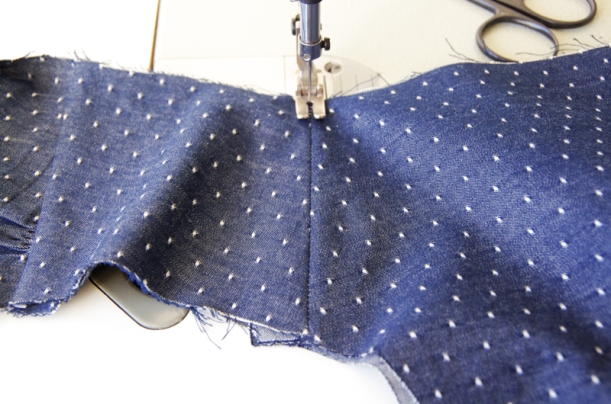
Finish the shoulder seams by opening up the blouse so that the yoke and yoke facing shoulder seams sit one on top of the other. Stitch in the ditch to join the two layers together. This step isn’t 100% necessary but it is a nice way to add structure and stabilize the shoulder seam. It also prevents the layers from shifting around.
That’s it for today! Your Camas Blouse is already taking shape! On Friday we will be adding the sleeves and sewing the side seams. We will even hem the main blouse so that it is ready for the placket!
