Camas Blouse Sew-Along: Day 7 - Sew the sleeves, side seams and hem
By the end of today’s sewing session your Camas will really look like a blouse – you will even be able to try it on! Here is where we left off on Wednesday: We had sewn the gathers, yokes and shoulder seams. I forgot to mention that it is a good idea to stay stitch along the neckline and armholes to keep the two yoke layers in place. Do this by stitching within the 5/8″ seam allowance using a normal stitch length. Staystitching is a great way to keep fabric from stretching out when you are working on the rest of the garment. Necklines and armholes are prone to stretching out because their curved edges include some fabric that is cut on the bias. You can see the staystitching that I did here:
Inserting Sleeves
Now it’s time to insert our sleeves! Pin the a sleeve to each armhole with right sides together. The double notch on the sleeve means that this should be aligned with the back of the garment. Match the notch at the top of the sleeve with the shoulder seam. Match the double notch on the sleeve with the double notch on the back of the blouse (right at the yoke seamline). Match the single notch on the sleeve with the single notch on the front of the blouse – note that this notch is not the same as the yoke seamline, it is placed closer to the side seam.
Sew the sleeve using a 5/8″ seam allowance. Be careful to keep the raw edges of your fabric aligned. Pivot the garment with your needle down and your presser foot up whenever you need to adjust to match the curve of this seam. Sewing a steeply curved sleeve like this can sometimes feel like magic – while you are sewing it feels like there is no way that the two curves are going to fit together but, if you pin at the notches and take the sewing process slowly, they will fit absolutely perfectly. :)

Finish the seam allowance using a serger or a zig zag stitch. Pardon my mis-matched forest green serger thread! I have been sewing several Camas Blouses at once (including a forest green one) and was too lazy to change the serger thread…oh dear!
Press the seam allowance towards the sleeve. In the photo above, I am using a pressing ham. You can press an armscye without one but a ham really makes it easier!
Side Seams
Now it is time to sew the side seams. In the instruction booklet I mention two possibilities for sewing these – I have photographed the main option (simply sew and finish the seam allowance wtih a serger or zig zag stitch) but keep in mind that you can try out a french seam if you like! A french seam would be particularly nice if you are creating an open front Camas cardigan. That way the raw edges are nicely contained. Another option that I don’t mention in the instruction booklet is to sew this seam using a flat fell finish. I mention this option due to an error I just made on the Camas Blouse yesterday! I had intended to sew a french seam on the Camas Cardigan I am making but accidentally sewed the sleeve and side seam with right sides together out of habit. Rather than unpicking the stitches from the very delicate poly chiffon I am using I decided to create a flat fell seam instead. It worked well! This is what it looks like:

Anyways, if you would just like to sew a regular side seam as I am sure most of you would, let’s continue! Pin the sleeve and sides seams with right sides together. Make sure that the intersecting seams meet up nicely at the armhole by pinning carefully.
Sew this seam using a 5/8″ seam allowance. If you are sewing a woven Camas, now is a great time to play around with a smaller seam allowance to give you a looser fitting sleeve. In the photo below you can see that I used a much smaller seam allowance on the sleeve than I did on the blouse side seam: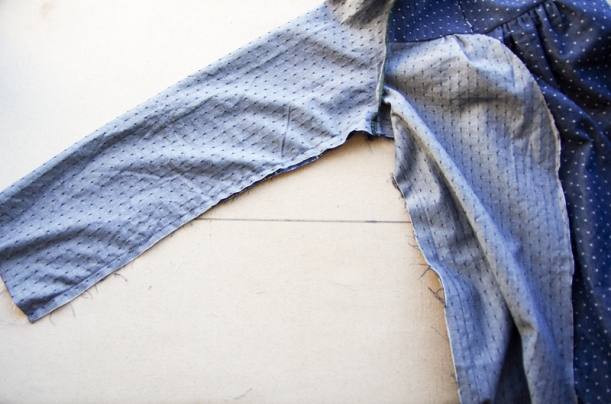
Now finish the seam allowance using a serger or a zig zag stitch. Press the seam allowance towards the back of the garment.

Sew the Hems
The blouse hems are sewn before adding the placket, so, although it might feel funny to sew a hem when you are only half way through the construction of the blouse, now is the time! Let’s start with the sleeve hems. You might like to try the garment on at this point to confirm that the sleeves are a flattering length for you.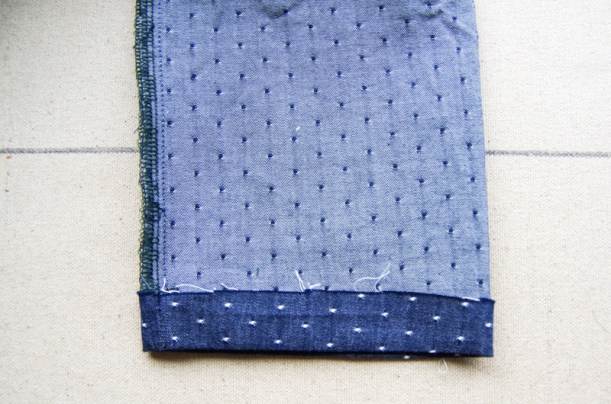
Press up the 5/8″ hem allowance.
Press 1/4″ under to hide the raw edge and stitch. Repeat for the second sleeve.
Begin the blouse hem in the same manner. Within the instruction booklet I include some tips to help you to create a nice curved hem. I’ll show you the basic way to create this hem first and then, afterwards, I have photographed another hemming idea to help you out if you’ve exaggerated the curve of the hem as a pattern hack. Here is the basic hem:
Press the 5/8″ hem allowance up. Try to ensure that the hem allowance remains even at the side seams where it curves upwards.
Press under 1/4″ to hide the raw edge. Stitch the hem and press thoroughly to make it as smooth and flat as possible:
Alternative Hem for Exaggerated Curves
If you have changed the shape of the hem to make a more exaggerated curve (as we discussed in the sew-along post about pattern hacks) you will probably need to create a narrow rolled hem. This is a nice finish if you are sewing the Camas in tissue weight knits or other floaty sorts of fabric (such as the poly chiffon that I am using below). The rolled hem will not weigh down the fabric in the same way as a wider hem would.
Megan Nielsen has an excellent tutorial on her blog that contains three ways to sew a rolled hem. My favorite option is #2 but I sometimes skip a step or two depending on how delicate or fiddly my fabric is. I recommend following all of her steps though (despite my bad example) because your hem will be much more precise than the one that I have sewn!
For this rolled hem I sewed a scant 1/4″ away from the raw edge. The stitching helps to keep the fabric a bit taught as you press under the raw edge to create a small roll.
Here is the result! What looks like a tuck in the center of the photo is actually just a trick of the camera and shadows. I noticed it on the camera screen when I took the photo but examined the blouse and repressed to make sure there was no tuck…there isn’t, but it keeps showing up in the photos! Just so you know. :P
Have a wonderful weekend! On Monday we will continue full steam ahead – we will be sewing the blouse placket. Many of you have found this to be the trickiest part of the blouse – I have all sorts of tricks and suggestions to give you so stay tuned!