

Eager to learn more?
Sift through our pattern hacks, sewing technique tutorals and guest blog posts by selecting from the filter below-left.
Tutorials
Grading the Sayward Raglan Up or Down for a Perfect Fit

I jumped for joy when Thread Theory asked me to test the new Sayward Raglan pattern – finally, a classic but fashionable design that would work for my husband! The options out there for plus-size menswear are just awful, and I’m so glad that Thread Theory has stepped in to fill that gap.

Once I saw the size chart though, I realised that my husband is just out of the 4x size range. No problem though! It’s simple to grade a basic pattern like this up or down a size, and today I’m going to show you how.
You will need:
- the Sayward Raglan pattern (although the same approach could be used on the Comox trunks, free Arrowsmith undershirt, or any other simple knit pattern)
- a clear quilting ruler
- marker or pencil

Let’s start grading!
There are many ways to grade up a pattern. For a simple knit pattern like the Sayward, I’m going to show you a straightforward method that will give a good result going up or down 1 or 2 sizes without too much fuss. If you want a more precise method for more complex patterns, I recommend this Craftsy class!
Step 1: Measurements!
Take measurements, and compare them to the size chart. The key thing here is to look at how many inches you’ll want to add or subtract to make the pattern fit!

In this case, I want the chest and shoulders to be about one size bigger, which means I’ll want to make the sleeves one size bigger too so that the seams match up nicely. In the waist and hip, I need to add an average of 6″ of ease. If I was adding that much to a children’s pattern, I would worry about distorting the proportions, but on a shirt for a big guy, it won’t be a problem.
At this point, you’ll also want to pay attention to height, and any fit preferences like extra length, shorter sleeves, etc.

Step 2: Grading up or down a size!
It’s time to lay out your pattern and start adjusting! The process is the same if you are grading up or down.
Essentially, we are going to continue the grading rule for the existing sizes to create a smaller or larger size. The way the existing sizes are nested will be our guide for how much to add or subtract!

In red, I’m grading the shoulders and sleeves up one size. I look at the distance between size 3x and 4x, and draw a new line the same distance out to create a 5x. In blue, I’m grading down to an XXS.
The process is the same for the front, back, and neckband. Pay attention to when the nested pattern lines get closer together or further apart along a curve!

3. Adding or Subtracting Ease
If one part of the shirt needs more or less ease, like the arms or torso, you may want to do more than just grade up or down the existing proportions.
For example, I only needed to grade the top part of the shirt up 1 size, but I want to add about 6″ of width from the underarm down. That means I need to add about 1 1/2″ to the front and back side seams.
To add ease, I straightened out the side seam, and simple drew a straight line down from the underarm to add more width. You could do the same in reverse to make the shirt slimmer.

(Side note: As a plus-size women, I often make similar adjustments for my pear-shaped figure. I might add a wedge to the side seam or centre front/back which results in a fun, swingy shape. For a traditionally masculine fit though, I chose to keep the side seams in this shirt straight and vertical. In sewing there are so many ways to approach each adjustment, so just keep the wearer’s preferences in mind!)
This is the point to adjust things like height, sleeve length, or neckline! For my version, I’m going to add 3″ in length and 2″ to the sleeve length because my husband prefers that look.

4. True the Seams
The final step whenever you adjust a pattern is to cut it out and make sure that all the seams still match up nicely.

Compare the front and back to each other to make sure the shoulders, side seam and length are identical on both pattern pieces. This is basically your chance to catch any errors, like adding more to the front than the back! Lay the curved raglan seam over the front and back pieces and “walk” them together to make sure the seam lines match. (Remember that the seam allowance is 5/8″, so that is where the length needs to match!)
I added a 1/2″ wedge to the sleeve side seams to help balance the extra width I added to the torso of the shirt, and I’ll ease any extra width as I sew. With a knit pattern, a few millimetres here or there won’t matter!
5. Sew!
If you have made significant changes to the pattern, it is always a good ideas to sew a quick trial version in cheep fabric. I made my tester version in slightly-sheer turquoise crinkle knit, which you can imagine was quite a look! Once you know your adjustments are right, then sew it up in nice fabric.
Here’s the finished Sayward Raglan!

We are both really happy with it! Raglan sleeves are new for him, but I think they look great. He likes the neckline and length, but wants another inch on the sleeves next time. I’m pleased with the fit in the torso – not too tight, but also not too baggy.

The great thing about a basic tee like this is you can perfect that pattern to reflect the wearer’s preferred fit and style. Jamie is an avid Fantastic Four fan (that’s an FF tattoo on his arm, and on my leg too), so he chose the team colours of royal blue and black. The fabric is a 95% cotton/5% spandex blend, which was a pleasure to sew!
And here’s how he’ll often wear it – layered with his “battle vest” covered in the nerdiest patches and pins!
So there you have it – the Sayward Raglan graded out to a 5x, and tailored to the wearer’s taste!
Once you’ve used this method a few times, you may find you don’t need to use a ruler and draw out your adjustments. I tend to grade up or down on the fly as I cut the paper pattern, or as I’m cutting out fabric. It just depends on your comfort level with grading and sewing knits!
Do you grade patterns up or down for yourself or others? It’s a useful skill for getting the most out of patterns, either as children grow, or to make one pattern work for many different figures! I’d love to hear how you approach grading, or if this tutorial works for you!
Coming up later today, we will actually sew the Sayward…perhaps the quickest part of this sew-along! See you later!
Sew a Silk Tie

Would you like to try your hand at tie-making this Father’s Day? It isn’t difficult to make your Dad a tie since the internet abounds with beautiful tutorials and even free patterns for all skill levels! Since a quick search for “tie tutorials” can lead to fairly overwhelming results, I decided to compile the fruits of my research into one handy blog post and a tutorial that brings together all of my favorite elements from the instructions already available on the web! Britex has a wealth of tie making supplies that can be very difficult to find elsewhere. For my tie I used this sunshine yellow Italian silk faille featuring nothing less than hot pink embroidered crabs! Since ties are cut on the bias, this silk was ideal for my purposes – the crabs run 45 degrees to the selvage! The silk is from Britex Fabrics and is currently sold out – there are all sorts of other gorgeous silks in their online shop though!

I consulted Matt (the prospective wearer) on the direction of the crabs – he elected to point them downwards so they wouldn’t be aggressively pinching at his neck.
While you will find my tutorial below, first (or afterwards) you might like to read all of the tutorials and other resources that I found so that you can truly immerse yourself in the world of tie-making. Here are all ofthe links sorted into the various categories that I researched:
The Anatomy of a Tie:
- Necktie Anatomy: The Classic Necktie Deconstructed as found on The Gentlemanual
- The Necktie Series as found on Put This On
Tutorials geared towards the average home sewer:
- Father’s Day Tie (pattern and tutorial) as found on The Purl Bee
- Men’s Style: How to Sew a Classic Necktie in 10 Easy Steps! as found on Craftsy
- Free Men’s Necktie Pattern and Tutorial as found on SweetShopSewing
Tutorials geared towards the advanced home sewer/menswear enthusiast:
- Tie Construction as found on Shirts And Ties
- How to Make a Silk Tie (article about tie maker Jon Henley) as found on The Guardian
- How we make our custom made/bespoke ties as found on Sam Hober
Videos on Tie-making:
- How to make a hand-crafted tie with Robert Surratt
- Tie-making, Behind the Scenes: How a Tie is Made By Hand
Particular Tie-Making Techniques:
- How to Hand-Sew: The Slip Stitch as found on Craftsy
- How to Make a Men’s Tie…Properly (best article on forming the tip of the tie) as found on Twenty-first Century Lady
Pattern Options:
- Wide: Men’s Necktie by SweetShopSewing
- Medium: Osman Tie by BurdaStyle
- Narrow: Father’s Day Tie by The Purl Bee
- Super Narrow: Skinny Tie by SeeKateSew
Now that we’re prepped, let’s move on to my tutorial! For this project you will need:
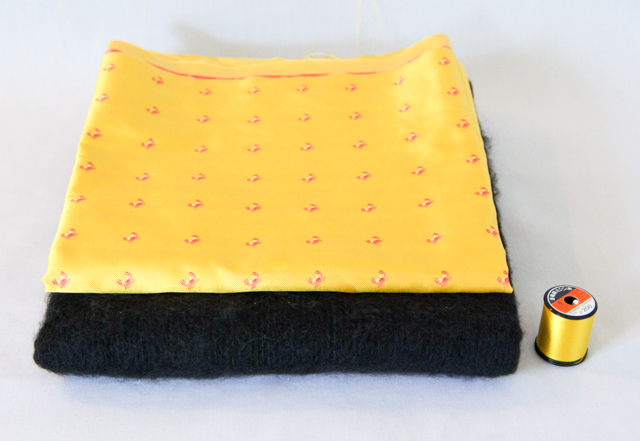
- 1 yard silk of medium weight. This may seem like a lot of fabric but remember that your tie must be cut on the bias! You may be able to squeeze a tie out of less if you are careful.
- 1 yard interlining (described below). This will also be cut on the bias.
Most ties are created with a sewn in (rather than fusible) interlining comprised of wool or a wool/nylon blend. This interlining gives the tie body (a good tie shouldn’t be flat, it should be lightly pressed so it maintains a three dimensional quality) and also a bit of rigidity. It is important to match the interlining with the fabric otherwise you run the risk of making your tie too stiff and negating the point of cutting your tie on the bias! You want your tie to look fluid and smooth…achieving this is probably the trickiest aspect of tie-making.
Since this silk faille was quite stiff I decided to use a loose wool interlining. In retrospect, I wish I had chosen an option with a touch more rigidity such as this classic wool interlining. Aside from the lack of rigidity, the color black was not the best pairing with the yellow silk – it shows through ever so slightly on the finished tie. All the same, the amount of body this wool gives the tie is ideal and I am happy that the tie ended up fluid enough to allow it to hang nicely (though I worry it might become misshapen over time).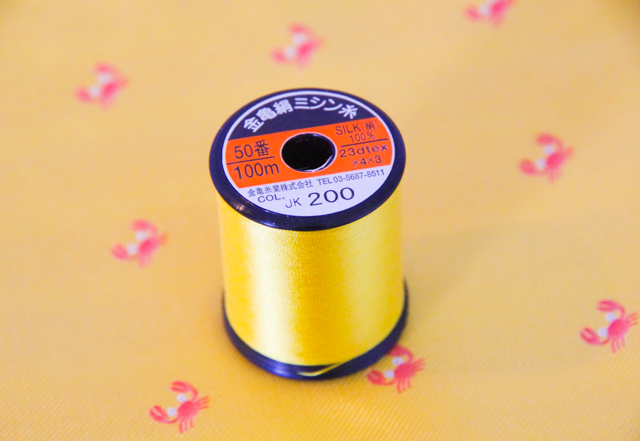
Since there is quite a bit of hand sewing involved in tie-making, it’s a good idea to use fine silk thread to avoid knots.
Once you’ve gathered your materials, establish the exact bias on both your silk and interlining. Some tie patterns represent the entire tie so they must be cut on one layer of fabric while other tie patterns require that you cut them out on the fold (making it easy to fold your fabric on a 45 degree angle).
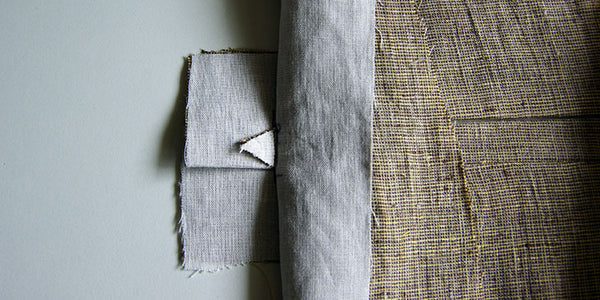
A tie shell is comprised of three main pieces (pictured below from left to right): The blade (the wide front), the neck (the middle), and the tail (the narrower back). The interlining is usually cut from one piece but I joined two pieces of fabric for mine by abutting the seams and zig-zagging them together so as to avoid adding extra bulk. On the right hand side of the photo below you can see my two “tipping” pieces – the tie I have made is “self-tipped” rather than “decorative-tipped” because I used the same silk rather than a contrast material as the lining. I also added a garment tag and a little strip of fabric to create a keeper loop. A man can choose to feed his tie tail through it if he desires (though some fashion blogs say this is not currently fashionable…who knew?!).
I chose to start making my tie by sewing the tips. Some people like to join the three main tie segments together before embarking on the tip but I wanted to avoid handling the tie as a long strip too much since the weight of the tips could cause the bias cut fabric to stretch out of shape. Here is an example (of a store bought tie) so you can see what we are aiming for when sewing a tie tip:
It is not easy to achieve something this precise (as you will soon see!). While all the sewing involved in tie-making is basic, the precision and skill employed is key to a high-end tie. I think I have a long ways to go before I could consider calling my version a ‘luxury’ tie!
If your tie pattern came with two pattern pieces for the tips, they will likely be the same size as the blade and tail tips. Trim them down 1/4″ on all four sides (not along the top).

Starting at the top edge, sew the tie and tie tip together with right sides together and a 1/4″ seam allowance (you can see my stitching on the right hand side of the photo below). Stop sewing 1/4″ from the end of the tie tip.
Here is a detailed photo showing you where to stop sewing:
Pull the tie tip over to the other side of the tie so raw edges meet and sew the other side of the tie tip in the same manner. You should sew up to but not over the previous stitching to form a precise point. Be careful to push the excess tie blade fabric out of the way (it will form a bubble). Here is a close up of the tie tip with the bubbled tie blade below:
And here is a photo of the bubble from the wrong side of the tie blade: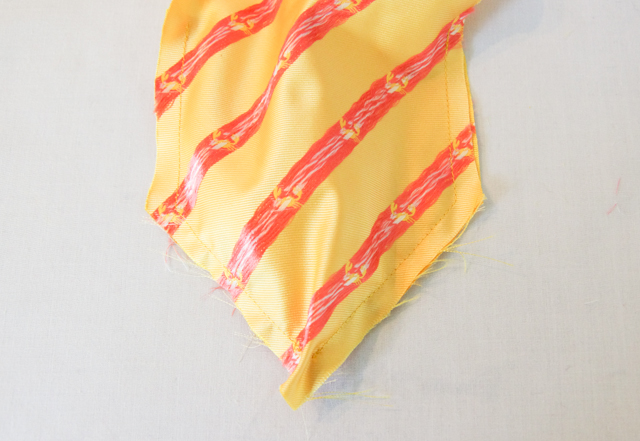
And a close up of this bubble:
Finish the tie point by folding the blade in half and stitching across the point from the center of the blade to the raw edge. This stitching will be perpendicular to your stitched point and within the seam allowance it should not cross your previous stitching.
When you turn the tip right side out, try pinching the point seam allowance to stop it from crunching up and becoming misshapen as you fold. The goal is to have your point seam allowance fold neatly within the tie. I wouldn’t advise trimming the point when you are working with silks since the danger of fraying drastically is very great!
My point did not turn out perfectly but stitch ripping was only an option once due to the amount of fraying I was experiencing! The point is not 100% angular but it is certainly passable from the distance most will be viewing it. From the underside you can see why it did not end up appearing precise:
Practice will hopefully make perfect!
Now it is time to sew the three tie segments together. Carefully press open the seam allowances (don’t push the iron along the fabric as this will cause your bias cut fabric to stretch out of shape, instead, just lift the iron up and move it to the next position).
Now that the points are assembled and the tie segments are joined, it is time to insert the interlining and prepare to hand stitch the final seam!
Turn under the seam allowances 1/4″ along the entire length of the tie (again, make sure to press instead of iron!).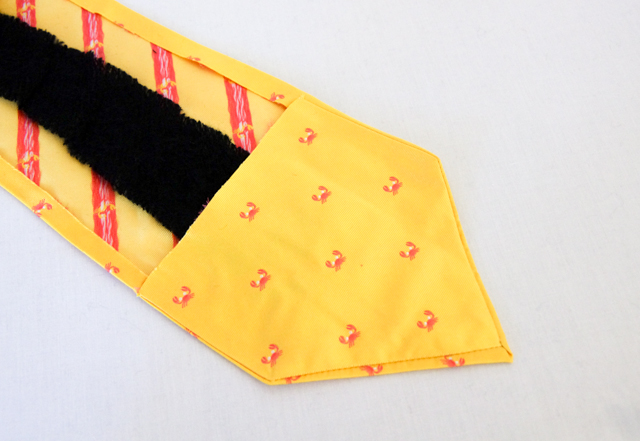
Press the tie edges inwards to meet in the middle. As you can see in the store-bought tie below, sometimes this seam can be slightly overlapped – depending on how you like to slip stitch, you can either abut the seam or overlap! You can also see how the keeper loop is inserted into this seam prior to stitching it down. We will do this now:
Create your keeper loop using a scrap of the silk. Ideally you would create a tube and turn it right side out. You could also avoid the frustration by simply creating binding and top stitching the open edge closed (keep in mind this makes the keeper loop a little stiff).
Stitch the loop to the seam allowance on the tie blade:
You can see the positioning of the keeper loop below:
Pin the entire seam together and prepare your thread for hand stitching! It is a good idea to run your thread through beeswax because you will likely be working with a very long piece of thread if you are trying to stitch the entire seam in one go. While it is possible to stitch the seam using several shorter lengths of thread, this is not ideal due to the nature of the slip stitch you are about to sew. Adding too many anchored points will cause the thread to restrict the natural fluidity of the tie (you will see what I mean in a moment!).
Begin stitching by anchoring the thread at one end of the tie:
Create a large and loose slip stitch all the way along the seam (I allowed the thread to travel up the silk 1/2″ between each stitch). See the list of tutorials above to learn how to slip stitch. Be very careful when stitching to avoid stitching into the front of the tie!
To end your stitching you will be creating another anchor/tack – but this time, the first loop of the anchor will not be pulled tight. Leave a loop of thread (as pictured below but about half the size) that you can tuck into the tie. This loop will allow your slip stitch to adjust in tension as the tie is worn and rolled over time – it will seem strange to leave your hand stitching so loose and seemingly fragile, but it is very necessary when trying to achieve a fluid tie.
Now it is just the finishing touches left! Press the keeper loop flat and tack each side to the back of the tie.
Bring your thread and needle down through the inside of the tie to stitch on the garment tag. Make tiny stitches along either short edge of the tag.
Your tie is complete! Give it a final gentle press and examine your work: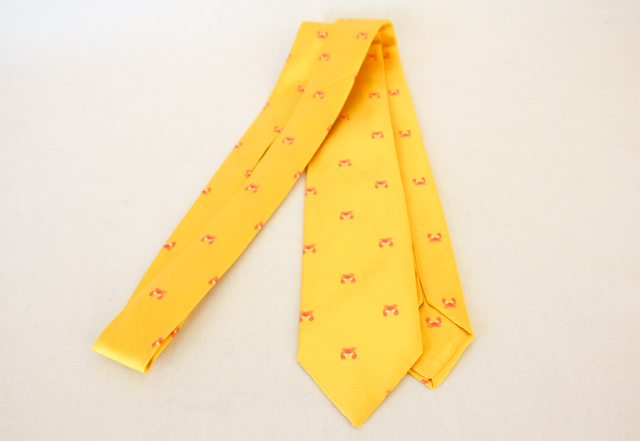

Before giving it to the wearer, fold the tie in half and roll it gently – this will allow the bias cut fabric to settle smoothly so that it is not stretched in any off-kilter sort of way. Your loose stitching and anchored loop of thread will have a chance to work while you do this!
I hope this tutorial saves you a lot of time researching before you embark on tie-making! Have you tried making a tie in the past? What resource or tutorial did you find most helpful? Did I miss any key resources during my research?
How to Measure a Man
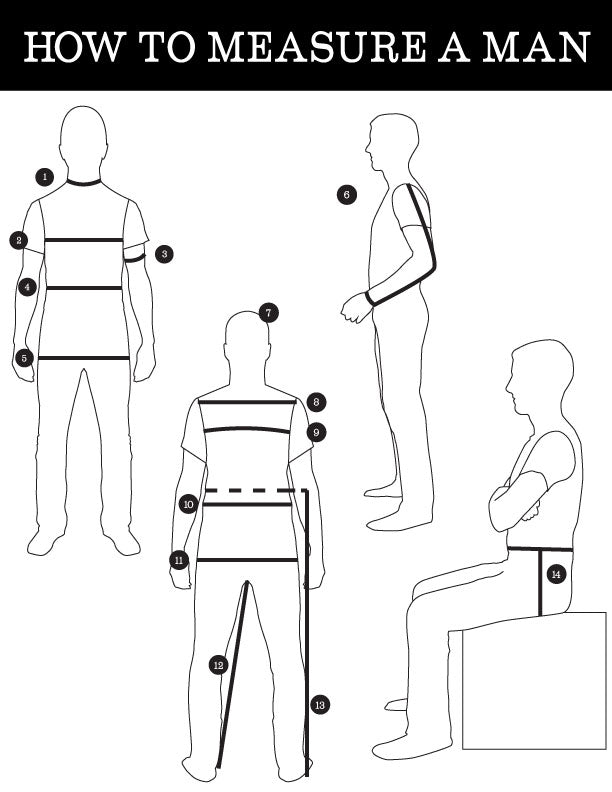
1. Neck Circumference: Measure around the base of the neck loosely.
2. Chest Circumference: An important measurement! Circle the tape measure around the chest underneath the armpits. Make sure the tape measurement is at the widest point of the chest. Raise the tape slightly along the back so that it sits over the shoulder blades. See #9 for more detail.
3. Arm Circumference: Measure around the bicep with the arm bent so the muscle is engaged.
4. Waist Circumference: Tie a string or narrow elastic around the body to determine the narrowest point. Circle the tape measure around this point.
5. Hip/Seat Circumference: Circle the tape measure around the fullest part of the seat. Make sure the tape measure is level with the ground rather than being angled in any way.
6. Sleeve Length: Bend the arm slightly as pictured. Measure from the shoulder bone to the wrist placing the tape measure over the curve of the elbow.
7. Wrist Circumference: Measure around the wrist just above the wrist bone.
8. Shoulder Width: Measure across the back at the widest point from the position where a sleeve seam sits.
9. Chest Circumference: As mentioned in #2, raise the tape measure slightly so that it crosses the protruding shoulder bones. This an important step to determine the true circumference of the chest because the amount individual’s shoulder blades protrude can differ greatly.
10. Trouser Waist: This position can differ depending on the style of pants. Keep in mind that the Body Measurement Chart for all of our patterns includes the Natural Waist Circumference while the Garment Measruement Chart includes the Trouser Waist Circumference. This makes it easy to compare these two measurements and determine your size!
11. Hip/Seat Circumference: Circle the tape measure around the fullest part of the seat. Make sure the tape measure is level with the ground rather than being angled in any way.
12. Inside Leg/Inseam: To determine the inside leg length, measure high in the crutch (the point where the leg meets the crotch) to the heel of the shoe. To measure a desired inseam length it can be more accurate to measure existing pants to account for the ease between the body’s crutch point and the actual pants crotch.
13. Side Seam Length: Measure from the waist (where the string or elastic is tied) to the heel of the shoe. Since pant rise can differ greatly (and is often lower than the natural waist level), find a desired side seam length by measuring existing pants with the same rise as the pants you intend to sew.
14. Body Rise: With the man sitting on a stool or chair so his knees are bent approximately 90 degrees, measure the depth from the trouser waist (rather than the natural waist), to the top of the stool or chair.
Download a printable PDF of this information!
How to sew on a Button

When I first started sewing I didn’t own too much in the way of sewing manuals and, anyways, they may not have helped me much even if I had them because I am more of a ‘try and try again’ style learner and probably wouldn’t have referred to them as I bumbled along the learning curve to becoming a proficient sewer!
When I began my first semester of fashion design school after spending several years avidly sewing my own clothing, I was very eager to learn the ‘proper’ way to do things thinking that I likely did them all wrong. As it turns out, I’ve since come to the opinion that often the ‘proper’ way of doing something when sewing is the way that works best for the circumstance.
In the case of sewing on buttons, for instance, the ‘proper’ way of attaching them is in any manner that results in a fastener that is strong, will not fall off over time, is easy to use and looks very nice.
So I’ll show you the way that I sew on a button and you can give it a try; if it fills all of the above criteria, then it is the ‘proper’ way for you!

And while I’m at it, I thought I should use some of the Merchant & Mills tools we have in our store so that you can see what is within the beautiful packaging. To sew on this button I’ll be using the measuring tape, the wide bow scissors, ahand sewing needle, a glass headed pin, and most importantly, tailor’s beeswax.

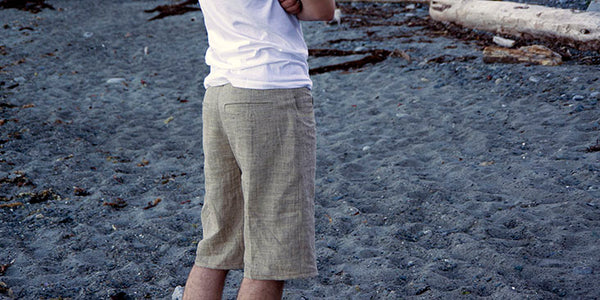
And I’m sewing the button to this pair of linen shorts that I just made for Matt.

The linen is courtesy of the Fabrics-store which is an online shop that specializes in the most lovely of linens. Both linens that I used (for the self fabric and the contrast waistband and fly shield are yarn-dyed. I think yarn dyed fabric has such beautiful depth to it and is so appealingly rustic. Check out the Fabrics-store’s gorgeous selection – it was lucky that Matt was around to pick the fabric because I was totally unable to pick a favorite (they’re all favorites!).

Okay, now lets move on to sewing on the button! First off, I like to determine the perfect button placement. On trousers, the button should sit directly above the zipper. On these shorts that was one inch in from the edge of the waistband. I also measured the halfway point between the top and bottom edge of the waistband so that the button would be centered.

To prepare my thread, I ran it through the tailor’s beeswax. To do that, just pinch the thread between the wax and your thumb and run it along the edge of the wax. Then repeat the process a second time. Finish the application by quickly rubbing the thread between my fingers to work the wax into it. It only takes a couple seconds and makes a world of difference!
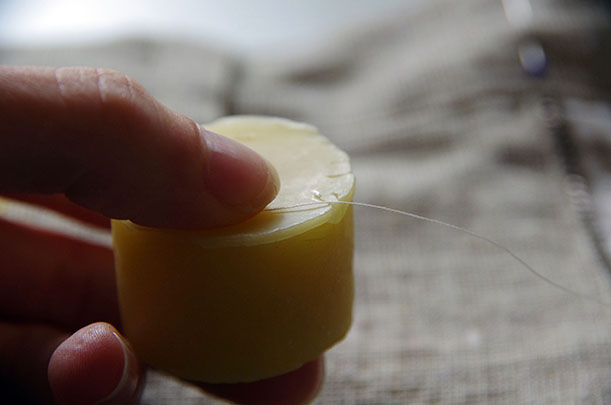
I used to hand sew without preparing my thread, which I now know was a silly thing to do! I was plagued with knots and tangles while carefully sewing hems and my buttons would often (and I mean OFTEN) snap off at the most awkward of times. Beeswax is quick to apply to the thread and helps to make it stronger. It also causes the thread to behave in a completely different manner than un-waxed thread – if it becomes tangled while hand sewing, my exasperating initial reaction of tugging at the knot actually works – the knot doesn’t become tighter, it just magically slips away!
Choose a sewing needle with a long eye – that way you can double up your thread and feed both ends through the eye at once. This may seem an impossible feat (two big fat thread ends through one tiny hole?!) but just give your ends a quick trim and the wax will keep them nice and stiff so you shouldn’t have a problem.

Threading the needle in this manner makes sewing on a button twice as fast…my construction teacher taught me this and I send her a telepathic thank you every time I sew on a button!

Make the thread ends even with the looped end of the thread (so that you will be sewing with four strands of thread) and knot it.

Now this may seem counter-intuitive (at least it initially did to me!): Start sewing on the button from the FRONT of the garment rather than the back. That way the knot is hidden underneath the button.
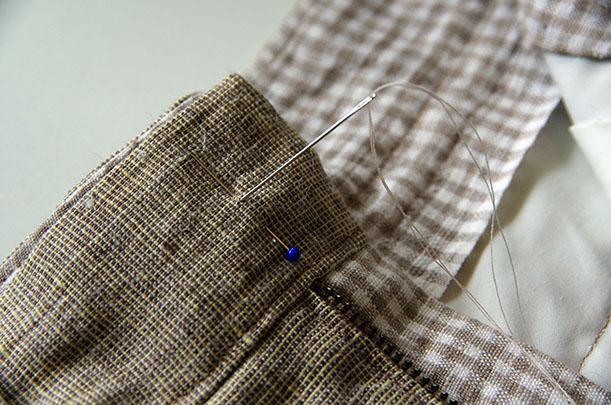
Once the needle and thread are pulled through to the back, bring the needle through to the front again as close to your original stitch as possible (but not in the same spot or you will simply be undoing your stitch!).

Instead of pulling the threads super tight, leave a gap between the button and the garment like so:

This will later be filled with a shank made out of twisted thread that holds the button away from the garment making it easier to grab and use. If you were sewing on a button with a shank, you wouldn’t have to do this because the shank is already provided!
Repeat this process several times but make sure to leave enough free thread on your needle to create a shank (somewhere in the vicinity of 5″-8″ (12 – 20 cm)).

End with your needle on the right side of the garment and twist the 5-8″ of thread around your stitching (in the space between the button and the garment). Pull tightly to create a solid shank.
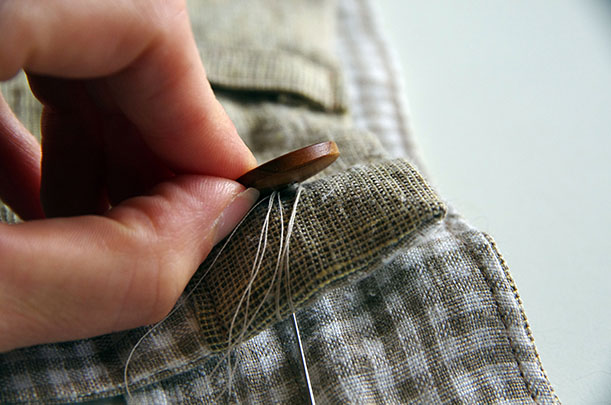
Once your shank has been created, it is time to secure the stitching. To do this, don’t just begin with a granny knot (that’s what I always did and they never held!). Instead, push the needle through the thread shank. It will probably be difficult to do, but you can always push the end of the needle against a hard surface or use a thimble to coax it through.

Now do this again from the opposite direction to lock everything in place.

My teacher said the next step is unnecessary but I can’t help myself – it feels too weird to end a hand-stitching process without tying a knot – so just tie a little knot using the loose ends from when you started stitching and the ends attached to your needle.

Trim off the excess thread and you have a super strong, beautiful and easy to use button!

You can hardly see any thread on the wrong side:
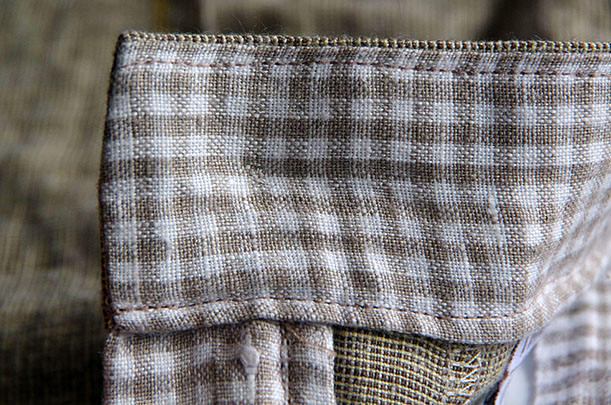
And it is really easy to grab and use:

Is this the process you use to sew on a button? If you do something different, what do you do? I’d love to hear as I imagine there are all sorts of techniques out there with many of them being just as good as what I have come to consider my ‘proper’ way.
Now one more photo of the finished shorts:

I think Matt will be wearing these shorts all summer long (and he reports that the wide legs are perfect for riding his bike to work)!

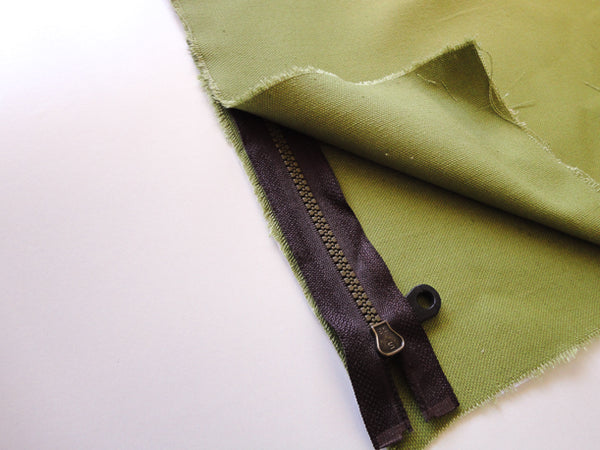
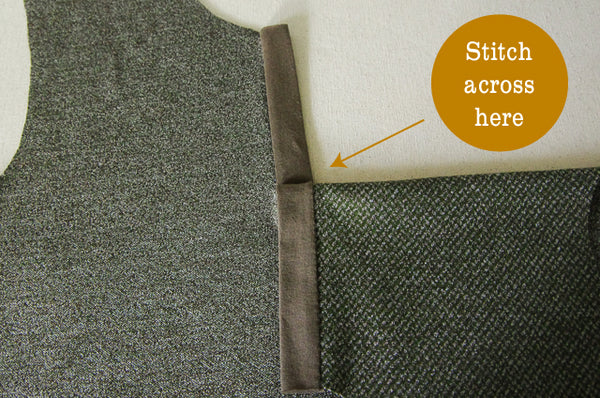
Welt Pocket Tutorial

This tutorial will show you how to make elegant pockets that you can add to trousers, jackets, vests or wherever else you can imagine this style of pocket. While this type of pocket is often referred to as a welt pocket in the sewing community and in sewing literature, it is actually traditionally called a 'jetted' pocket. A true welt is formed on top of the garment and topstitched in place. I like this jetted style better because it results in a clean finish with no visible topstitching. Even though it is truly a jetted pocket I will continue to refer to it as a welt pocket since that is what it is most often called these days and I want to make sure that you can find this tutorial when Google searching 'Welt Pockets'! :P
Welt pockets often have the bad reputation as being scary and difficult to sew. While it might take a little while to make perfectly square corners and until the origami folds become second nature, they really aren't that difficult...it is just a matter of doing the right step at the right time. And here are all the right steps laid out in photos for you!

For these shorts I used the Jutland Pants pattern which includes all necessary pieces. In case you are working with a pants pattern that doesn't include welt pocket pattern pieces, here are some guidelines to make your own.
For each pocket:
- Welt rectangle - one interfaced rectangle that is about four times the height of your welt and a couple inches wider.
- Shallow pocket lining - one shallow pocket piece (either shaped like mine is or just a shallow rectangle that is the same width as the welt rectangle) made out of thin cotton or some other pocketing material.
- Deep pocket lining - one long pocket piece that is shaped to match the width and bottom of your shallow pocket piece and is tall enough to extend past the top of the pants (mine was 12" tall)
- Pocket facing - a rectangle approximately the size of your welt piece that will be top-stitched to the deep pocket lining to act as a backdrop for the welt pocket (so that you don't see the pocketing fabric behind the open welt).
- Interfacing - A square of interfacing that is larger than your welt rectangle piece to apply to the trousers.
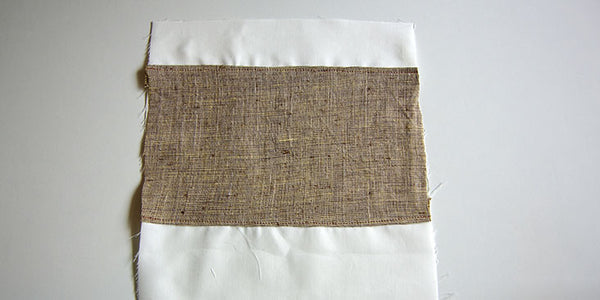
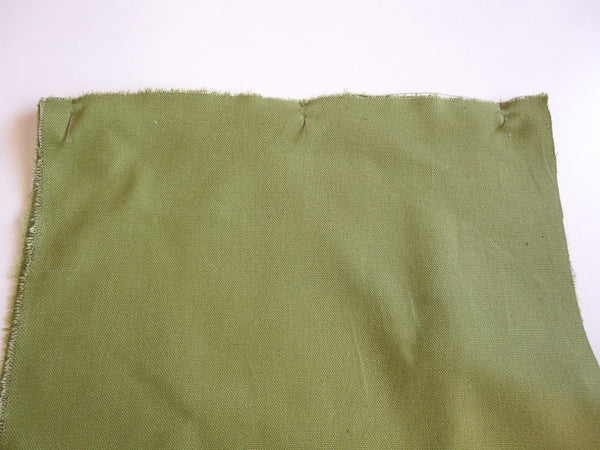
Okay, now that we have all of our pieces cut out and interfacing applied, we can begin to assemble the pockets! On the top third of the wrong side of the welt rectangle, mark the finished width and height of your welt (you can choose this based on your preference or use my measurements which were 5/8" tall X 5 1/2" wide). If you are sewing the Jutland Pants, you can use the welt template that we've provided.
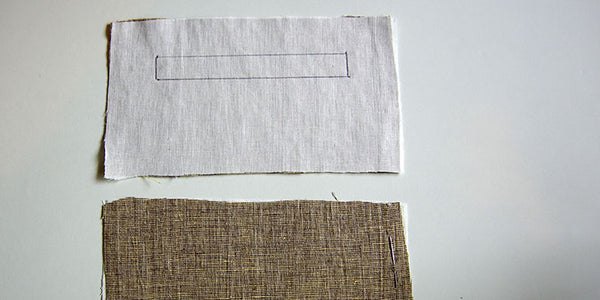
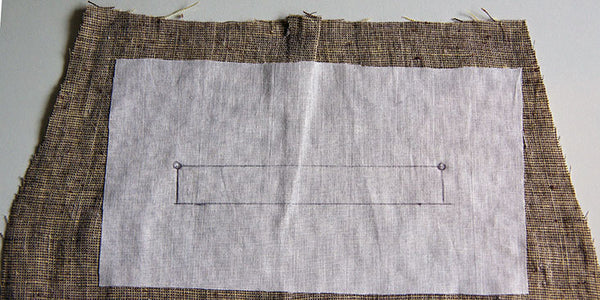
Draw markings on your interfaced trouser pieces as well - make sure you mark both the right and wrong side of your pants. If you are sewing the Jutland Pants, use the provided marks to choose your welt placement. You can use chalk or you can use thread basting to create your markings.
Here is my basting stitch:
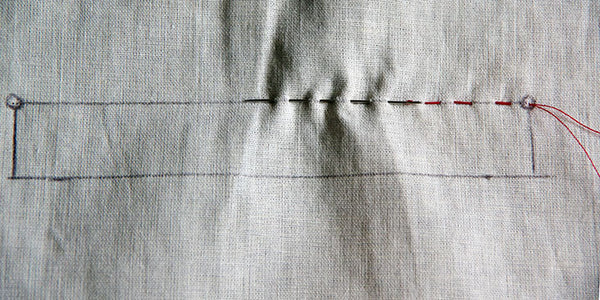
And the view from the right side (make sure to stitch thoroughly at the corners so that they are very accurate):
Line up your trousers with your welt piece, right sides together. Your markings will come in handy here to make sure everything is lined up precisely.
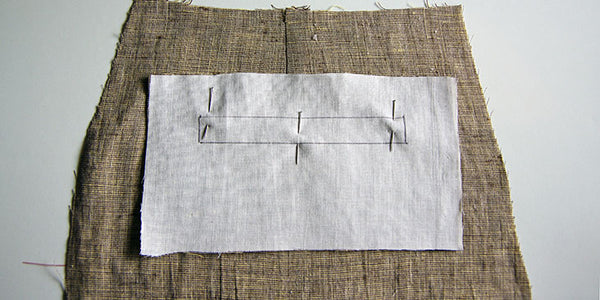
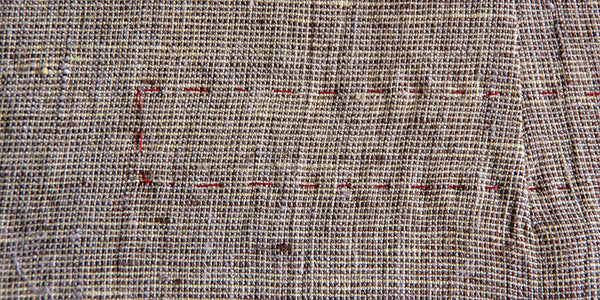
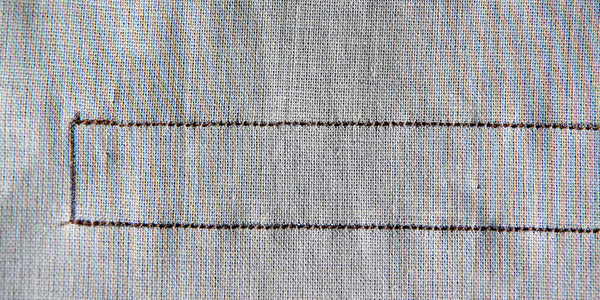
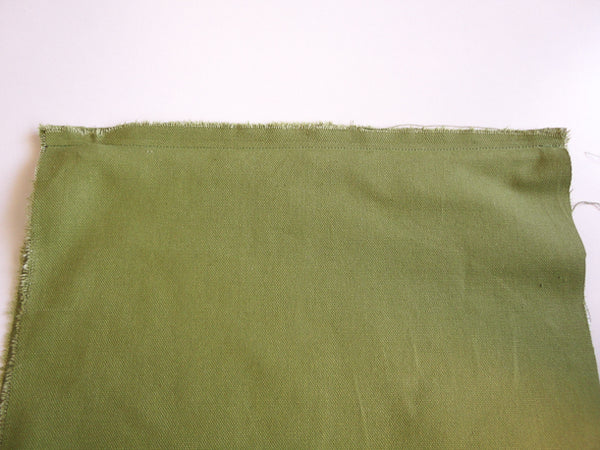
Using a very short stitch length for added strength and precision, stitch along the long edges of the welt rectangle. Stop and back stitch precisely at each corner.
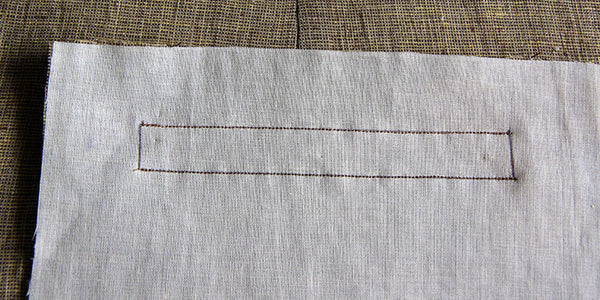
Here is a close up to show you how carefully you should stitch over the marked lines:
Now press the loose sections of the welt to help things fold crisply later on. Here I am pressing the top of the welt:
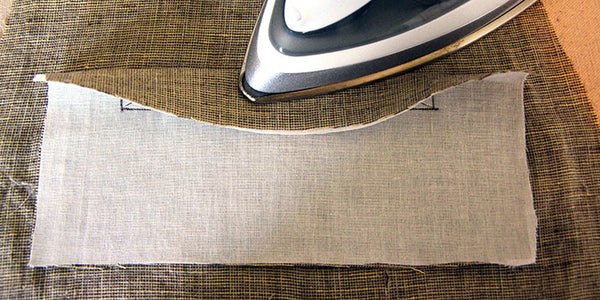
And pressing the bottom of the welt:
Using sharp little scissors, cut along the center of the welt and stop 1/2" from either end. Cut on a diagonal towards each corner, clipping as close to the stitching as you dare! The closer you get, the crisper your welt corners will appear later on...but be warned - if you snip beyond your stitching your welt will have little holes in each corner!
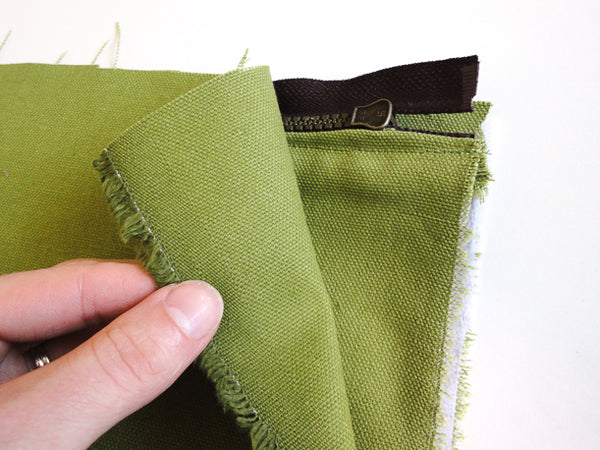
Turn the welt to the wrong side of the garment so that you are left with a rectangular window on the right side:
And the loose fabric on the wrong side:
Now is a great time to remove all the basting thread!
To reduce bulk later, flip up the bottom of the welt and press the seam allowances that are hidden underneath open.
And now press the sides and the top of the welt crisply flat (isn't linen lovely to press?). If you'd like, you can press the seam slightly towards the wrong side of the garment so that it isn't visible from the right side.

Turn the garment on the right side to press all four corners carefully - you can pinch and pull them a little to make them look perfectly right angled.
From the wrong side of the garment, create an accordion fold with the welt rectangle so that the folded edge meets the top of the welt window. Press the folded edge crisply.
From the right side of the garment, your welt will look almost finished!
To keep the welt in place, uncover the sides of the welt by folding over the trousers. You will see a little triangle of fabric and your accordion fold. Stitch as close to the base of the triangle as possible through all layers except the trousers themselves.
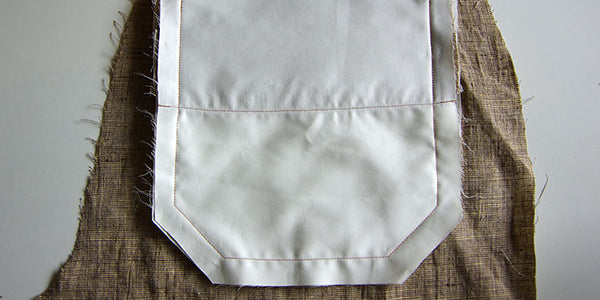
Your welt is finished! Now it's time to add the pocket bag so that it doesn't open up to display underwear (unless you've made yourself some perfect Comox Trunks that you really want to show off :P).
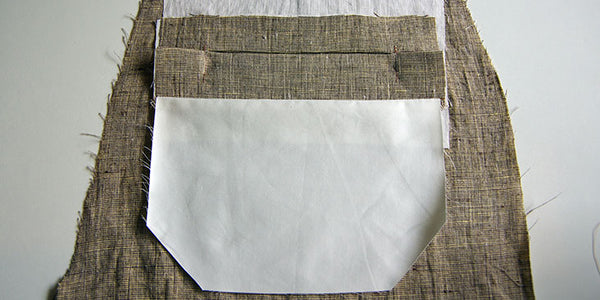
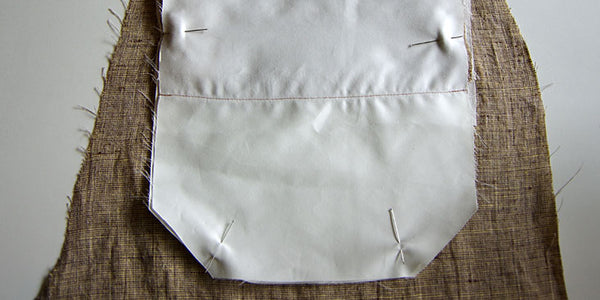
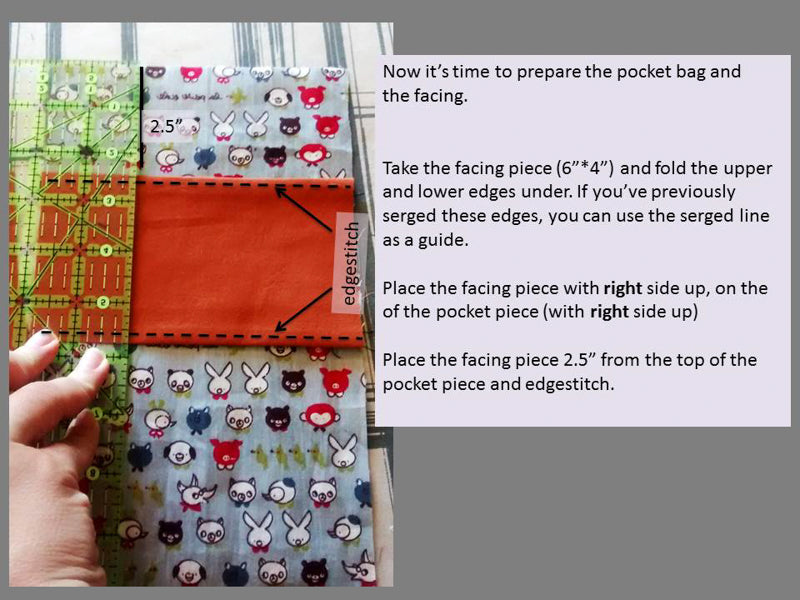
To add the pocket bag, first place the shallow pocket lining with right side down on top of the welt. Line up the top pocket edge with the bottom of the welt. Stitch using a 5/8" seam allowance.
Finish with a serger or a zig zag stitch:
Press pocket lining downwards:
At this point you can add a button hole to your welt pockets if you desire. I made a separate pair of pants to demonstrate how to do this:
At this point in the welt pocket sewing process, stitch a vertical buttonhole below the welt through the main pants and the single layer of the pocket lining. I stitched mine over the bottom of the Jutland Pants dart.
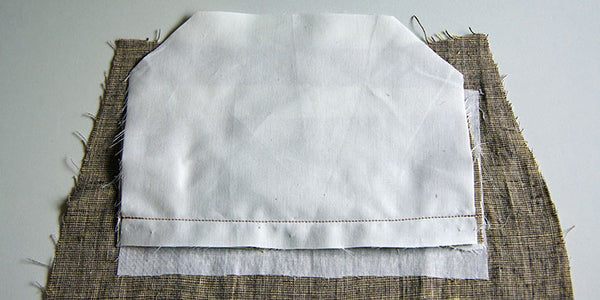
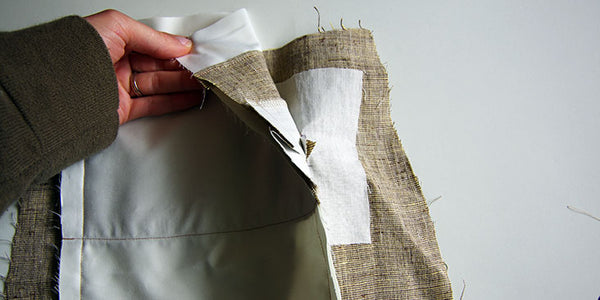
To prepare the deep pocket lining, first press under the long edges of the pocket facing 5/8":

Top stitch the pocket facing to the deep pocket lining. You will want to place this facing so that it lies directly over the welt pocket when the bottom of the deep pocket lining is lined up with the bottom of the shallow pocket lining.
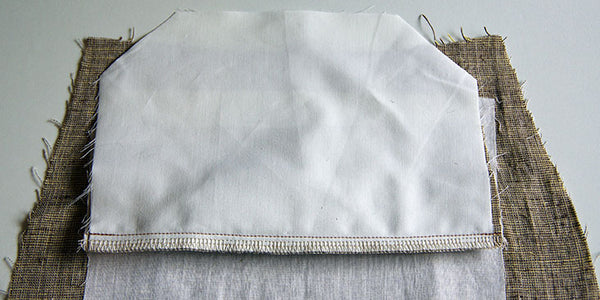
Line the pocket pieces up with right sides together and pin in place through all layers of the welt folds (but not through the trousers themselves).
Stitch around all pocket edges using a 5/8" seam allowance. You won't need to stitch up to the top of the deep pocket lining because no other layers extend this high.
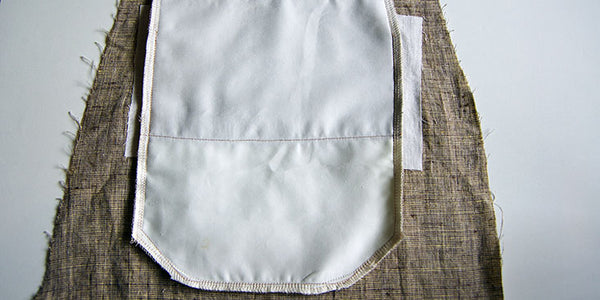
This is how your pocket will look at this point:
Finish the edges of the pocket with a serger or a zig zag stitch.
To prevent your welts from sagging in the middle, fold down the top of the trousers to expose the little seam allowance between the trousers and the pocket pieces. Stitch through the seam allowance and all the pocket layers.

If you are adding buttons and button holes to your pants, this is the point that you can sew on your button! Open up the pocket and position the button directly under the button hole.

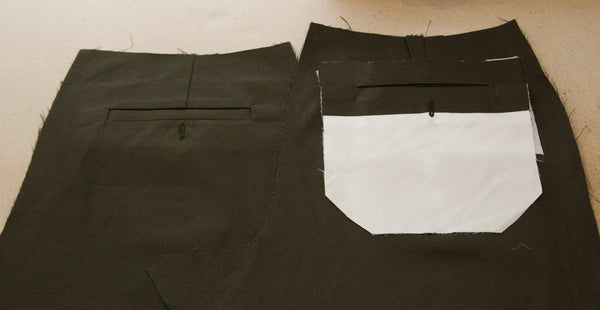
And that's it! A finished welt pocket! With a button:

Or without a button:
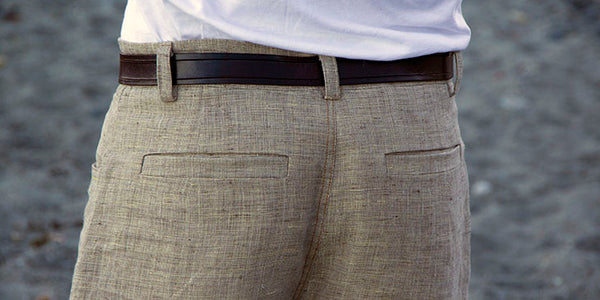
Now you can add them to just about everything!
It's Hammer Time: Jean Rivets
Today in the Thread Theory Tutorials department, we're going to be installing jean rivets using our new Jean & Pants Essential Notions kit! It is also a long-overdue guest post by yours truly, Matt.
We're going to take my (very) worn in Jedediah Pants and spruce them up a bit with pocket reinforcing rivets.

First of all, let's gather our tools! This project will involve a little more than your usual sewing endeavor...

You will need:
- A hammer (mine is ridiculously overkill. Any small hammer will do)
- Something pointy (I used my awl, but you can use a small nail too)
- A marking device (fabric chalk is great, but a pencil or pen works just as well)
- Side cutters (these are semi-optional; more on that later)
- Some wood (not a lot to say about that)
- Steel (this one is pretty important; details to follow)
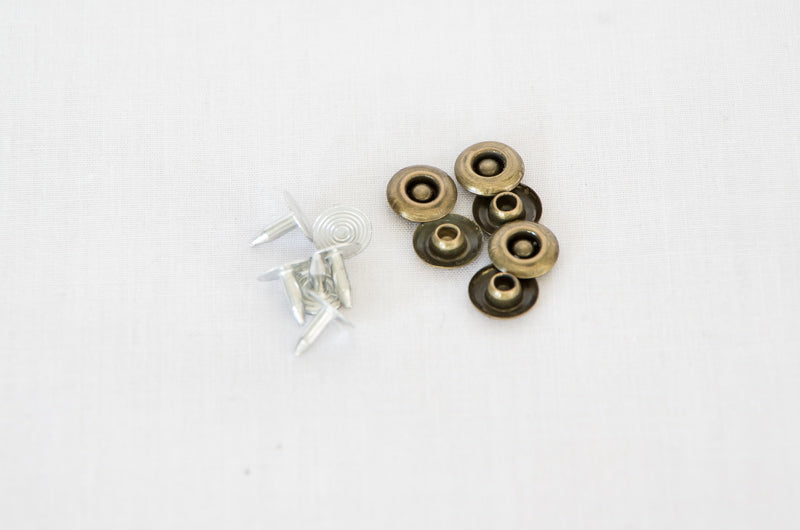
... And most importantly, rivets! These are from our Jeans & Pants Essential Notions kit. For this tutorial, the silver part will be referred to as the "pin" and the brass part will be the "cap".
Your pointy object will be used to make a hole in the layers of fabric for the pin part of the rivet to be pushed through. A pin will work for marking the location, but an awl or nail is much more ideal as it will spread the fibers of the fabric and make the pin-pushing step much easier.

The first step of this project is to decide where you want your rivets to be placed. I opted to put one at each corner of my slash pockets to add a bit of reinforcement. If your pants have a small change pocket, you can install them on that as well. Back patch pockets? Yep, those too! Once you've installed a couple, you'll want to put them on every pair of pants you own!

Next, mark the center of the rivet cap using your pencil, pen, jiffy marker, fabric chalk, etc. It isn't very important what you use here as your mark is going to be well covered by the rivet when we're done.

Next, prepare your pants both emotionally and physically for the pain they are about to endure. Also, get your chunk of wood to use as a backing board.

The chunk of wood is an optional tool, but I found it really makes this step easy, and you don't run the risk of stabbing your finger with your awl (which isn't fun... Trust me).
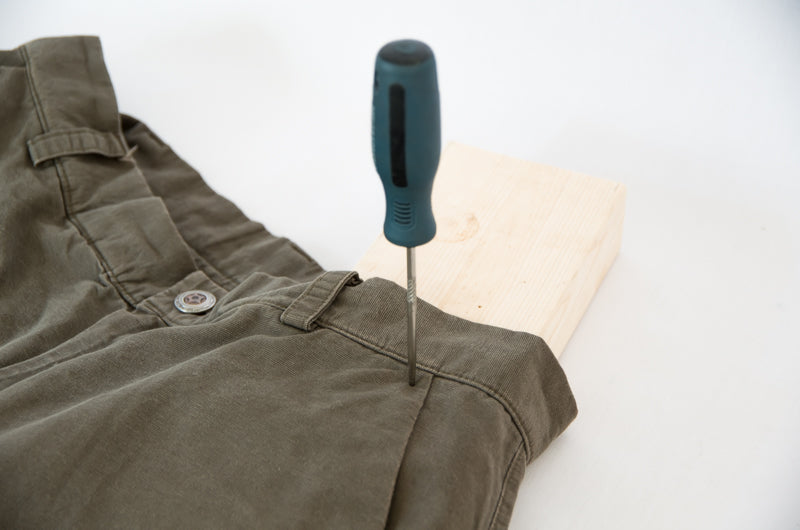
Now push your awl (or nail, or other pointy object) through until the hole in the fabric is approximately the same size as the pin.

Line up the pin with your awl hole...

... And push it through!

Congratulations, you're half way there!
Now for some more fun tools! While pushing the pin from the bottom, use your side cutters to trim away most of the excess tip. You want just a tiny bit of metal (about 1/16") protruding from the hole. This will give the rivet a nice snug fit when the pin is squashed into the cap.
Note: There are some tutorials around that suggest using the full length of the pin and cutting scraps of fabric to act as a "spacer" for the underside of the pin. While this is a great technique if you don't have side cutters, I find that cutting the pin gives a much more "snug" rivet and results in a sturdier finished product. If you don't have side cutters, many pliers have a cutting section. If you don't have pliers, you could try using a very sturdy pair of scissors... Not your fabric scissors, though!

Just a little nub.

This gives you an idea of the amount of pin I cut off.

Now fit your cap over the tip of the pin. It should sit nearly flush with the fabric. If it is sitting too high off the fabric, try cutting a bit more off the pin.

Time to get out your steel! I used a piece of scrap from an old knife-making project; you can use anything you would like, and it really only needs to be slightly larger than the rivet cap (although the larger it is, the easier it is to keep the cap on the steel). The steel is actually very important. I thought it would be fine to use a piece of hardwood, and I was sorely mistaken. When you hammer the aluminum pin into the brass cap, the brass actually deforms and mushrooms with the aluminum. If your backing is only wood, the aluminum pin will just puncture the brass cap and sink the whole assembly into the wood. I did some more experiments on harder wood and concrete (making the mistakes so you don't have to!) and neither worked well compared to steel. If you can't find any scrap steel, most fabric stores have snap kits that include a little tool that functions the same as the steel.

Flip the whole assembly onto the steel so that the pin head is pointed up at you (your target!) and the cap is on the steel, centered under the pin.

Now comes the fun part! Get out your hammer and start swinging! The most important things are to hit it nice and flat and to not use too much force; it is much better to do several gentle taps than one solid whack that could ruin the whole thing. After a few solid taps, lift it up and try to twist/pry the cap while holding the pin. If you sense that is moving at all or doesn't feel completely locked in place, put it back on the steel and give it a few more good taps. After a couple rivets, you'll get the hang of it and will be able to tell when it is good and set.

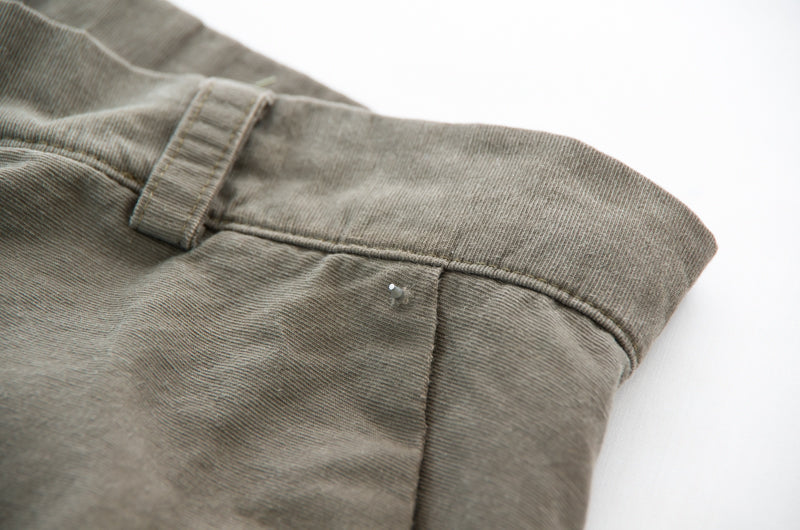
Ta-da!!! The rivet is cinched right down onto the fabric and I'm completely unable to pry it up or twist it.

Here's a close-up shot so you can see how flush to the fabric it is; if you trimmed your pin short enough, it should look just like this!

Lastly, here's a shot of an un-hammered rivet and the rivet we just finished installing. Notice how the brass has deformed with the aluminum pin; this is what locks the rivet in place and keeps it from coming apart!

I hope your rivet installing is as fun and satisfying as mine was! It is an excellent way to put a finishing touch on Jeds, jeans, or even bags and purses! I hope you liked my tutorial!
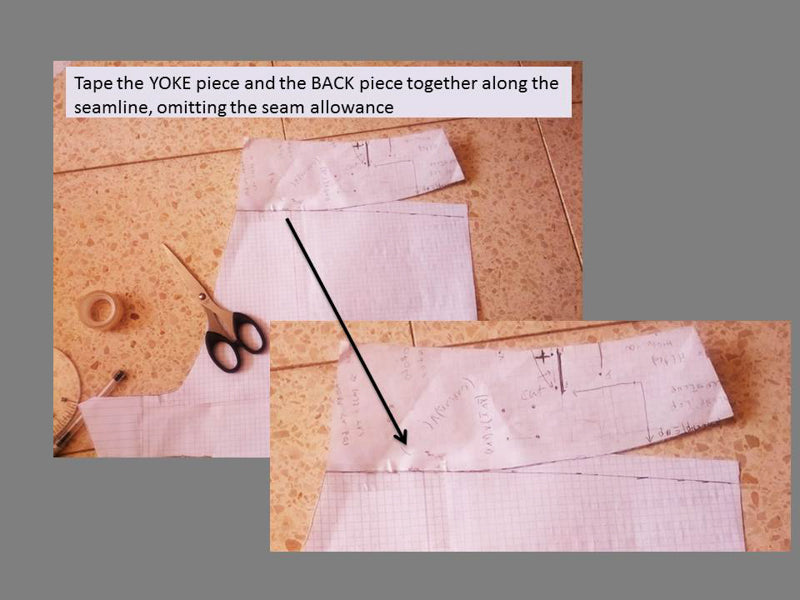
Removing the yoke and adding welt pockets to the Jedediah Pants
Today I have the first of three tutorials to show you (as a result of our Tutorial Contest). This tutorial was submitted after the contest deadline by Roni Arbel but it is so excellent I just HAD to include it along with the winner’s two tutorials! Now get ready for an excellent lesson in both pattern manipulation and careful sewing as Roni teaches you how to use the Jedediah Pants to create an entirely different style of pants!


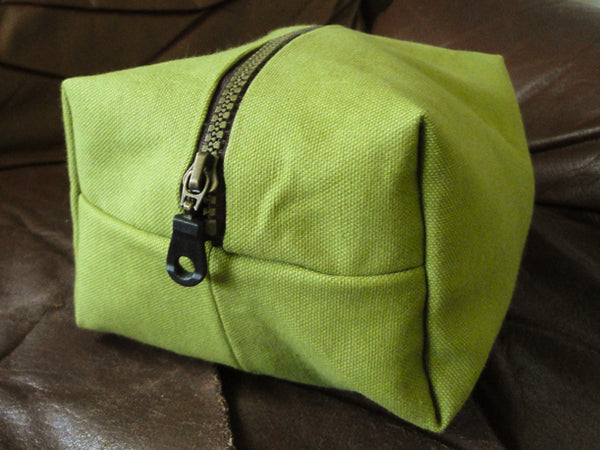
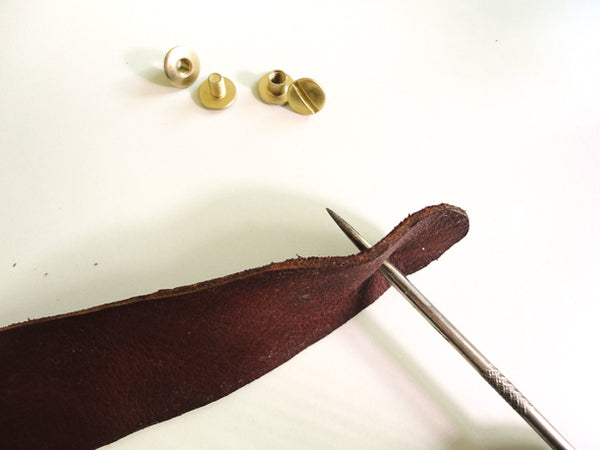
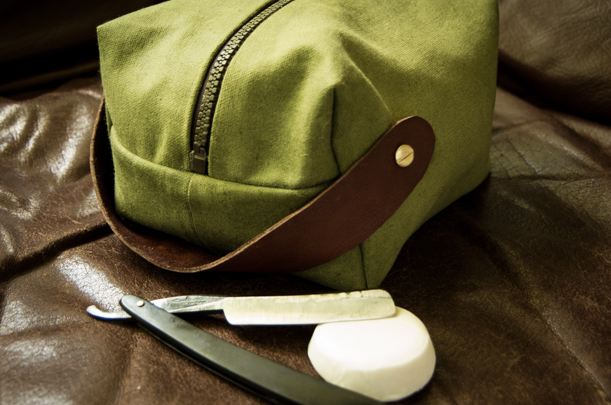
Father's Day Shaving Kit

In my opinion (and hopefully in my Dad's opinion), there is no better way to express your love for your Dad on Father's Day than by giving him something that you made yourself. My Dad loves everything I make for him and his enthusiasm over his handmade clothes is one the main reasons I find sewing menswear so rewarding.
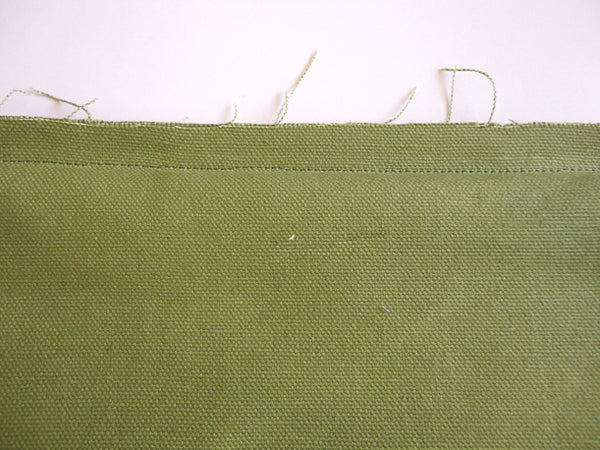
This Father's Day, forgo the cliché gifts of a watch or new tools and instead make your Dad something! Not sure what to make? Or do you still prefer to buy your Dad something that he has been asking for? Then make this shaving kit/generally useful bag and fill it with your dad's favourite things! It's big enough to fit any toiletries or shaving supplies you'd like to fill it with, a selection of screw drivers or even a pile of his favourite snacks.

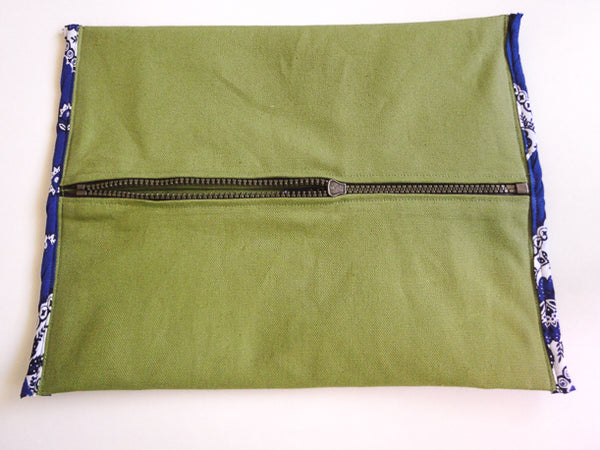
This bag is really quick and easy to make and results in a VERY sturdy case with a classic manly aesthetic. It is interfaced, lined and even waxed to create a bag that will only get better as it wears in with heavy use. I'll show you how to sew the bag using supplies from the Bag Making Kit that is new in our store but you can also gather your own supplies if you would prefer!

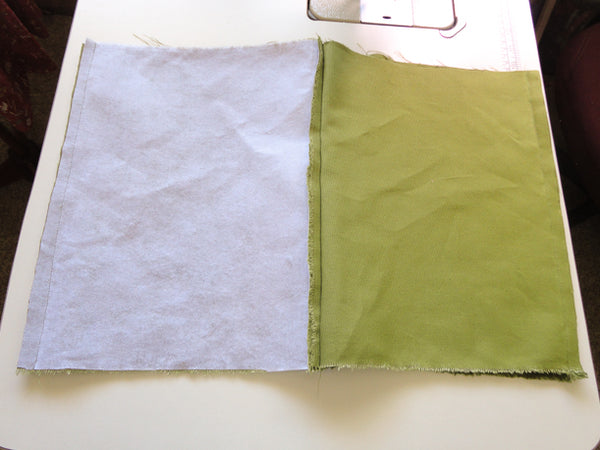
The materials you will need to create an approximately 6" wide, 9" long and 4 1/2" tall (bag are: 15.2 cm wide, 22.9 cm long and 11.4 cm tall)
Case:
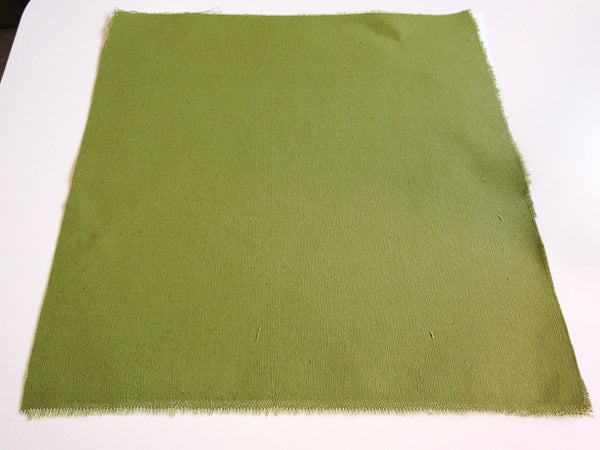
- Two 13" x 12" (33 cm x 30.5 cm) rectangles of cotton canvas or similar heavy fabric for the outer bag
- Two 13" x 12" (33 cm x 30.5 cm) rectangles of lining material (either the same as the self fabric or something that is easy to wipe out and clean
- Two 13" x 12" (33 cm x 30.5 cm) rectangles of heavy interfacing (optional)
- One 12" (30 cm) zipper (either separable for a bag that opens EXTRA wide or regular closed end - choose something heavy duty). Please note that since creating this tutorial we now include a 14" metal zipper in our Bag Making Supplies Kit. This can easily be shortened to suit this tutorial's dimensions by pulling the metal teeth with pliers! The larger zipper is more versatile in this kit as it is large enough to be used for all sorts of bag types!
- Otter Wax to apply to the finished case for a hard wearing/water resistant exterior (optional)
Optional Handle:
- One 12" (30 cm) strip of leather (approx. 1 1/2" (3.8 cm) wide - try cutting a piece from a thrift store belt!) (optional)
- Two to four Chicago screws or rivets that are thick enough to go through your leather handle and all layers of canvas (optional)
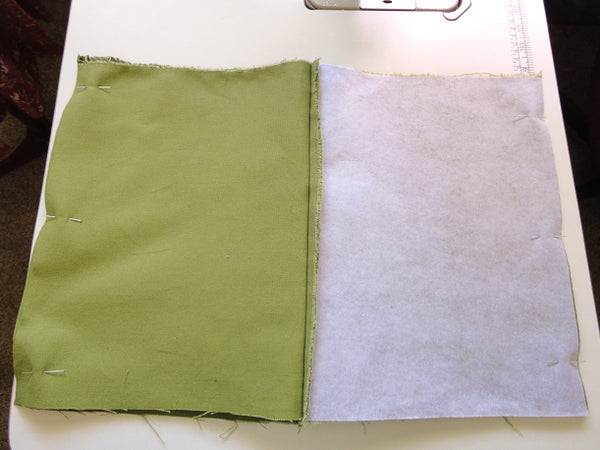
Apply your interfacing to the two outer rectangles.
Lay one of the outer rectangles right side up.
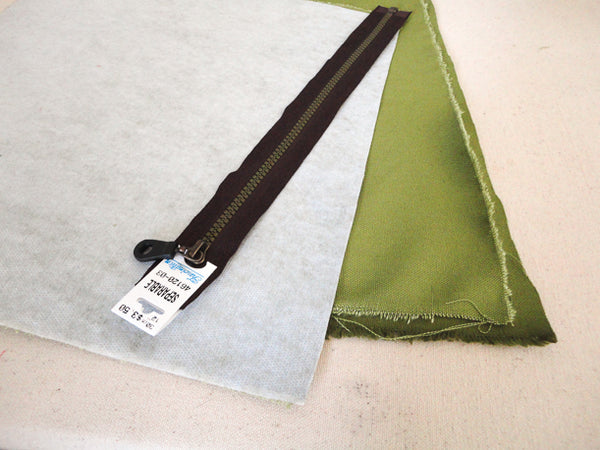
Lay the zipper with the right side down on top of the 13" (33 cm) side of the rectangle. Line up the zipper tape with the raw edge of the fabric and position the zipper so that there is 1/2" (1.3 cm) seam allowance on either end of the zipper teeth (mine needed to be shifted a little to the left in this photo):
Place a lining rectangle on top of the zipper with the wrong side up and the raw edges lined up with the outer rectangle. Pin in place.
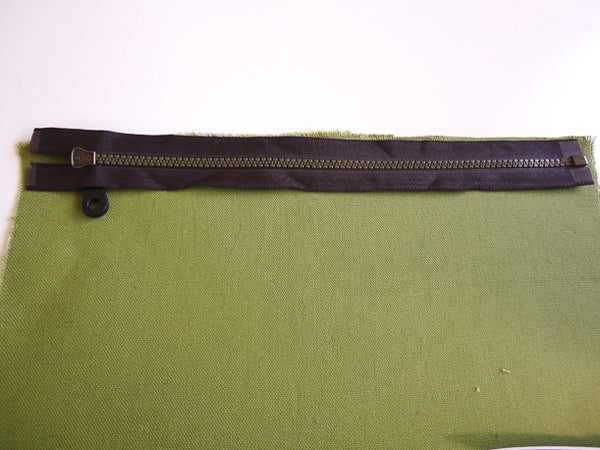
Use a zipper foot to stitch along the zipper tape. Try to avoid stitching too close to the zipper teeth (leave at least 1/8" (0.3 cm) space between your stitching and the teeth) because your lining fabric will get caught in the zipper teeth if it is too close...do what I say, not what I do because you will see later that I stitched quite close!.
Flip your fabric pieces around so that no seam allowances are visible. If you would like, you can pull the outer and lining fabric away from the zipper teeth (pull it very taught!) and top stitch to ensure the teeth will not catch the fabric.
To add the other side of the bag to the zipper, place the second outer rectangle right side up, lay the zipper with the wrong side up on top of it and then add the lining material with the wrong side up (this is the same process that you used for the first side of the zipper).
Pin in place and stitch with a zipper foot.
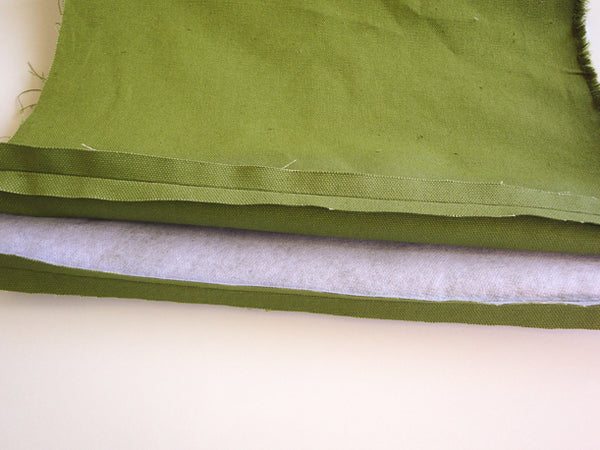
Your zipper is successfully inserted! Give it a press (but avoid pressing the plastic zipper because it will melt!).
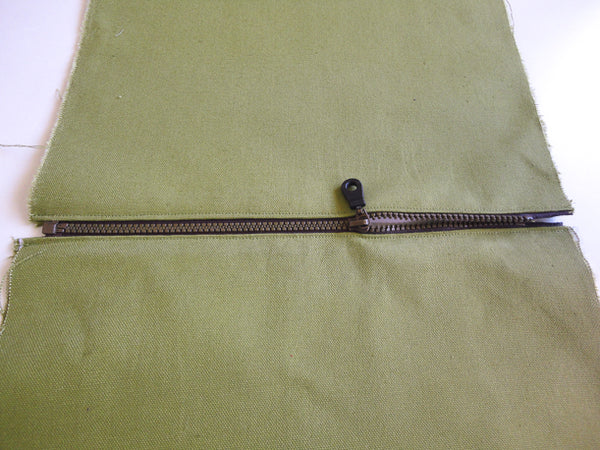
Now it is time to sew the bottom seam. This method will result in no raw edges along this seam. Position your bag so that the bottom edge of the lining rectangles meet (with right sides together) and pin. Do this for the outer fabric as well. From this point onward, make sure to leave your zipper partially open so that you can flip your bag right side out later on!
Here is a close up of how the zipper will look along the middle seam when your fabric is positioned correctly:
Stitch these two seams using a 1/2" (1.3 cm) seam allowance.
Press the seams open.
Now flip the bag around so that the right side of the lining is facing you (along with the wrong side of the zipper) and the bottom seam is lined up with the zipper. Remember to keep your zipper partially open for this step (again, do what I say, not what I do!). Pin the side seams and stitch using a zipper foot and a 1/2" (1.3 cm) seam allowance. If your zipper is positioned correctly, your stitching will cross the zipper just below the last teeth (so you will only have to sew across the fabric zipper tape and not across the plastic teeth).
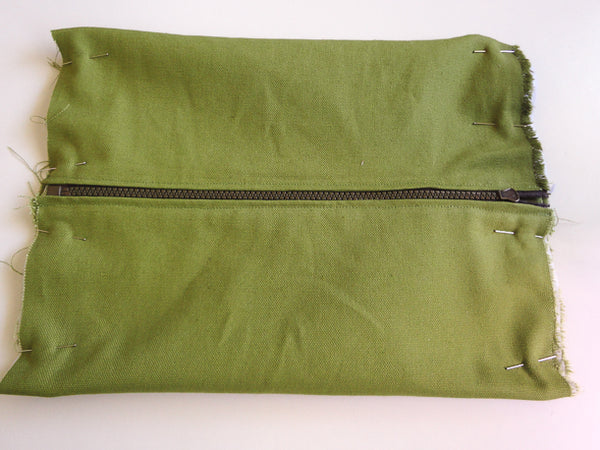
Finish this raw edge using binding or a serger.
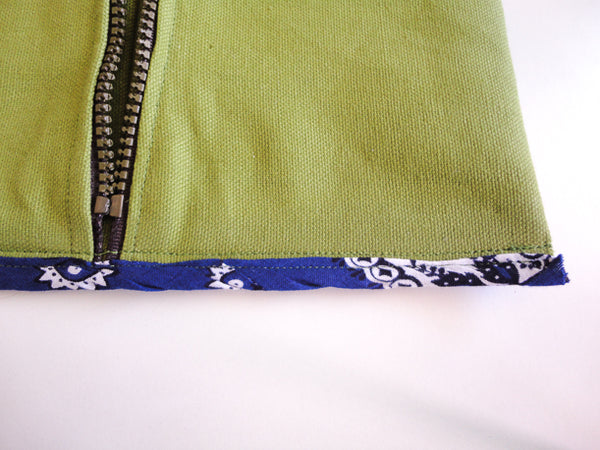
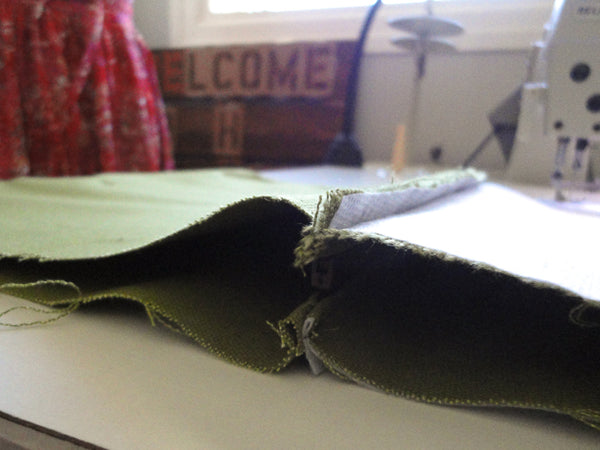
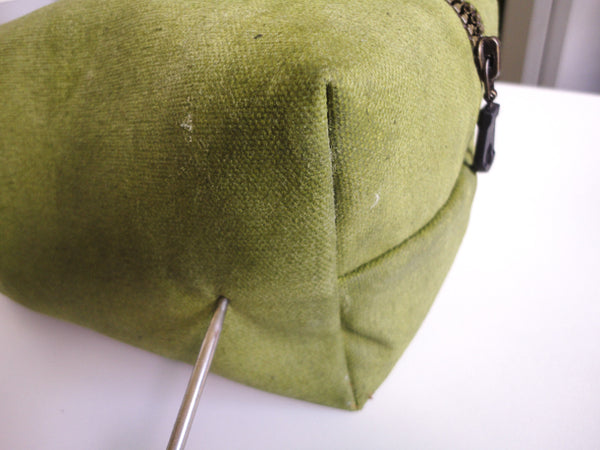
Your bag is almost done! We just need to shape the corners now.
Pinch each corner as photographed below to 'puff' the bag up.
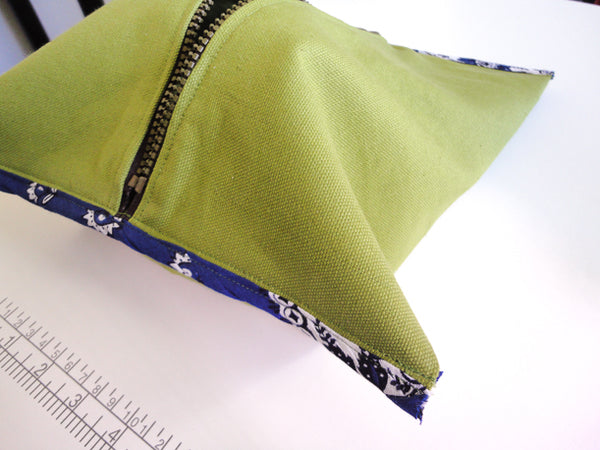
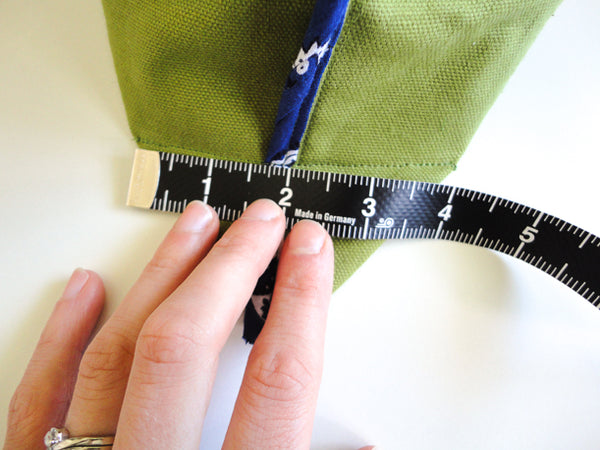
Sew across each corner to create your desired height. I sewed a 4" (10.2 cm) long line of stitching. If you sew further down the corner, your bag will be wider and shorter; if you sew further up the corner (to create a longer line of stitching) your bag will be narrower and taller.
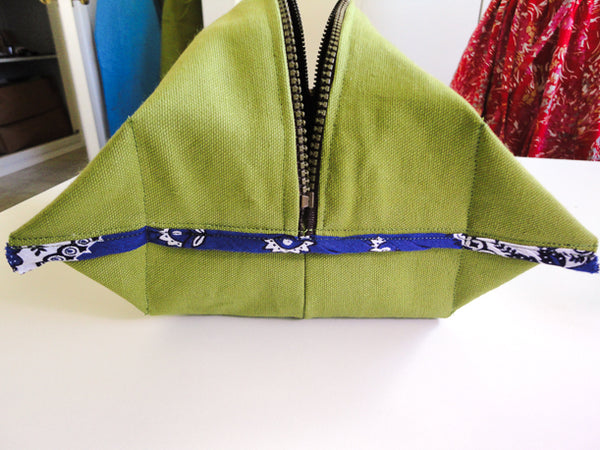
At this point, you can leave the corners in place (they add extra structure when the bag is turned right side out) or you can trim them and finish the seam allowances with binding or a serger. Turn your bag right side out and admire your work!
Your Father's Day bag could be completely done and ready to fill at this point...but if you want to take your work to the next level and make something even better than you could find in the store, here are a few ideas:
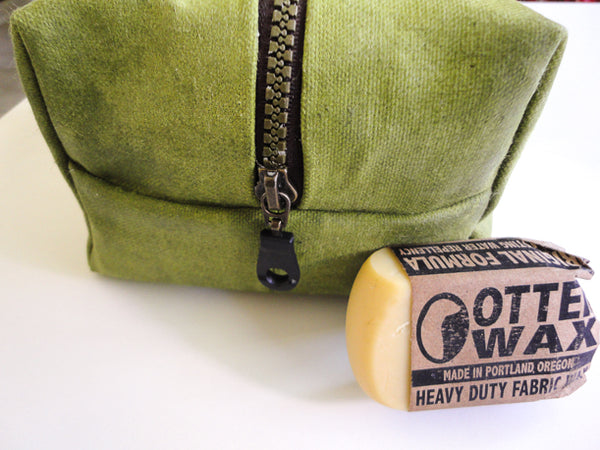
Apply Otter Wax to your canvas bag:
It's as simple as rubbing it on as thick as you would like. It will feel sticky and make your fabric look mottled/dirty at first, but just keep rubbing it on until the coating is even and then leave it out of the sun to cure for 24 hours. Your canvas will gain some lustre and become perfectly rugged looking. If your dad likes the look of classic oilskin raincoats and is quite hard on his belongings, this finish will suit him perfectly! It will resist water, the fabric will be stronger, and it will wear in over time rather than wear out (think of the nice crinkled and soft look of worn denim or an old waxed canvas jacket).
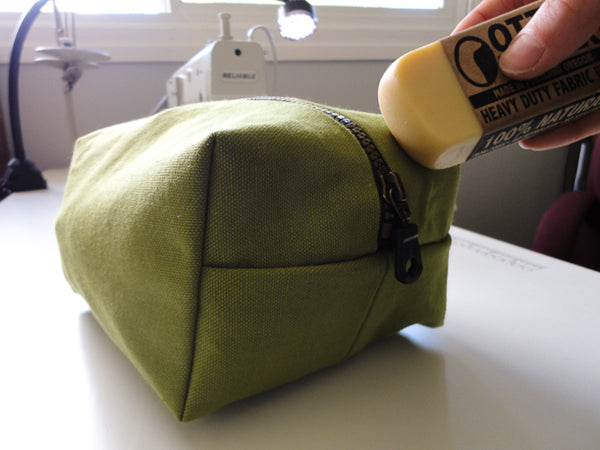
I didn't worry about getting wax in the zipper - after unzipping it a few times, the wax wears off and maybe even helps make it operate smoother! To work the wax into the seams, I used my fingers and the corner of the bar...and I came away with hands that were as smooth as if I had just gone for a manicure (yay for unexpected perks!).
Keep in mind that Otter Wax is different from most fabric waxes in that it doesn't need heating or any other special treatment before it cures (plus it's all natural and smells deliciously like beeswax). It simply needs to be rubbed on and then left to dry/cure. If you are using a different sort of fabric wax, you'll need to follow the manufacturer's directions!
Now, your bag could be done at this point as well...but shall we take it one step further?
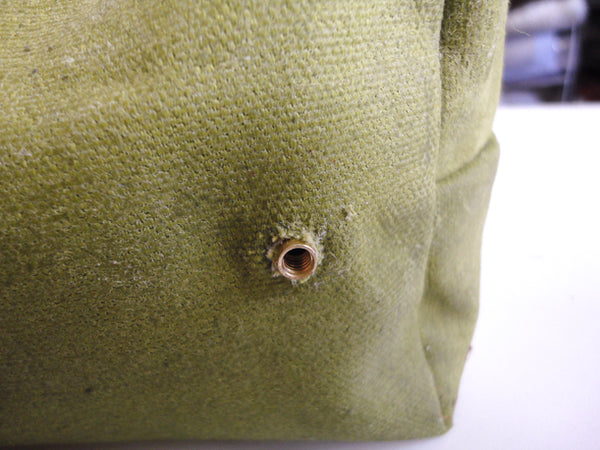
Add a leather handle to your bag so that your dad can easily grab it (and for an extra touch of manliness!).
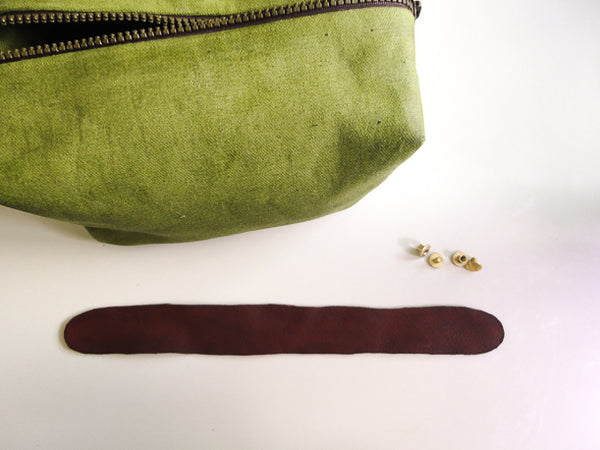
I used Chicago Screws (available in our bag making kit) to attach the handle without having to use specialized tools but you could also use rivets if you don't mind a little hammering and have the right rivet applying tools on hand!
Chicago Screws are commonly used in scrap booking but they can also be a great sewing notion! They simply screw together by hand (or with a flat head screw driver) and have nice large heads that thoroughly cover the hole punched in your fabric - I find these large heads make them more secure than small rivets because they are not likely to pull/rip through the fabric if the handle is yanked on.

I used a small scrap of leather for my handle but I think a strip from an old belt would work even better because the thickness of a belt would create a nice stiff handle. The one benefit of thinner leather is that you don't need a special leather punch to create a hole - just punch a hole with an awl and trim it to the desired width with small embroidery scissors. If you don't like working with leather, you could sew a canvas strap and apply it with rivets, Chicago Screws or simply by sewing it on.
If you are applying your leather handle as I did, just punch a hole in the leather with an awl and cut it to the correct size (keep the hole as small as it possibly can be while still being able to fit over the screw post).
Repeat this process on your bag. I lined my handle up with the horizontal seam at the end of the bag, but you could place yours wherever you desire. You could also add two rivets or Chicago Screws to each side so that the handle is not able to swivel.
Place the female half of the screw inside the bag and push it through the hole that you made. Place the leather strap over top of it and simply twist on the male portion of the screw until it is tight. Simple as that!
Now fill your Dad's kit with whatever you think he would like - be it a luxury shaving cream, some chocolate bars, a new paperback, or even a gift certificate. I hope your Dad is as proud of you and your DIY skills as my Dad is of mine :).
If you'd like try using some of the materials I did, you can find them all in our store! We have them all bundled as a bag making kit or the Chicago Screws, separable zipper, duck canvas and OtterWax are all sold individually.
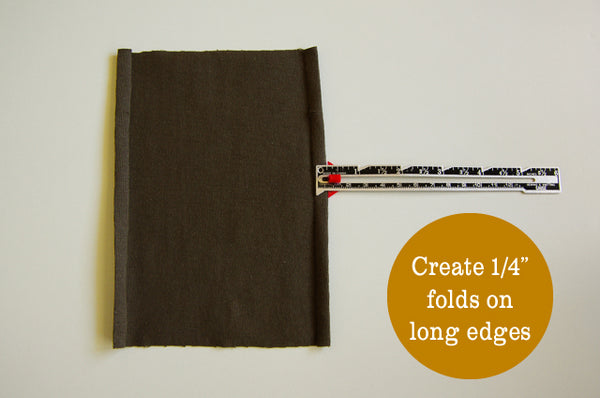
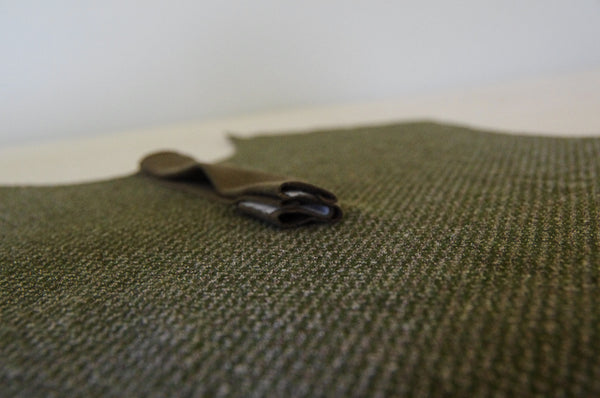
Strathcona Henley Placket Tutorial
Are you a little bit nervous about sewing the Strathcona Henley placket? Don't worry! This is normal! This tutorial will show you how to approach the placket in a slow and careful manner that allows you to backtrack and re-do pieces as needed.

Since the fabric that I used for this Strathcona Henley is of medium weight, I decided to sew the Henley placket using a lighter scrap of contrast cotton knit that I had left over from a past project. I opted to sew the placket using the most fool-proof manner possible – hand sewing!
Even though I love sewing with knits (especially since I know that any knit garment will become a staple in my closet!), I am often filled with trepidation when a design requires me to sew something small or detailed with a knit, such as the Henley placket. In order to avoid the worry of nicking and unravelling my knit fabric while unpicking crooked topstitching, I simply hand stitch any small details and enjoy the relaxing few extra worry-free minutes that this takes!
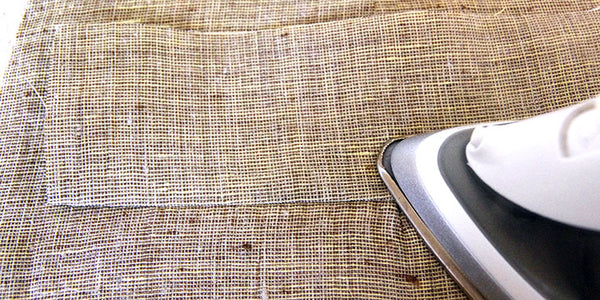
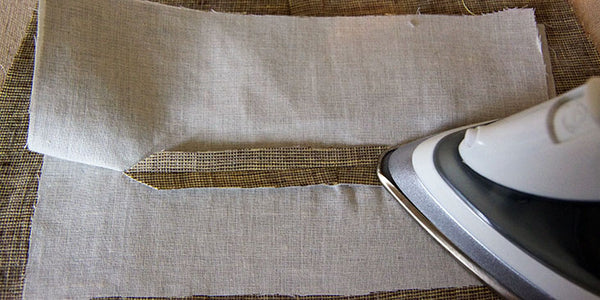
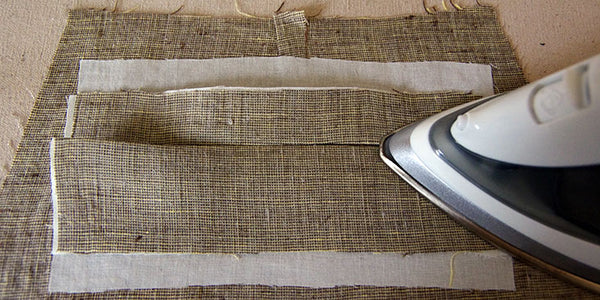
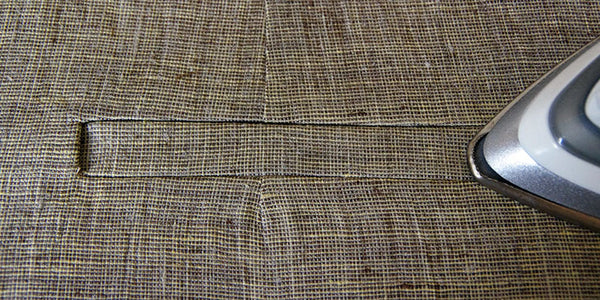
To begin the placket, you will first need to prepare the fabric piece by ironing a selection of folds. These folds will provide you with a guide to apply the interfacing and will later help you fold your placket correctly when it has been attached to the Henley front. Here are a series of photos to walk you through these steps:

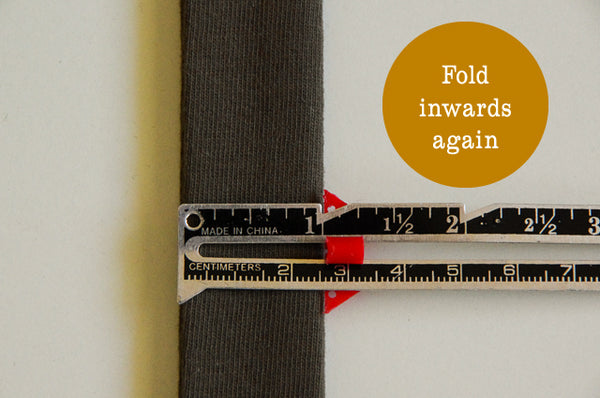
Now you can open up your folded fabric to see your ironed guidelines.
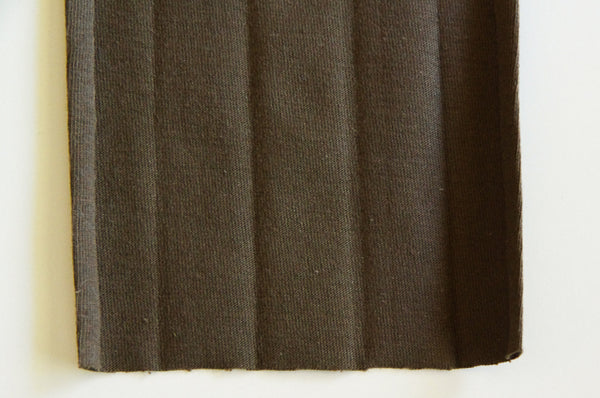
Using the ironed guidelines, apply 1” strips of interfacing to the areas either side of the center section. You may need to re-press your guidelines after applying your interfacing. Then, fold the entire placket in half and press just along the fold to create the center line that you see in the photo below. This center crease will act as a guide for you to cut along later.

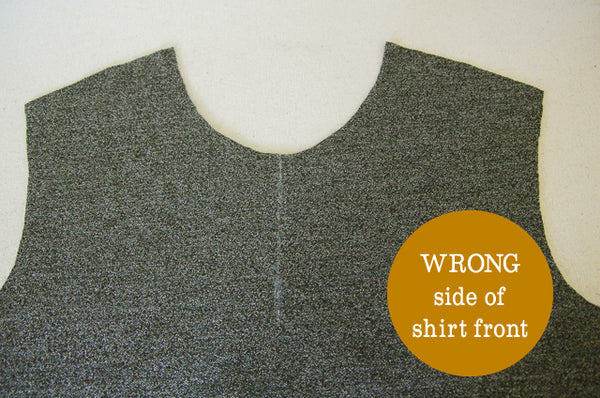
On your Henley front, you will have marked the “Placket Placement Line.” Make sure you are working on the WRONG side of your garment. This is very important, because if you attach your placket to the right side of the shirt front, your placket will end up backwards later on!
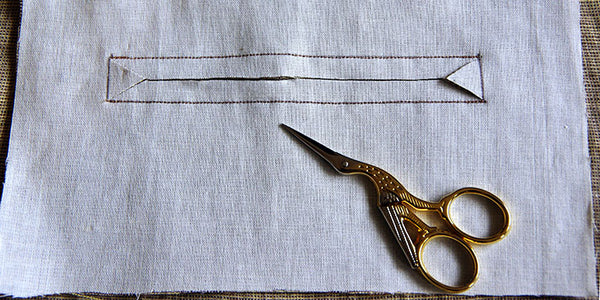
Pin the placket’s center crease to this marked line. Also, place a pin or mark with chalk the future bottom of the placket. The bottom is indicated by the notches on the left and right of the placket.
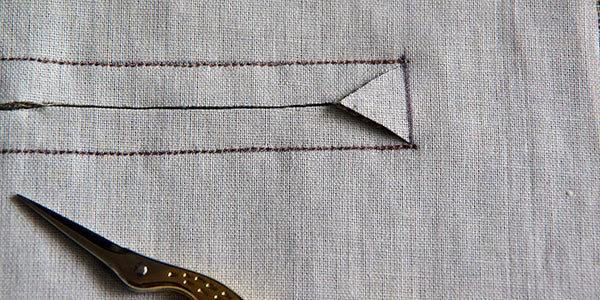
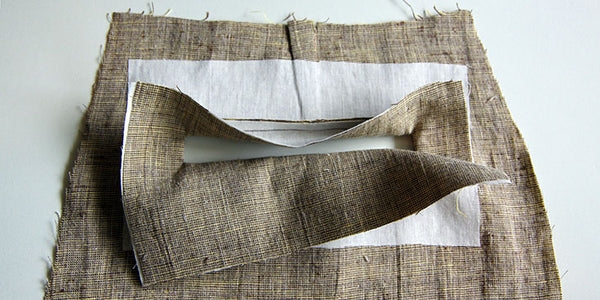
Now you can sew along the creased lines either side of the center and across the bottom to create a squared off “U” shape. Cut along the center line through both layers of fabric until approximately 1” from your bottom stitching. At this point, clip outwards to each corner as pictured below. Clip quite close to your stitching but be careful not to actually clip over it!
Now trim the fabric flaps to 1/8”-1/4” to reduce the bulk.
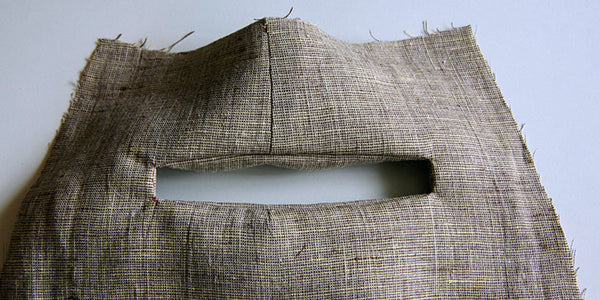
And you are ready to start folding and sewing! Push the entire placket through the opening you just created and flip the shirt around so you are now looking at the right side of the shirt. Fold along the creased fold lines so that each side of the placket is sandwiching the trimmed seam allowances. Pin the right front placket (if you were wearing the shirt) and sew it in place using tiny, invisible stitches from top until bottom (the bottom is where the notches and your stitching are, not the bottom of the placket fabric). Alternatively, you could topstitch 1/8” from the placket edge using your machine.
Before sewing the left placket, you will need to prepare the bottom of the fabric. Tidy up the loose fabric at the bottom so it becomes a series of 1” folds.
Trim all but the top two layers to within ½” from your bottom stitching. This will reduce the bulk at the bottom of your placket.
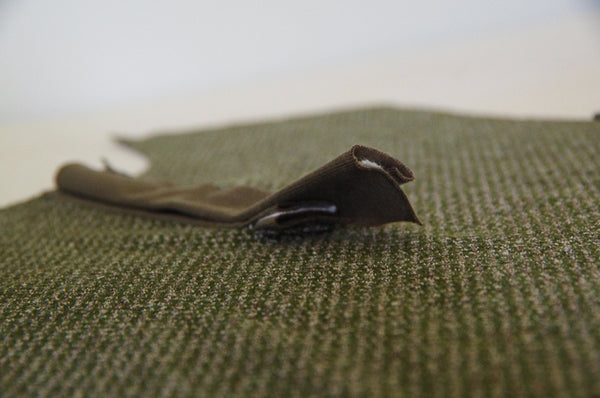
Fold the bottom fabric under squarely and pin in place. Now it is time to hand sew the left side of the placket!

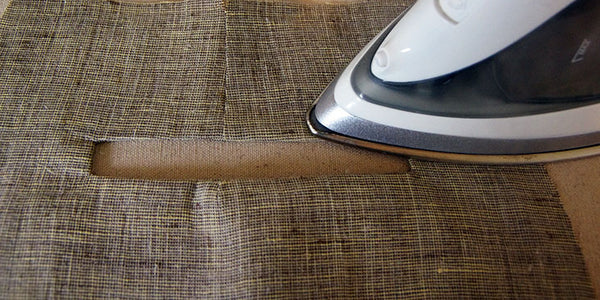
Continue sewing around the bottom of the placket until all edges are secure. Press your placket really thoroughly at this point to make sure that the shirt is sitting nicely without any pulling or puckers.
For this next step, you could skip all the hand stitching and move directly to finishing the bottom of your placket with topstitching, but you’ll probably notice there are still a lot of areas on the underside of the placket where fabric could shift around and get caught out of place when topstitching. It’s super quick and easy to just do a few hand stitches to ensure everything stays where it should. First, turn the garment over so you’re looking at the wrong side of the Henley front. Tuck the bottom of the placket into the ‘pocket’ made by your previous hand stitching.
Stitch where you just tucked so that the fabric can’t sneak out again!

You can also open up the placket as pictured below and make a few stitches to join the left and right plackets pieces together across the bottom.
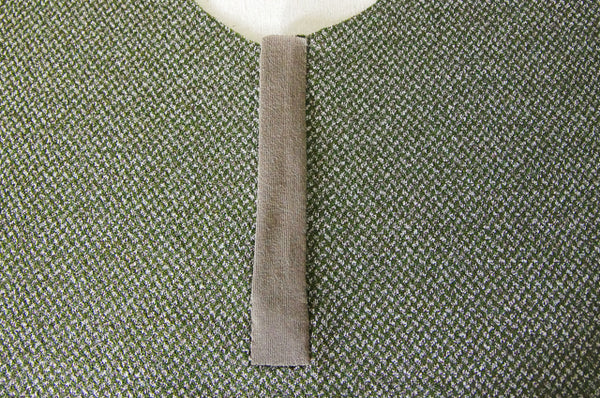
Now, the last step is some very visible topstitching which I invariably fail to make perfectly square! It is possible to stitch a perfect square and cross-lines if you are more precise with your machine stitching than I am, but if you are like me, just embrace the rustic manliness your slightly un-square topstitched square gives your Henley! Once snaps or buttons are applied and the rest of the garment is sewn, it will blend in nicely.

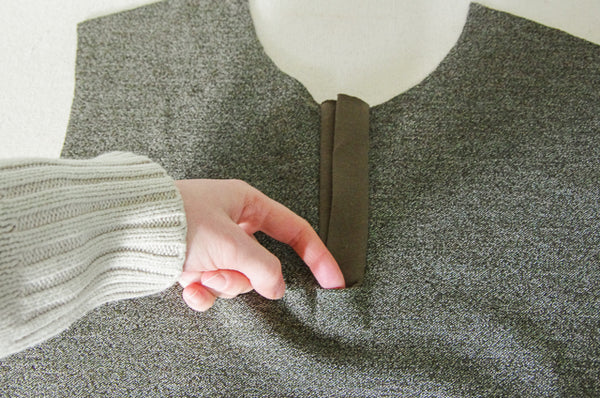
The rest of the Henley is a breeze after this and takes me about an hour to finish from this point! And voila, Matt has a new sweater to wear for spring hikes and around the campfire (because, in my opinion, these are the perfect sorts of situations to wear an earthy and rugged wool Henley)!

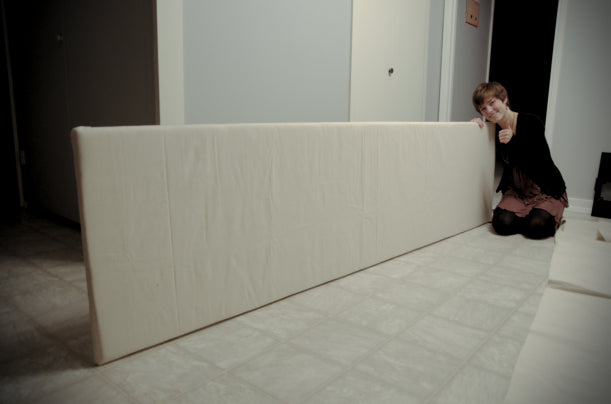
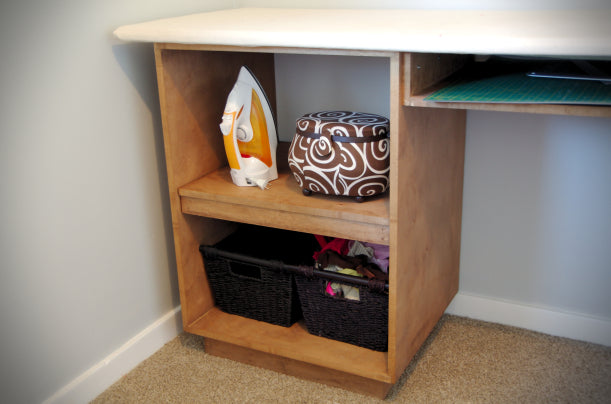
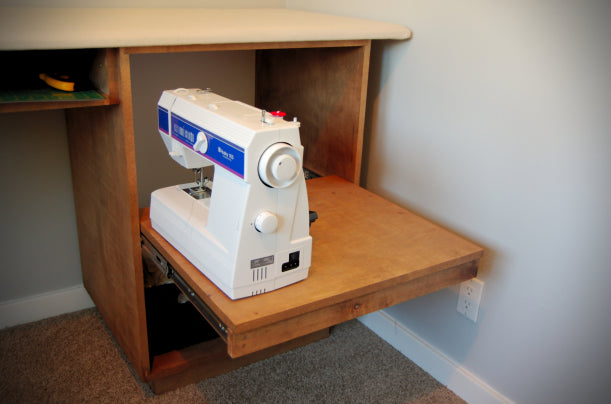
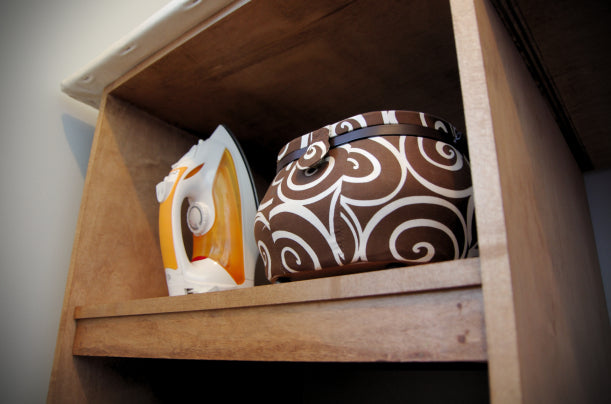
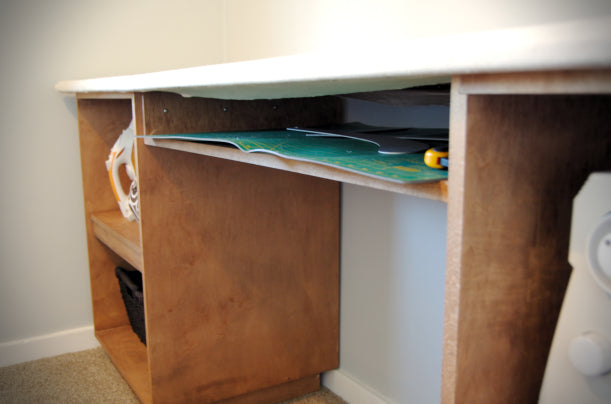
DIY Ironing and Pinning Table
Morgan and I were too excited about the most recent addition to the sewing room to wait for the Friday post! So, without further ado, here it is!
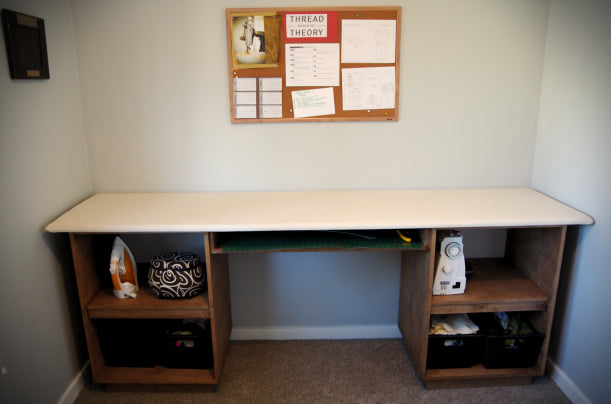
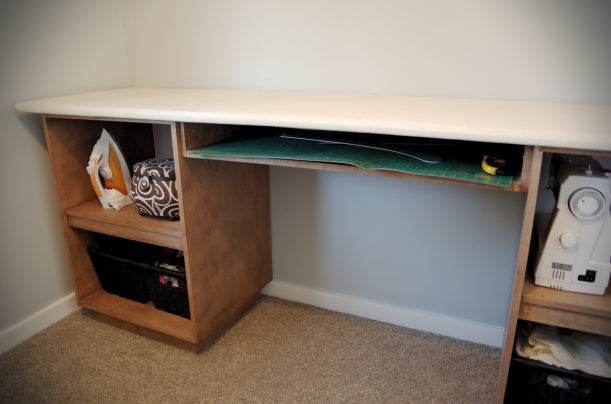
This DIY tutorial is for an ironing table that is specially designed to pin together duvets, which Morgan sews for The Heather Company. It is also the perfect table for ironing as well as a great cutting mat surface.
This tutorial is for the working surface of the table (which contains several important layers), as the shelves can really be made of anything (but more on that later!)
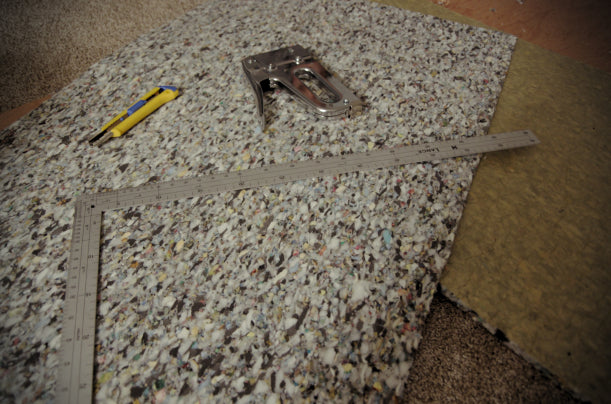
Here are some things you will need!
- A sheet of plywood
- Carpet padding
- Heavy canvas (12oz to 14oz)
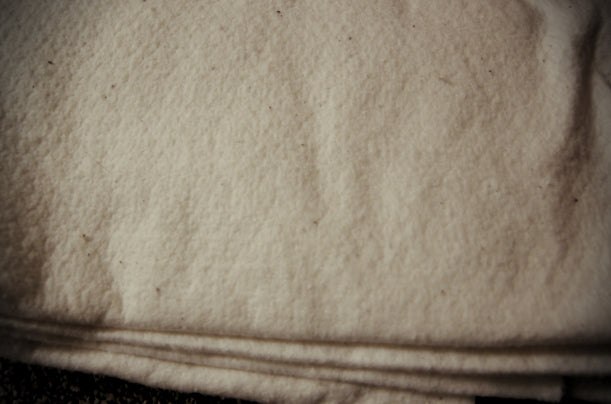
- Cotton needle punch batting
- A staple gun
- Scissors
- A ruler
- Liquid glue

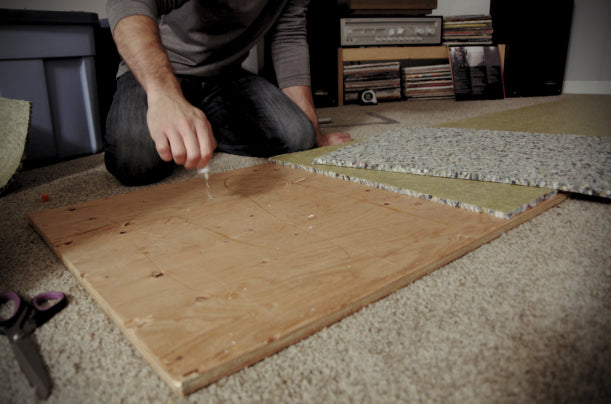
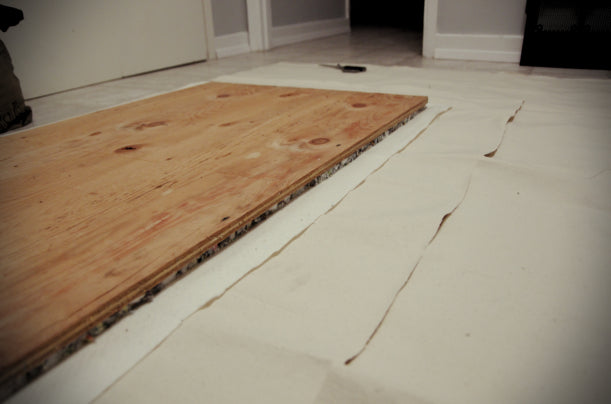
The first step is to determine the size you want your table to be. We decided to make it the full width of our spare bedroom (a.k.a. the sewing studio) and 24" deep. This allows the cutting mat to easily sit on top without any overhang. Then, simply cut a piece of plywood to the size you want! The thickness of the plywood all depends on how wide the gap between the shelves will be; ask your local handy-man for help!
Next, get your carpet underlay and cut it with scissors or a box knife to cover the entire surface of the plywood.
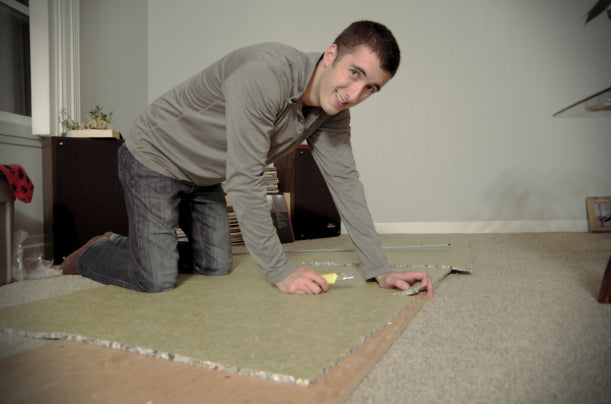
Do a dry fit first, and then cover your plywood with glue squiggles. I used an all-purpose liquid super glue made by Titan.
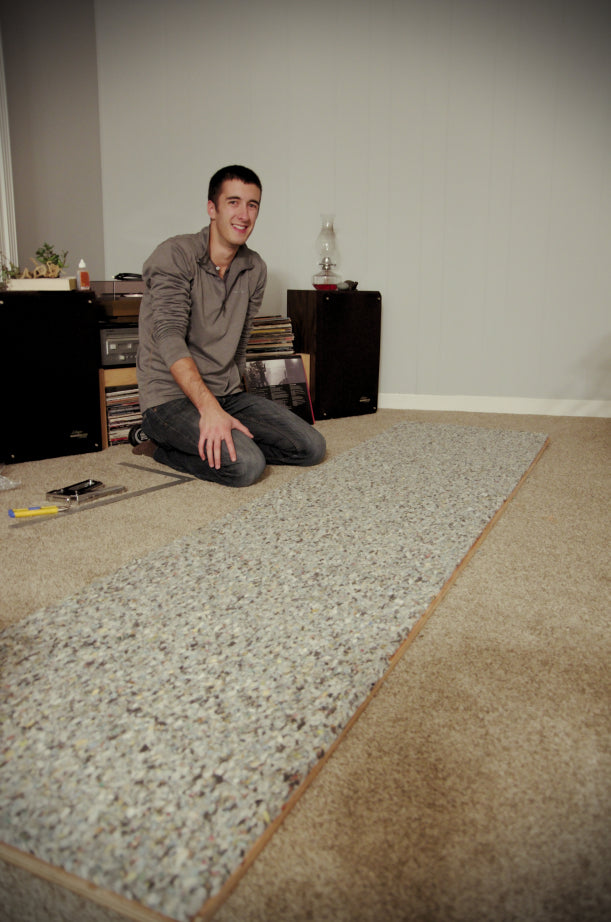
Next, wait for the glue to dry enough that it holds the carpet padding in place (it doesn't have to completely set). Lay out your canvas with the cotton needle punch on top, then flip the plywood and carpet padding upside-down on top of it all. You should now have the underside of the plywood showing with a layer of carpet padding, cotton needle punch, and canvas underneath. We let the needle punch overlap a couple inches on each side, and then canvas quite a bit more than that - about 6-8 inches.
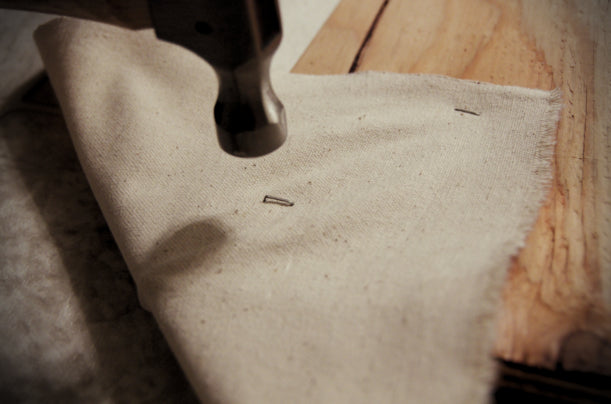
Now comes the fun part! With one person on each end, pull the canvas nice and tight, doing your best to get it stretched in both directions. Fold it up and over the raw side of the plywood and staple it down!
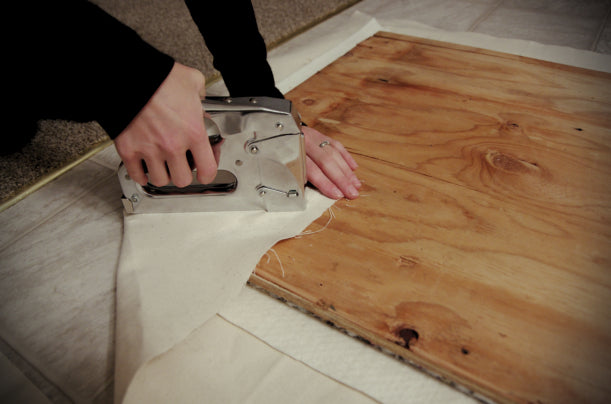
Work your way around the whole surface stapling every 6 inches or so. If you get a few staples sticking up, tap them down with a hammer.
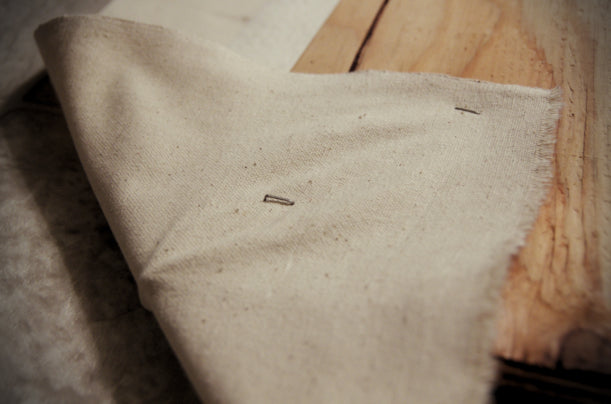
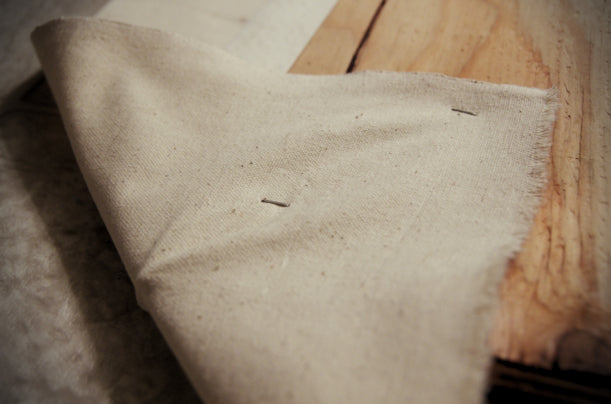
Next, flip the whole kit-and-kaboodle over and admire your handy-work!
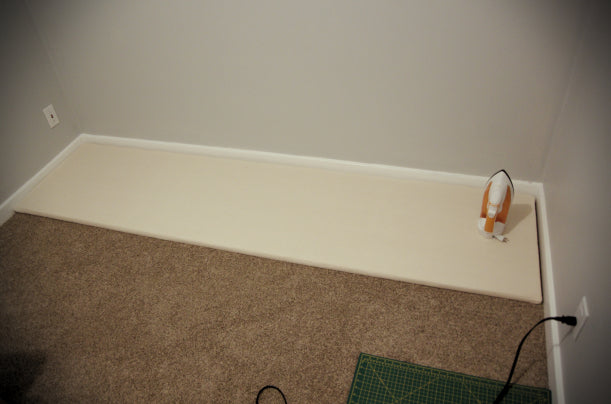
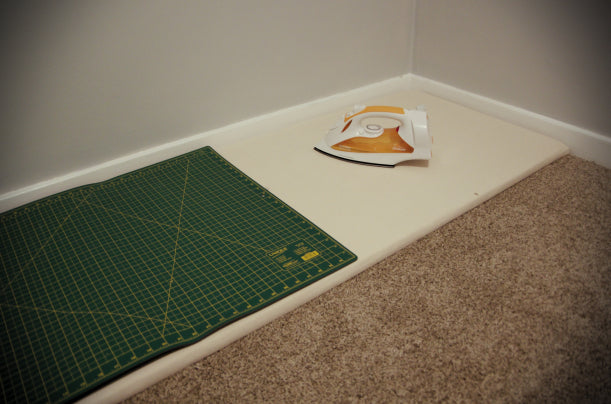
The canvas might not be super tight at this point, but as you iron on it, the canvas will shrink and it will make a nice smooth surface.
Next, put it on top of some cupboards/side tables/saw horses/anything you want! My mum and dad had promised Morgan some custom-made cabinets for her birthday, and we thought this would be a perfect opportunity to cash in! We designed them to have enough space to hold Morgan's Husqvarna machine and her serger, and to have a small slot for her cutting table. My parents went above and beyond and built the cabinets up on small risers and made slide out platforms! We were totally blown away by their sturdy-ness, and we sanded them and applied a coat of black walnut Danish Oil and set them up!


All in all, the ironing table-top was a VERY simple process. We did the entire thing (except cutting the plywood) on our living room floor and only had to do a quick vacuum to clean up after! The carpet padding makes a bit of a mess when you cut it... We weren't keeping track of time, but this project could EASILY be done in an an afternoon/evening. And, once the table-top is done, you could put it on anything from filing cabinets to Ikea Expedit cubes!
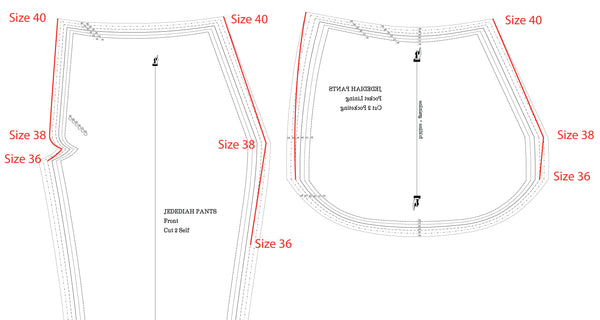
Grading between sizes for the Jedediah Pants
In the images below I've shown you how to grade between sizes 36 and 40 on the Jedediah Pants. This would be useful if your waist measurement matches our size 40 on the Body Measurement chart while your hips match size 36. The red lines indicate where you should draw new lines using a curved ruler (or eyeballing a smooth curve). After drawing these lines you can cut out the pattern using the size 40 waistband, the graded lines and then the size 36 legs.

I HIGHLY recommend doing a mock up of the pants if you choose to grade between sizes (or before you start to sew your fashion fabric regardless of if you have adjusted the pattern or not as you may find out that you would like to make some adjustments based on your mock-up!). There are a few potential issues that could be created by grading the pants. Here are some that I anticipate if your grading is quite extreme and a few suggestions on how to solve them:
1. The front pockets could gape a little too much: If you mock-up the pattern after doing your grading you will see if this is the case. You can remove the excess fabric by creating a deeper seam allowance for the front of the pants at the waist seam and the side seam (flattening the front of the pants onto the pocket lining and facings).
2. The seat seam might not fit as well as it will the way the pattern was originally drafted: Grading between two sizes will change the curve of the seat seam. If you are worried about opening the can of worms that adjusting a pant seat seam can be (ug!) then consider leaving the seat seam as is and only doing minimal grading along the side seams. I know this isn't the correct way to approach things but it is far less intimidating if this is your first time adjusting the fit of a pattern! Only do this if you are grading up or down ONE size (meaning you only need a small adjustment). If you DO need to grade the seat seam, try to keep the shape and length of the new curve as similar as possible to the old curve.
3. The thigh area might become too baggy or too tight: To fix this, you will simply need to extend your grading down the leg further so that the shift between sizes is more gradual. At the tight or baggy point, make sure to keep your graded line closest to the larger or smaller size accordingly.
But don't let this overwhelm you! Just purchase some cheap fabric to sew a mock-up (an old bedsheet for instance), and see how the trousers look before cutting in to your final fabric.
Lengthening or Shortening a Pattern Piece
Here is a quick visual tutorial explaining how to lengthen and shorten the pant leg pieces of the pants to help you along the way to a totally custom fit. This process would apply to any pattern that needs adjusting!
Supplies you will need:
- For Lengthening only: Paper or tissue the width of your pattern piece (a normal sheet of Letter size paper turned horizontally easily matches the pant leg width)
- Tape
- Scissors
- A measuring tool - either a ruler or a tape will work fine
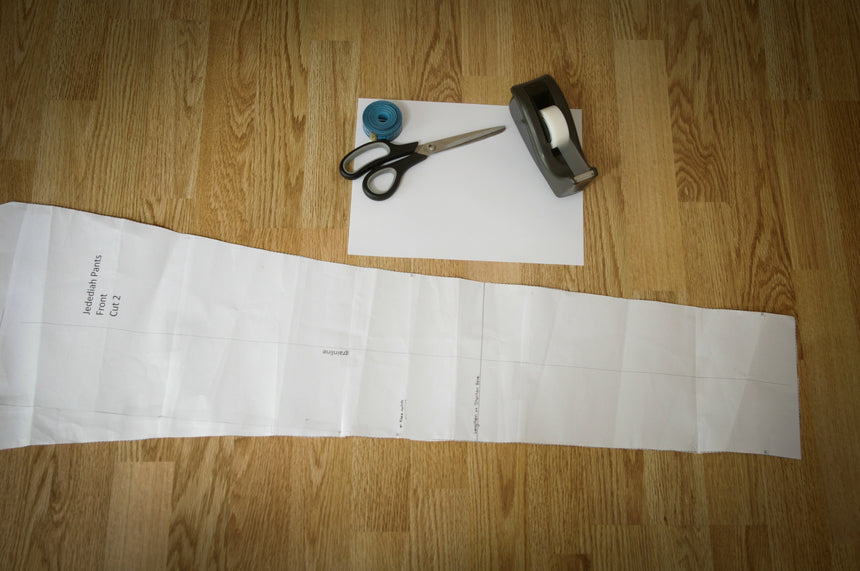
1) Determine how much length you need to add or subtract from your pattern by measuring the wearer (their inseam, their back length, their arm length or whatever area you are concerned will need adjustments) and comparing this measurement to the body measurements included in the pattern's instruction booklet. If the wearer's inseam is 34" for instance, while the pattern has a 33" inseam (despite the fact that they fit the waist measurement), then you will need to lengthen the pattern by 1".
2) If your pattern includes a "Lengthen or Shorten Here" line, simply cut along this line, separating the pattern into two pieces. If you have not been given this line, you can make your own by using a ruler to draw a horizontal line along the part of the pattern with the least amount of flare or taper. Make sure, if lengthening the body of a garment, to lengthen all corresponding facings and plackets so that the pattern pieces will still fit together later on in the sewing process.
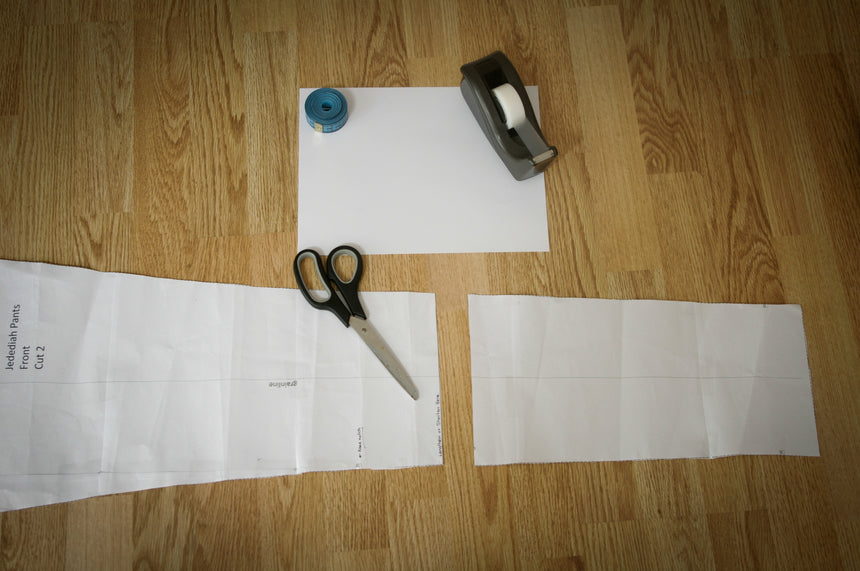
3) For Lengthening: Using a ruler or other straight edge, draw a line on your blank piece of paper or tissue so that you can use it as a guide to extend the grain line and thus ensure that your two pieces are being lined up correctly.
For Shortening: Overlap your two pieces the amount you determined in Step 1 and line up the grain line so it forms a straight line.
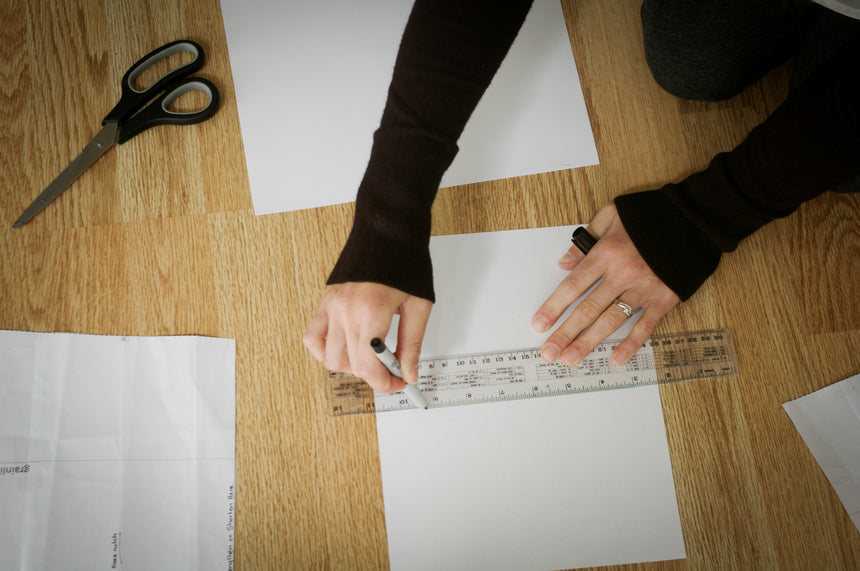
Lay the paper down with the pattern pieces on top of it and line up the pattern's grain line with the one that you drew.

The grain line that was drawn on the blank piece of paper (now underneath the two pattern pieces) is lined up perfectly with the grain line of the original pattern piece. The gap between the two pattern pieces measures 1".
Step 4) Tape your pattern pieces down to the paper (or, if shortening, to each other) and blend the curve or straight edge to connect either edge of the pattern. Cut off the excess paper.
Cut off the excess paper. Make sure to blend the new edge smoothly.
Your lengthened pant leg - 1" longer than before!
It's as simple as that! The only tricky part is making sure you've remembered to do this to all the pieces that need adjusting (you don't want to forget a shirt button placket or something and accidentally cut it out of fabric while it is still too short...can't say this has ever happened to me...ahem...)
Happy sewing!