Camas Blouse Sew-Along: Day 9 - Closures and Styling
We’re on the home stretch! Today we are sewing on our closures and I will show you my new Camas Dress and Cardigan in action! On Friday I will show you a parade of Camas Blouses that have been popping up all over the internet. I hope yours will be included in the parade – to be sure that it will, email me photos at info@threadtheory.ca.
Adding Closures

There are many ways to finish off the Camas Placket – some of which are detailed in the instruction book and some of which I will mention today. Here are the ways I’ve come up with. Maybe you have thought of others?
- Add buttonholes to the right placket (if you were wearing the blouse) and sew corresponding buttons to the left placket.
- Add snaps – I especially like pearl snaps!
- Sew the buttons through both plackets to create false buttons. You could optionally topstitch the placket closed before doing this to avoid any chance of gaping or peek-a-boos.
- Topstitch the placket closed and avoid any closures. This would be a very clean, minimalist look.
- Leave the placket open to create a cardigan.
- Add a tie belt made from self or contrast fabric to accompany buttons as a blouse or dress or use only the belt (no other closures) to create a robe style cardigan.
For the two garments that I sewed throughout the sew-along, I chose to leave one without closures and added false buttons and a tie belt to the other. Here is how I added false buttons without stitching the placket closed:

I topstitched the inner placket in place before addressing the issue of closures (as you can see in the last sew-along post). This differs slightly from the instruction booklet where I instruct you to stitch the two plackets together while topstitching.

Place the right placket (if you were wearing the blouse) over the left placket and pin together. Make sure the hem is even.

Mark your button placement on the right placket. If you are sewing the pattern without lengthening it you can use the button placement markings from the pattern piece. If you have lengthened the blouse as I have here, you will need to determine the button placement yourself. You can follow the spacing provided on the pattern (6.35 cm/ 2.5″) or choose your own. It might be a good idea to try on the blouse so you can see where the top button should be placed.
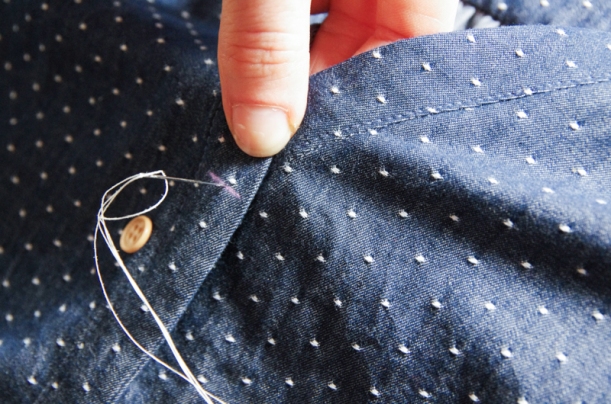
Pierce your needle through both plackets when stitching each button in place. Follow mytutorial on sewing on a button if you are often frustrated by hand sewn buttons popping off!
And you’re done! WOOT!!! Wear that gorgeous Camas for your Valentine’s festivities…or…you might find yourself grabbing it from your closet just about every day because it is so comfortable :).
Here are my finished Camas garments:

Meet the Camas shirt dress! I sewed this using a lovely dotted cotton chambray fromStylemaker Fabrics.

I lengthened the Camas as I instructed in our post on Camas mods. I kept the side seam very straight to get the slim silhouette I was imagining.

I also lengthened the sleeves slightly so I could roll them up to create cuffs:
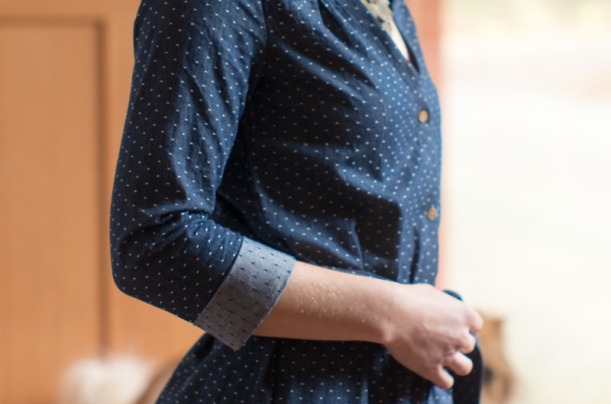
The buttons I used are tiny little 3/8″ shirt buttons made from Tagua Nut. You will be finding those in our shop when we launch an upcoming menswear pattern – the button up shirt! I really like the creamy color for casual shirts like this one. I find that these thin buttons with their subtle engraving look more subtle and professional than the thick shirt buttons that I often find in my local fabric shop.

When I lengthened the blouse pattern I kept the original hem curve. I really like how this shaping looks on a shirt dress!

I created a belt out of two strips of self fabric. I didn’t bother with belt loops – I had originally intended to add thread chain belt loops but when I tied the belt around my waist I felt those were really unnecessary. The fabric does not shift or slip so there was no reason to require thread loops to keep the belt in place.

Since this shirt dress is sewn using a woven fabric with pretty much no drape (I know, this is NOT what I recommended in the fabric selection post!) I find the neckline rides up and gapes a little. I tried moving around by calling our pup, Luki, to test how the dress provided coverage despite the fact that it doesn’t want to sit flat against my neckline. I think it provides tolerable coverage:

It’s a bit annoying that I have to pull the dress back down over my chest after I move my arms up though. I think this problem would not occur if the fabric had more drape and wanted to match the contours of my body.

When planning to sew this version of the Camas in a woven, I raised the underarm seam and used a smaller seam allowance at the elbow to accomodate for the fabric having no stretch. I detailed how to do this in our post on sewing with woven fabrics. I didn’t make any other fit adjustments despite the fact that I have a very broad back and straight shoulders. Looking at the photo below I can see I probably needed to add 1/2″ of width across the back. This is a pretty standard adjustment for me. I haven’t done this for past Camas Blouses that I have sewn using knits because I did not notice a problem with the fit across the back. Even with this woven version, the problem is exceptionally minimal – I have full arm movement and only notice a small amount of tightness when I put my arms directly in front of me. I don’t think it’s something I’m very worried about!

Now I’ll show you the second blouse I made during the sew along! This one was sewn as an open front cardigan.

I used the super soft Canadian-made black interlock fabric that we carry in our shop for the front of the cardigan and the sleeves. It makes a nice spring cardigan because it is quite light weight.

For the yokes I used a sweater knit featuring a black and brown herringbone design that I had left over in my scrap bin from another project.

For the back of the blouse I used a polyester chiffon with a romantic floral print. I had made it into a simple kimono in the past but didn’t do a very nice job of sewing it so I recut it to use in this project instead. I’m glad I can finally wear this fabric because I think the print is so pretty!
As you can see, I changed the back hemline shape so that it makes a very dramatic swoop. I showed you how to do this in the Camas modification post. I also lengthened the sleeves as we discussed in that post.

I think this cardigan will be very versatile in the spring and summer. It can be worn over dresses or over jeans and a t-shirt. The interlock makes it feel comfy and casual while the chiffon dresses it up without making the cardigan too delicate (since it is a tightly woven poly chiffon that doesn’t seem prone to snags and can be put through the wash and dryer). Plus I can wear it with outfits that suit black OR brown – this makes any garment a win in my opinon!

I look forward to seeing and hearing about your Camas successes and modifications! I hope you enjoyed the sew-along. Thanks for joining me :).