Haslam Hat Sew-Along: Day 3 - Sewing!
Sewing the Haslam Hat Variation 2 with Ties
1. Cut out shell and lining pieces for the hat top and ear flaps.

2. Take the outer hat top piece and place it with the fabric right side up on your workspace.
Fold one outer dome section of the hat top towards the center with the right sides together. Match the first two sets of points together and the curved V-cut out.
Stitch along the curved edges at 5/8" (1.5 cm), creating a curved dart. Press the seam allowances to one side.
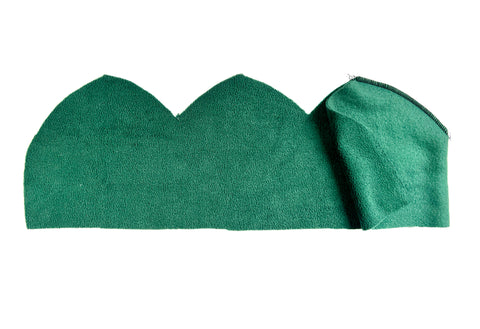
3. Repeat for the opposite side of the hat top, leaving the center unsewn for now.
Open up the hat along the seams and position the hat top so that the two dart seams meet, and the raw edges of the center of the hat top are aligned. Stitch along the curved seams at 5/8" (1.5 cm).
Repeat steps 1 - 3 for the hat top lining.

Top View

Side View

Finished Top View
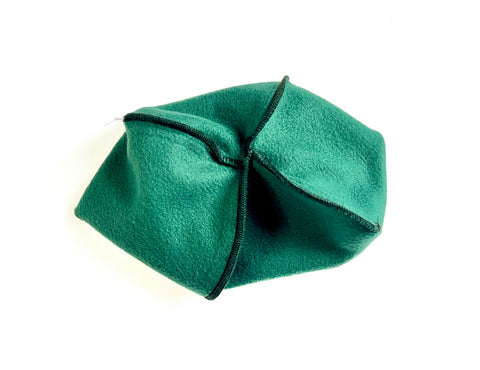
Turn the hat top right side out.
At this point, try on the hat top and see how it fits around the crown of your head. If you wish for a more fitted look you can extend the dart points to be longer and curve down further on the hat top.
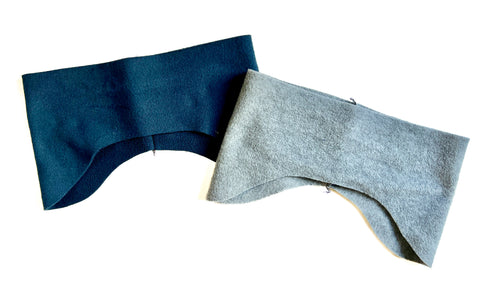
4. With the right sides together, fold the shell and lining ear flap pieces in half aligning the short edges. Stitch together at 5/8" (1.5 cm).

5. Cut two long strips of fabric for ties. For this design, I decided to cut strips of green polar fleece used for the hat top. Due to the structure of polar fleece, it does not unravel easily, so you don't have to finish the long edges!

To make the strips look less like rectangles, I stretched the strips lengthwise. This makes the long edges curl in and create more of a tubular shape and look less flat.

6. At the ends of the ties, I made a knot and then clipped into the fabric to create the appearance of tassels.

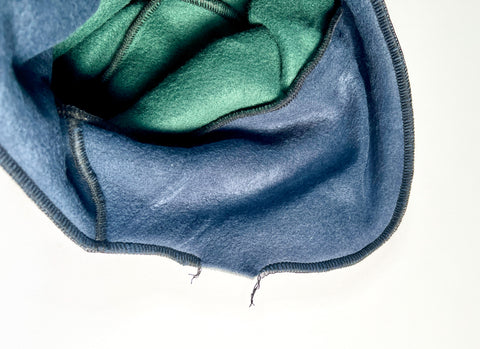
7. With right sides together, match the shell and lining ear flaps to the hat tops, aligning notches and back seams. Stitch together at 5/8" (1.5 cm).
You now have the shell, lining, and ties for the hat.

8. Match the short ends of the ties to the center bottom of the shell ear flaps. Position the ties so that the raw edge of the ties aligns with the raw edges of the ear flaps and the tassel part goes towards the hat top.

9. Leave the shell and ties with the fabric right sides out, and turn the lining to be wrong side out. Insert the shell into the lining so that the right sides of the shell and lining are matching. Align the shell and lining pieces along the ear flaps, making sure the center back seams are aligned, sandwiching the ties. Stitch together at 5/8" (1.5 cm), but leave a gap near the back seam about 3" – 4" (8 cm – 10 cm) wide.

10. Pull the shell and lining through the seam opening to turn the fabric right sides out.

11. Neatly press the edges of the ear flaps in place. Pull on the ties to make sure the shell and lining are turned fully right side out and to create a nice curve.


12. Using a needle and thread, hand-sew the seam opening closed.

13. With seams aligned stitch in the ditch, through the shell and lining layers, along the seam connecting the ear flaps to the hat tops.
For extra reinforcement or decorative finishing, topstitch around the edges of the ear flaps and on the hat top.
