Grading the Sayward Raglan Up or Down for a Perfect Fit
I jumped for joy when Thread Theory asked me to test the new Sayward Raglan pattern – finally, a classic but fashionable design that would work for my husband! The options out there for plus-size menswear are just awful, and I’m so glad that Thread Theory has stepped in to fill that gap.

Once I saw the size chart though, I realised that my husband is just out of the 4x size range. No problem though! It’s simple to grade a basic pattern like this up or down a size, and today I’m going to show you how.
You will need:
- the Sayward Raglan pattern (although the same approach could be used on the Comox trunks, free Arrowsmith undershirt, or any other simple knit pattern)
- a clear quilting ruler
- marker or pencil

Let’s start grading!
There are many ways to grade up a pattern. For a simple knit pattern like the Sayward, I’m going to show you a straightforward method that will give a good result going up or down 1 or 2 sizes without too much fuss. If you want a more precise method for more complex patterns, I recommend this Craftsy class!
Step 1: Measurements!
Take measurements, and compare them to the size chart. The key thing here is to look at how many inches you’ll want to add or subtract to make the pattern fit!

In this case, I want the chest and shoulders to be about one size bigger, which means I’ll want to make the sleeves one size bigger too so that the seams match up nicely. In the waist and hip, I need to add an average of 6″ of ease. If I was adding that much to a children’s pattern, I would worry about distorting the proportions, but on a shirt for a big guy, it won’t be a problem.
At this point, you’ll also want to pay attention to height, and any fit preferences like extra length, shorter sleeves, etc.

Step 2: Grading up or down a size!
It’s time to lay out your pattern and start adjusting! The process is the same if you are grading up or down.
Essentially, we are going to continue the grading rule for the existing sizes to create a smaller or larger size. The way the existing sizes are nested will be our guide for how much to add or subtract!

In red, I’m grading the shoulders and sleeves up one size. I look at the distance between size 3x and 4x, and draw a new line the same distance out to create a 5x. In blue, I’m grading down to an XXS.
The process is the same for the front, back, and neckband. Pay attention to when the nested pattern lines get closer together or further apart along a curve!

3. Adding or Subtracting Ease
If one part of the shirt needs more or less ease, like the arms or torso, you may want to do more than just grade up or down the existing proportions.
For example, I only needed to grade the top part of the shirt up 1 size, but I want to add about 6″ of width from the underarm down. That means I need to add about 1 1/2″ to the front and back side seams.
To add ease, I straightened out the side seam, and simple drew a straight line down from the underarm to add more width. You could do the same in reverse to make the shirt slimmer.

(Side note: As a plus-size women, I often make similar adjustments for my pear-shaped figure. I might add a wedge to the side seam or centre front/back which results in a fun, swingy shape. For a traditionally masculine fit though, I chose to keep the side seams in this shirt straight and vertical. In sewing there are so many ways to approach each adjustment, so just keep the wearer’s preferences in mind!)
This is the point to adjust things like height, sleeve length, or neckline! For my version, I’m going to add 3″ in length and 2″ to the sleeve length because my husband prefers that look.

4. True the Seams
The final step whenever you adjust a pattern is to cut it out and make sure that all the seams still match up nicely.

Compare the front and back to each other to make sure the shoulders, side seam and length are identical on both pattern pieces. This is basically your chance to catch any errors, like adding more to the front than the back! Lay the curved raglan seam over the front and back pieces and “walk” them together to make sure the seam lines match. (Remember that the seam allowance is 5/8″, so that is where the length needs to match!)
I added a 1/2″ wedge to the sleeve side seams to help balance the extra width I added to the torso of the shirt, and I’ll ease any extra width as I sew. With a knit pattern, a few millimetres here or there won’t matter!
5. Sew!
If you have made significant changes to the pattern, it is always a good ideas to sew a quick trial version in cheep fabric. I made my tester version in slightly-sheer turquoise crinkle knit, which you can imagine was quite a look! Once you know your adjustments are right, then sew it up in nice fabric.
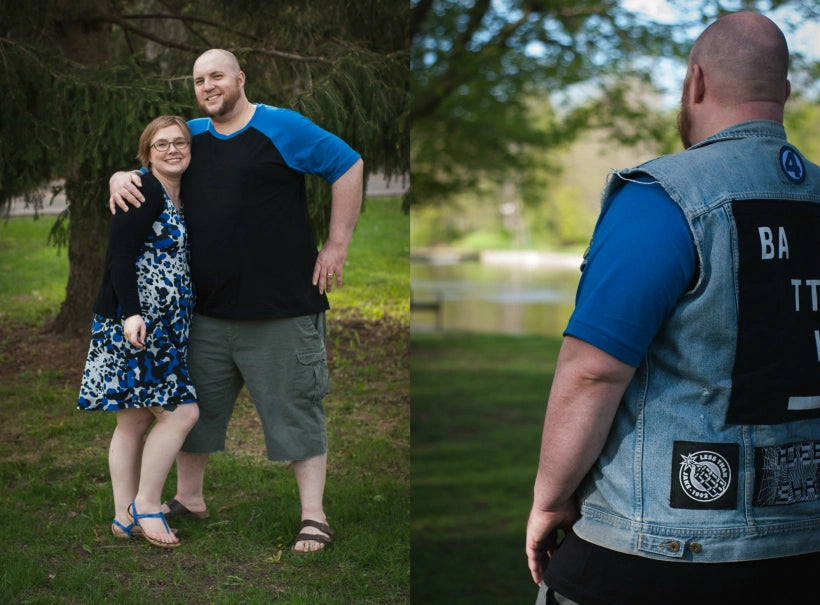
Here’s the finished Sayward Raglan!

We are both really happy with it! Raglan sleeves are new for him, but I think they look great. He likes the neckline and length, but wants another inch on the sleeves next time. I’m pleased with the fit in the torso – not too tight, but also not too baggy.

The great thing about a basic tee like this is you can perfect that pattern to reflect the wearer’s preferred fit and style. Jamie is an avid Fantastic Four fan (that’s an FF tattoo on his arm, and on my leg too), so he chose the team colours of royal blue and black. The fabric is a 95% cotton/5% spandex blend, which was a pleasure to sew!
And here’s how he’ll often wear it – layered with his “battle vest” covered in the nerdiest patches and pins!
So there you have it – the Sayward Raglan graded out to a 5x, and tailored to the wearer’s taste!
Once you’ve used this method a few times, you may find you don’t need to use a ruler and draw out your adjustments. I tend to grade up or down on the fly as I cut the paper pattern, or as I’m cutting out fabric. It just depends on your comfort level with grading and sewing knits!
Do you grade patterns up or down for yourself or others? It’s a useful skill for getting the most out of patterns, either as children grow, or to make one pattern work for many different figures! I’d love to hear how you approach grading, or if this tutorial works for you!
Coming up later today, we will actually sew the Sayward…perhaps the quickest part of this sew-along! See you later!