Jutland Sew-Along: Extra - Adding a Gusset and Removable Knee Pads
Today we’re going to talk about creating removable knee pads and we will be adding a gusset to the Jutland Pants! I’m adding both of these features to the heavy work pants I’m making for my Uncle. My inspiration is the brand of pants my Uncle likes to wear (Kühl) which always include a gusset.
Creating Removable Knee Pads
Let’s start with the easiest job today – I’ll show you how I’ve altered the knee patches to create pockets for knee pads! You can use these to insert store-bought knee pads or you can simply add some padding of your choice. I bought some foam alternative from my local fabric store which is really just a lofty synthetic batting. I cut two rectangles the size of the knee patch minus seam allowances.

To make the knee patches into pockets I bound the top edge and then pressed it under 5/8″. If your fabric isn’t overly bulky you could fold the raw edge under instead of binding it. I avoided this because I didn’t want to add that much bulk to my side and inseams. I finished this edge by top stitching and edge stitching along the fold.


Next, I added the velcro to the top edge of the knee patch and stitched it in place using a rectangular stitch pattern as pictured above.

I folded under the bottom edge of the knee patch and pressed as directed in the instructions. I Placed the knee patch on the pant leg so that the finished edges matched the provided notches. I marked where matching velcro needed to be added to the pant leg and removed the knee patch. I stitched the velcro on to the pant leg.
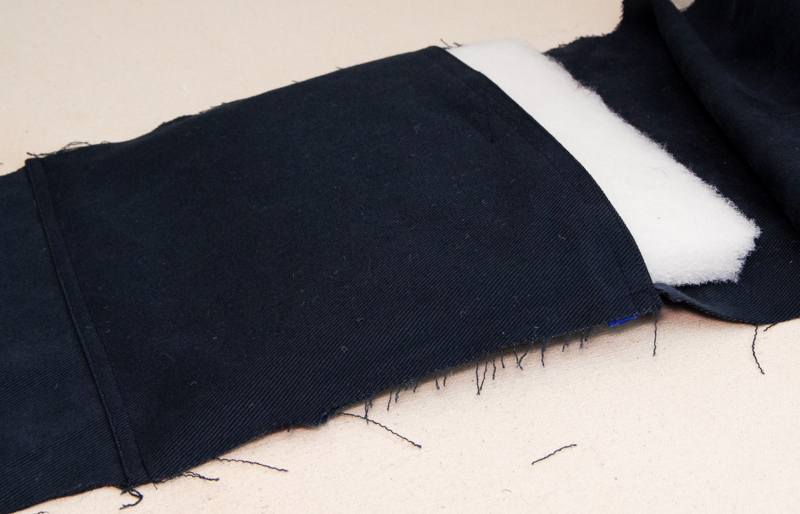
To finish my knee pad pocket, I pinned the knee patch back in place and basted within the seam allowances along the side seam and inseam. I top stitched and edge stitched along the bottom horizontal edge.
Remember to leave the top edge free of stitching! You now have a pocket to which knee pads may be added and removed while the pants are worn or washed.
That was a pretty easy way to warm up…so now lets move on to a little pattern drafting! Let’s create a gusset:
What is a gusset?
Let’s talk a little about what a gusset is and what purpose it serves. A gusset is a diamond or triangular piece of fabric that is inserted into a garment. This piece of material can be added for several entirely different reasons:

(Photo of underarm gusset from blog Reves Mecanique)
- To add room and flexibility: A gusset can be added to the underarm of a tight woven dress as in the tutorial on Gertie’s Blog For Better Sewing or to the crotch of jeans such as the famous “Chuck Norris Jeans” to add width without loosing structure and a close fit.

(Photo of advert from Chris’s Invincible Super-Blog)
- To prevent seam allowances from creating bulk: A gusset can be used to prevent many seams from meeting in one area. Lulu Lemon’s ABC (anti ball crushing) Pants, designed to be all-purpose trousers for active men, use a gusset to prevent the Centre Back, Centre Front, and both inseams from meeting at one point. When a person is crouched or sitting smooth fabric will press against them rather than a big mash of seams. You can see a review of the pants complete with a look at the shape of the gusset in this YouTube video.

- To add strength: A gusset is a good way to add strength at high stress points. The diamond or triangular shape disperses the stress to it’s various points rather than allowing the stress to concentrate at the one area where all the seams join. The All American Clothing Company provides two photos and a description explaining how the stress is dispersed when sitting.
- To save fabric: The use of gussets on plus size pants is quite common as a fabric saving measure during manufacturing. Adding a gusset, as you will see in the tutorial below, causes the crotch curve on the pants Front and Back pieces to be considerably reduced. This makes them far easier to place side by side on fabric as they are much more rectangular in shape and narrower than classic pants pattern pieces.
How to Draft a Gusset
For my Uncle’s pants, I decided to create a gusset that does not add a lot of extra room in the crotch since this was not necessary for the pants to fit him well. I mostly just want to disperse stress and add a little bit of flexibility. Since this is the case, it was necessary for me to remove fabric from the pants Front and Back before adding it by sewing in a gusset.

Since the Jutland Pants include seam allowance, it is a good idea to mark all the seam lines on the pattern before beginning any pattern alterations. When altering the pattern, only work on the actual pattern and don’t work within the seam allowances.
- Once all seam allowances are marked, draw in the desired shape and size of your gusset. My shape is indicated by the orange shading. I created a gusset that was 4″ along the inseam and then is larger in the back of the pants than the front. I made mine small enough (I hope!) that it won’t be visible when the pants are worn because the entire gusset will be hidden in the crotch.
- Now that the actual gusset area is marked, you need to add new seam allowances to the pants before cutting the gusset area off of the pattern pieces. You can see the new seam allowances indicated with black lines. Remember, they are being added to the pants pattern so they will cut into the gusset shape that you just drew. I connected this new seam allowance with the existing inseam seam allowance and the crotch curve seam allowance.
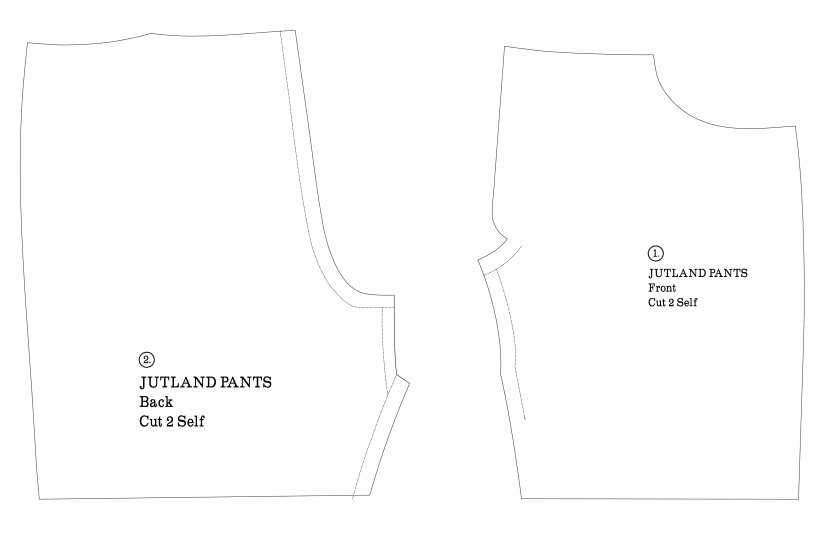
- Trace the two gusset pattern pieces onto new paper (using tracing paper or by holding the pattern piece up to a window and tracing with regular paper on top of it). Remember that the gusset shape is the orange shaded area.
- Once your gusset pattern pieces are recorded (NOT before!) you are ready to cut into the Jutland Pants Front and Back. Cut along the new seam allowances that you created. Your Pants Front and Back pieces are now complete.

- Above is a diagram explaining how the gusset elements that you traced onto new paper merge to become the actual pattern piece. You will see that the shapes don’t fit together perfectly to create a diamond (the skinny slivers have a gap in the centre as you can see in diagram one). This is okay – by adjusting the shape slightly you will be adding a little more room and thus flexibility into your pants. You can either trace around the rough diamond shape to create a pointed diamond or you can round the corners as I have for what I hope will be a more pleasing gusset shape reminiscent of the Lulu Lemon ABC gusset. If you would like to cut your gusset on the fold, you can do so (as in diagram 3) because it is symmetrical! Oh…and don’t forget to add seam allowances to your gusset pattern piece!
I will be covering how to add the gusset into the Jutland Pants on Friday when I show you how to sew the Fly and Waistband (that’ll be a big post!). This is because it is easiest to change the order of construction when adding a gusset. In the Jutland instructions the fly is constructed near the end of the pants sewing process (so you can work up the confidence for that step!) but, for my Uncle’s pair of pants with a gusset, I will construct the fly and crotch seam first, add in the gusset and then sew the side and inseams.
In the meantime, come back tomorrow for a free pocket embroidery template and a screwdriver pocket template!