Morden Work Pants Sew-along: Day 9 - Waistband, Belt Loops, Hardware, Hem
Let's finish up these work pants!
I'll be sewing the belt loops today as I didn't do this at the beginning of the sewing process as is detailed in the instruction booklet. You've probably finished yours already!
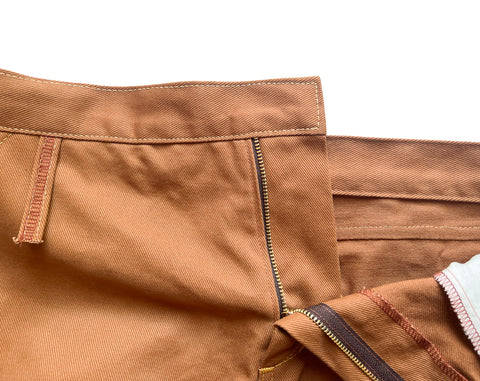
Both variations of the Morden Work Pants have different numbers of belt loops. Variation 1 has seven belt loops for extra support for holding a work belt or an extra carabiner. Variation 2 has five belt loops, for a more traditional and casual look.
(Left: Belt loop, Right: Hammer Loop V1)

BELT LOOPS
To make the belt loops, first, you will finish one long strip of fabric. Serge or zigzag the long raw edges of the belt loop piece. Fold the edges to the wrong side of the fabric in a tri-fold, overlapping the finished edges. Using topstitching thread, edgestitch along both folded edges.
HAMMER LOOP
You can assemble the hammer loop the same way as the belt loops. If you do not want any finished edges to show on the hammer loop, you can fold each finished edge to meet in the center. Then fold it in half, matching the two folded edges. Then using topstitching thread, edgestitch on either side of the hammer loop.


Cut the number of belt loops you need for your Variation. Each belt loop should be about 3 1/2" (9 cm) long.

Match the belt loops to the waistline of the pants. With the right sides together, align one short end of each belt loop to the waistline.
VARIATION 1: Match one belt loop to the center back seam, each side seam, and the middle of each back piece.


VARIATION 2: Do not include the two mid-back belt loops.
WAISTBAND
With the right sides together, match the short notched edges of the right and left waistband together. This is the center back. My waistband pieces are angled slightly to be more fitted at the center back.

Press the seam allowances open.

With the wrong sides together, fold the waistband in half matching the long edges.

Unfold the waistband. Fold the long un-notched edge to the wrong side at 5/8" (1.5 cm)

With the right sides together and notches aligned, match the waistband to the waistline. The notches on the waistband should align with the side seams. Make sure you are matching the right waistband to the right front, and the left waistband to the left front. The short edges of the waistband will extend past the center front edges 5/8" (1.5 cm).

Pin. Stitch. Press the waistband up along the seam.

Fold the waistband so that the right sides are together and the long folded edges are aligned. At the center front, stitch the short ends of the waistband together at 5/8" (1.5 cm). Clip the top corner of the seam allowances. If your fabric is bulky you may need to trim and grade the seam allowances.

Turn the waistband right side out. Use a point-turner at the corners. Neatly press the waistband in place.

Pin the inner folded edge of the waistband to the waistline. The folded edge should slightly cover the waistline stitches.

With the pants right side up, use topstitching thread, and edgestitch around all the edges of the waistband. As you're sewing, check and make sure you are catching the folded edge of the waistband underneath. You may need to hammer or use a seam jumper at the center front edges.
Following the instructions on your hardware, install a jeans button on the right waistband, aligned with the zipper.
Make a buttonhole on the left waistband that matches the jeans button.
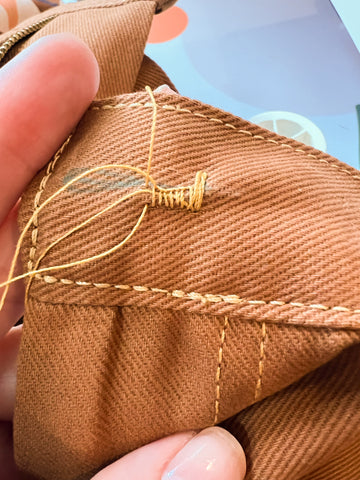
Before you make a buttonhole on your project, make a test one on some scrap fabric. If you are using bulky fabric your machine may get stuck while making a buttonhole. This was happening with my fabric so I did a hand-sewn buttonhole instead. Here is how I did that:
First, mark your buttonhole placement and how big you need the buttonhole to be. Since I am hand-sewing, I decided to make a keyhole buttonhole - which is not a feature my sewing machine can do. The keyhole buttonhole is rounded at the center front edge to make a larger opening to account for a button shank.

I am using the same topstitching thread for the buttonhole. To help keep your thread from knotting as you are sewing, run it through some beeswax or thread conditioner before you start sewing.
Start at the end of your buttonhole marking. First, make some larger backstitches. You can start stitching around the top or bottom but make sure you are stitching from right to left. I started at the bottom. For extra strength, I am including another piece of thread that I will wrap the stitches around. This is sometimes called a gimp thread.
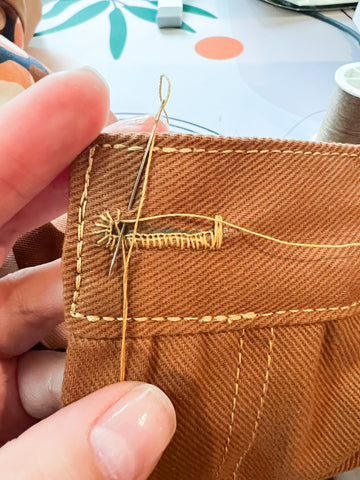
The stitch you want to do is a blanket stitch, with the straight end of the stitch facing the center of the buttonhole.
To do this stitch:
- Bring your needle up through your fabric as shown below.
- Wrap the thread around your needle from right to left.

- Pull the needle all the way through and tighten the stitch. If using a gimp thread make sure it is secured in the stitch.
- Continue all around your buttonhole marking. Your stitches do not need to be very close together, but no farther than 1/8" (3 mm) apart.
Following the manufacturer's instructions, install your jeans button at the marking on the right waistband. Add any remaining hardware you wish to use, such as rivets.
If you are using lighter-weight fabrics (9oz or less) rivets may be too heavy for the fabric and could cause tears over time. Instead, make bar tacks at the areas where you would put a rivet.

FINISH BELT LOOPS
Press the unsewn short edges of each belt loop to the wrong side at 1/4" (6 mm). Fold the belt loops up over the waistband, matching the pressed short edge to the top of the waistband. Press the lower portion of the belt loops so that they lay flat against the pants. Bar tack on each belt loop's top and the lower folded edge to keep them in place.

HEM
Last but not least, hem your pants!
Fold the raw edge of the hem up 7/8" (22 mm) and press. Fold the hem up another 7/8" (22 mm) and press.

Turn the pants wrong side out.
Using topstitching thread, stitch at 3/4" (2 cm) around the leg opening.
You may need to use the seam jumper tool when you get to the inseam. You can also hammer the seam allowance around the leg opening and especially at the inseam to reduce bulk.


You have completed your Morden Work Pants! Share your pants-making journey with us on social media using #mordenworkpants or send us an email! We hope you enjoyed the process!