Belvedere Waistcoat Sew-Along: Day 2 - Fitting
 Today we will be examining the Belvedere size chart and then discussing a few fitting options that you can pursue to create a waistcoat that is beautifully tailored to the wearer's proportions. If you have already looked through the instruction booklet you will notice that I go in to a fair amount of detail about measuring and a few fit adjustments. I have elaborated further on these below and I've also attempted to phrase my instructions differently. I always attempt different phrasing during sew-alongs in case you are finding a step within the pattern instructions difficult to understand...different phrasing may make things click for you!
Step 1: Take Body Measurements
To choose your pattern size, begin by taking accurate measurements of the wearer. Have him put on the shirt and trousers he will most likely wear with his waistcoat. Next, have him stand tall with good posture and a relaxed body (no sucking in the tummy artificially!).
Chest
Circle your tape measure under the arms so that it is around the widest part of the chest. Make sure that it is sitting horizontally. If you notice that the tape measure is sitting under the protruding shoulder blades, it is acceptable to raise the tape measure slightly on the back only so that it is across both the fullest part of the front chest and the fullest part of the shoulder blades.

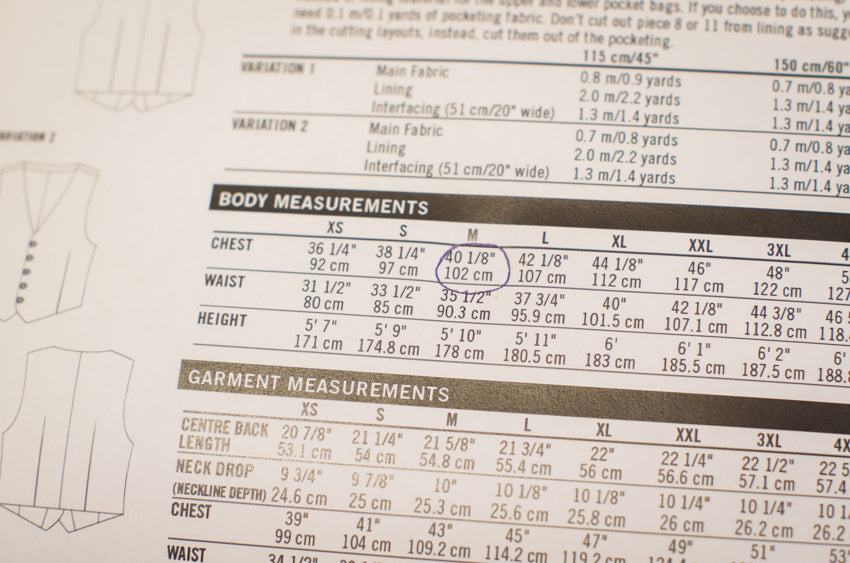
Examine the Body Measurement chart and circle the closest chest measurement. Circle the larger measurement if you are between sizes.
Waist
Now circle the waist with your tape measure in the same manner. It can sometimes be difficult to determine the waist position as it is not always the narrowest point depending on the man's proportions. Measure at approximately navel level.

Circle the waist measurement in the Body Measurement chart. If it falls under a different size than your chest measurement, don't worry, it is easy to use both sizes! This is called "grading between sizes." I have made a tutorial on how to do this (featuring our Jedediah Pants).

If you are intimidated by grading between sizes and would prefer to stick to a single size, it is perfectly okay to do this (as long as your chest and waist measurements are no more than two sizes apart). Just choose the larger size. For example, if the wearer's chest measurement is 40 1/8" and his waist measurement is 33 1/2", cut out the size M pattern. You will be able to adjust your actual waistcoat near the end of the construction process by taking in the side seams if the chest or waist is a bit too roomy. In our example the waist would be too roomy so you would need to take in the side seams.
Height
The Belvedere is drafted proportionately which means that the larger sizes don't only get wider, they also become slightly longer. The heights selected for each size are based on a census of a large number of the German population (where our patternmaking software is developed). How tall is your wearer? Even if the wearer matches the height listed under his size, there is a good chance you will need to adjust the length of the pattern. This is because a properly fitted waistcoat should extend to the bottom of the trouser waistband and the rise of the wearer's trousers might be different than the one we drafted for! Which takes us to our next step...
Step 2: Analyse Garment Measurements
Centre Back Length
The Belvedere has been designed to cover the waistband of dress trousers which traditionally have a high (navel level) rise. We have given the centre back length of the finished waistcoat in the garment measurement chart so that you can compare the pattern length to the length that you need to suit your wearer's trousers. If the waistcoat will be worn with jeans or lower rise trousers, it will need to be lengthened so that it fully covers the waistband. Even if you make no other fit adjustments, I highly recommend performing this simple one so that the wearer can enjoy a waistcoat perfectly tailored to his outfit...this is hard to come by when shopping for ready-made waistcoats! Here is how to check the length of the pattern compared to the wearer's measurements: With the wearer dressed in the trousers he will most often wear with the waistcoat, place the measuring tape so that it extends from the top of the spine (where the base of the shirt collar stand sits) to the bottom of the waistband.

Look at the Centre Back Length in the Garment Measurement Chart. Does the measurement you took differ from the one in the chart? If so, check out our tutorial on adjusting length later in this post!

Neckline Drop
The Neckline Drop is an important measurement if the wearer plans to pair his waistcoat with a suit jacket or blazer. He will likely want the waistcoat to peek out from under the suit jacket along the neckline.

(Image from Articles of Style)
The Belvedere has been drafted to include a moderately cut neckline which looks smart and modern worn without a suit jacket. It would also be a great match for most 1 and 2 button suit jackets.

If the wearer will usually be wearing suit jacket with a high neckline (a 3 button suit jacket for instance), have him put on his suit jacket with it completely buttoned up. Measure from the base of the neck down the centre front.

Does the Belvedere neckline extend below the suit jacket? You will need to raise it so it is at least 2" higher than the suit if you would like it to be visible! We will discuss how to do this during the next post (during which we customise the style of our waistcoats).
Ease
The last two measurements to discuss are the Chest and Waist measurements listed in the Garment Measurement chart above. I have just added these to the chart so that you can determine the amount of ease (room for things like breathing and movement) the wearer will have. As I mentioned earlier, the order of construction I have used for the Belvedere will allow you to play around with ease when you are very close to being finished the waistcoat! You will be able to try it on the wearer and take in the side seams or let them out slightly (using the large 5/8" seam allowance) to create a close fitting garment that hugs the wearer in a very flattering way.
Step 3: Fit to Unique Proportions
Now that we've determined base measurements, let's talk about fitting the pattern to unique proportions. Male proportions can differ hugely. Our size chart is suited to average to slim men with just a hint of an athletic figure (which means slightly broad shoulders, a narrow to average waist, and average to lanky proportions). If your waistcoat wearer has a full tummy or stocky build you might need to make some adjustments. Here are a few common areas that may need adjustments before you begin to sew! Please comment if I've missed an alteration that you would like me to help you with!
Tall (or average with plans to wear low rise pants)
You will need to lengthen the following pattern pieces: Front, Back, Front Lining, Back Lining, Front Facing. 
Determine how much length you need to add with the following equation: Your Centre Back Length measurement - the Centre Back Length Measurement found within the Garment Measurement chart = Amount you need to add. Cut along each "Lengthen and Shorten Here" line and place the pattern piece over a new piece of paper. Tape the cut pieces to the paper and extend the lines, smoothing a little if necessary. Cut out your newly lengthened pattern piece.

See a more detailed tutorial (using the Jedediah Pants) here!
Stocky/Broad Figure
The Belvedere features some nice details to fit to the body's curves. Even though men generally feature straighter figures then women, most still do feature distinct curves. Stocky body types will have far less pronounced curves than average or athletic bodies. The curved areas include the small of the back and the waist.

If your wearer has a very rectangular or full figure you will probably notice that there is no curve along the small of the back and not much difference between the chest and the waist or hip measurements. You might like to decrease the curves drafted in to the Belvedere so that there is more room for the fullness of your wearer's figure. It is quite easy to do this! Just draw and sew straighter lines for the centre back seam and the darts. Here is an example illustration. You could keep more curve or remove more curve depending on the shape of the wearer's body.

Full Stomach
Waistcoats are notoriously tricky to fit to rounded stomachs because they are already so closely fitted, there is no room for the fabric to blouse over the roundness of the belly. To combat this problem, rotund men (and now all fashion conscious men) have left their bottom button undone for over 100 years. This tradition of leaving the bottom button open (on both suits and waistcoats) is said to have stemmed from the rotund Edward VII's practice. There are several other theories but this is the story most commonly accepted by menswear enthusiasts. The problem of fitting a waistcoat to a round belly is alleviated by adding more room at the waist, be it through leaving a button open or making adjustments to the pattern. Here are two approaches - an easy and a more difficult option:- Sew 5 buttons and leave the 5th open. Use the button layout for Variation 2 which features five functional buttons. If the waistcoat is worn with the 5th button open the wearer is both very stylish and gives themselves more ease in the waist and hips.
- Angle the centre front: If the wearer's belly sits roundly at centre front the waistcoat would look baggy and ill fitted if you added more room at the side seams because you only really need more room at the front. The Body measurements are likely 3 or more sizes apart (for example, the chest measurement is a size S and the waist is a size XL. All other proportions suit size S). Using the size S pattern, cut in to the pattern from the armhole to create a hinge at the dart point. Pivot the centre front so that it angles outward causing the armhole cut to overlap. Angle the centre front until you have added enough room for the size XL waist measurement. Draw in a little bit of extra armhole length at the shoulder seam and side seam to accommodate for the overlap (since the armhole length needs to match the Back side seam). You will notice that the angle of the shoulder seam and neckline also changes; you may need to make an adjustment to both of these so that they are closer to the original angle. Adjust the size of the dart to also be the original size. These adjustments cause all of the extra room to be added as close to the centre front as possible. I would highly recommend sewing up at least one mock up to tweak the fit since this is a large change to the way this waistcoat is shaped.

Very Thin or Very Thick Arms (or average with a style preference)
The shape and depth of a waistcoat armhole can vary greatly based on style preference and also to suit the wearer's proportions. You can raise or lower the armhole if your wearer has thin or thick arms. I drafted the Belvedere to have quite large and deeply curved armholes so that they fit like this:
If you would like to alter this curve, you can do so by drawing a new curve along the Front, Back, Front Lining and Back Lining pattern pieces. Make sure the waistcoat and corresponding lining curves match in length and shape so that they sew together easily. 
Square or Sloped Shoulders, Round or Straight Posture
The shoulder seam of a well fitted waistcoat should sit very flat against the body and should sit along the top of the wearers shoulder. If your wearer has very sloped or square shoulders you may need to adjust the angle of the shoulder seam (on the waistcoat Front, Back, Front Lining, Back Lining, Front Facing and Back Facing). You can add or remove the extra to the underarm to keep the armhole the same size. Here is a diagram to show you the change for square shoulders:
Adjustment for square shoulders.
For sloped shoulders you do not need to make changes to the pattern pieces. You can take in the seam while you are sewing the waistcoat (baste the seam and try it on the wearer). If your wearer has over erect or very rounded posture, you might need to angle the shoulder seam backwards or tilt it forwards. Since the Belvedere includes large 5/8" seam allowances you likely don't need to make adjustments to the pattern and can instead work within the seam allowance by adjusting while you sew. Sew your seam something like this for rounded posture (and the opposite for overly erect posture).

Adjustment for overly erect posture (angle the seam towards the back).
The wearer is a woman!
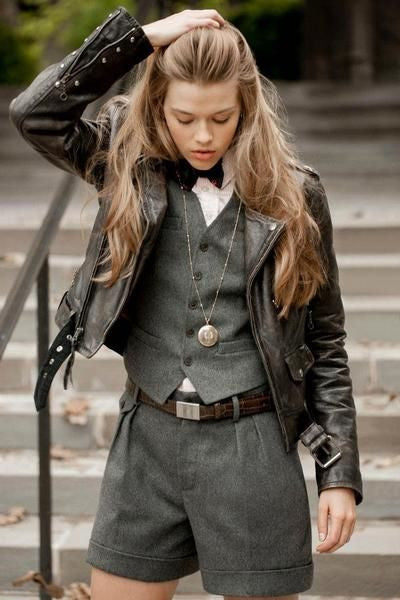
I have already received quite a few requests to draft a Belvedere for women. I don't have any plans to do so at this time but you should give it a try! I'll be sewing one of the sew-along waistcoats for myself so we can see how the ideas I've listed below work out in reality. I've created a Pinterest board featuring some great looks for inspiration too! Here are a few thoughts on adjusting this menswear pattern to suit female curves. Your approach will likely be different depending on the size of the chest in proportion to the waist:
Small Chest: For small chested women only small adjustments may be needed. Choose the waistcoat size based on the woman's chest measurement and then adjust the shoulders, waist and hip by taking them in. Increase the curve of the centre back seam, the size and curve of the darts, and the curve of the side seam to suit the wearer's figure. Since many women have more sloped shoulders and thinner arms than men, it may be necessary to raise the underarms and increase the slope of the shoulders. When sewing the darts it may be necessary to lower the point to make sure that it sits slightly below the bust point.

Don't worry, this isn't as daunting as it looks in the diagram! Just cut out the waistcoat pattern and baste or pin the seams together so you can try it on the woman's body. You can then pinch and sew your changes in a very visual, step-by-step way!

Larger Chest: This is quite a bit trickier and I must emphasise that I have only tried this as a thought experiment (not with a real fit model or mock up). Choose the waistcoat size based on the wearer's chest measurement and grade between sizes to suit the waist measurement. The curve of the bust will cause the armhole to gape so it is necessary to reduce the size of the armhole by adding a dart. Since adding an armhole dart is not often an attractive design feature, it's time to bust out the princess seams! Pinch out the gaping armhole to create a dart. You can cut out a quick mock up and use pins to pinch the dart to suit the wearer exactly. Now extend the darts to meet near (but not directly on) the bust point and curve to create a flattering princess seam. Here is a rough approximation of the curve but you will want to adjust the shape to suit the wearer's figure:

On Wednesday I will have some fun tutorials and pattern downloads ready for you so that you can customise your Belvedere to your heart's content. Stay tuned for patch pockets, a collar tutorial and belt options!
Oh, and if I've overwhelmed you with all of this talk about fitting, please take a deep breath ignore the bulk of this post. Keep in mind that when you shop for clothing at a store you are buying something that has had no fit adjustments to suit the wearer. If you sew up the Belvedere with just one of these fit adjustments (such as adding a bit of length) you will end up with a garment that is better tailored to the wearer than a store bought waistcoat! That's what makes sewing awesome!