

Eager to learn more?
Sift through our pattern hacks, sewing technique tutorals and guest blog posts by selecting from the filter below-left.
Tutorials
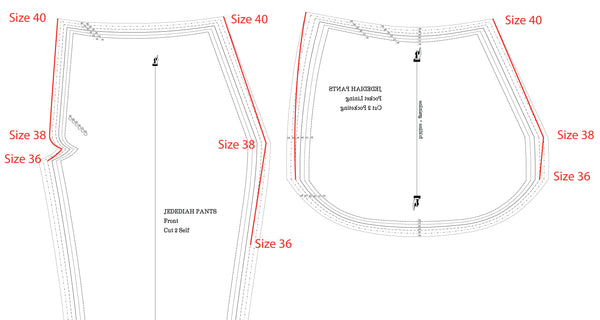
Grading between sizes for the Jedediah Pants
In the images below I've shown you how to grade between sizes 36 and 40 on the Jedediah Pants. This would be useful if your waist measurement matches our size 40 on the Body Measurement chart while your hips match size 36. The red lines indicate where you should draw new lines using a curved ruler (or eyeballing a smooth curve). After drawing these lines you can cut out the pattern using the size 40 waistband, the graded lines and then the size 36 legs.

I HIGHLY recommend doing a mock up of the pants if you choose to grade between sizes (or before you start to sew your fashion fabric regardless of if you have adjusted the pattern or not as you may find out that you would like to make some adjustments based on your mock-up!). There are a few potential issues that could be created by grading the pants. Here are some that I anticipate if your grading is quite extreme and a few suggestions on how to solve them:
1. The front pockets could gape a little too much: If you mock-up the pattern after doing your grading you will see if this is the case. You can remove the excess fabric by creating a deeper seam allowance for the front of the pants at the waist seam and the side seam (flattening the front of the pants onto the pocket lining and facings).
2. The seat seam might not fit as well as it will the way the pattern was originally drafted: Grading between two sizes will change the curve of the seat seam. If you are worried about opening the can of worms that adjusting a pant seat seam can be (ug!) then consider leaving the seat seam as is and only doing minimal grading along the side seams. I know this isn't the correct way to approach things but it is far less intimidating if this is your first time adjusting the fit of a pattern! Only do this if you are grading up or down ONE size (meaning you only need a small adjustment). If you DO need to grade the seat seam, try to keep the shape and length of the new curve as similar as possible to the old curve.
3. The thigh area might become too baggy or too tight: To fix this, you will simply need to extend your grading down the leg further so that the shift between sizes is more gradual. At the tight or baggy point, make sure to keep your graded line closest to the larger or smaller size accordingly.
But don't let this overwhelm you! Just purchase some cheap fabric to sew a mock-up (an old bedsheet for instance), and see how the trousers look before cutting in to your final fabric.