Belvedere Waistcoat Sew-Along: Day 8 - Welt Pockets (or add alternative patch pockets)
Today we add the welt pockets to our waistcoat fronts or, if you are sewing variation 2 with no packets, you can sit back and relax! At the end of this post I will show you how to create the rounded corner patch pocket that I created as a free pattern download to add on to the Belvedere. There are two patch pocket shapes available in the download and they feature the same construction methods.
If you have been attempting to follow along with the sew-along schedule, I apologise for the adjustments I have been making to it over the last two weeks! I had been trying to adjust by one day maximum so you wouldn’t be left twiddling your thumbs while you waited for me but I simply couldn’t fit everything in last week and had to delay Friday’s post until today. I hope this didn’t upset your plans for the weekend! On the bright side, delaying the sew-along allowed me to complete brand new samples for the entire Parkland Collection of patterns! We had a wonderful photoshoot on Sunday with my parents and grandparents so there will be some fresh garments and photos for you to view on our website once Matt has finished editing them!
Ok, let’s move on to our welt pockets:

We will be using the templates, the welts, pocket facings and pocket bags.

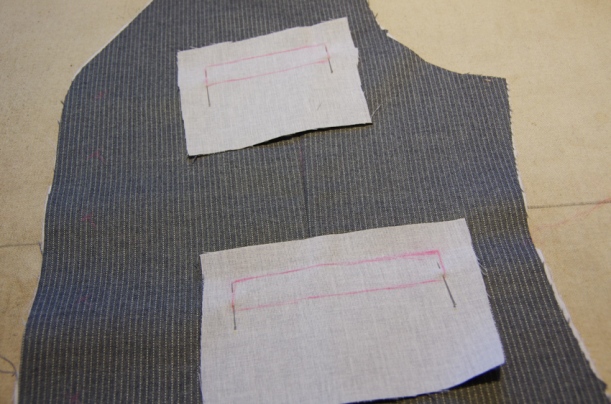
During an earlier sew-along post we marked our welt placement on the waistcoat fronts. You might need to refresh your chalk lines if they became worn while you sewed the darts – do so by placing the templates on the right side of your waistcoat front and tracing around them.

Cut open the window in the welt pattern piece (just cut the paper, do not cut your fabric pieces!). This will allow you to trace the welt outline on to the wrong side of the welt fabric.

Place the welt and waistcoat front with right sides together. Align your markings by poking through your welt fabric with pins at each corner and/or lift up the welt edges to peek at the markings below:

If you are attempting to pattern match stripes, it is important to be very finicky with your welt placement. I’ve always been quite terrible at matching stripes but this is how I try to do so:

I pin my piece in place and fold down the fabric along the seamline to see if the stripes continue along the seam without breaking…of course, it is necessary to stitch very accurately to ensure this remains the case!
Now that your welt pieces are pinned to the waistcoat front, prepare your sewing machine by reducing the stitch length so that it is quite short. This short stitch length will slow you down to ensure that you stitch accurately and it will also make your pocket corners stronger.

Stitch along the two long sides of the welt rectangle. Try your best to begin and end your stitching exactly at the rectangle corners. If you stop to early or extend your stitching too far your finished welt may pucker or refuse to sit squarely later on.


After stitching I like to do some preemptive pressing to make things easier on myself later on. The more pressing you do at this point, the easier it will be to press the welt in to shape later. Begin by pressing the top of the welt down:

And then press the bottom of the welt up:

Now comes the slightly intimidating part…it is time to cut through all layers of your fabric to create windows in your waistcoat front!

Cut through the middle of the welt by poking your holes through the center and snipping towards either edge. Stop about 1/2″ before the end of the welt and snip two diagonal lines to create a “Y”. Cut very precisely so that the points of the “Y” end exactly at each backstitch. Again, precision here will lead to a nicely shaped welt without any puckering.
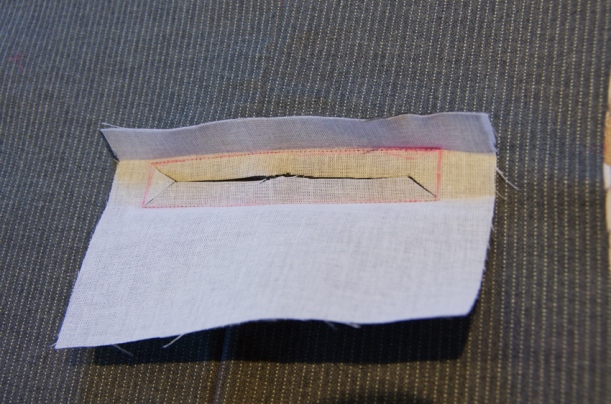
Now that the welt window has been opened, it is possible to push the welt fabric through your slice so that it is on the wrong side of the waistcoat front:


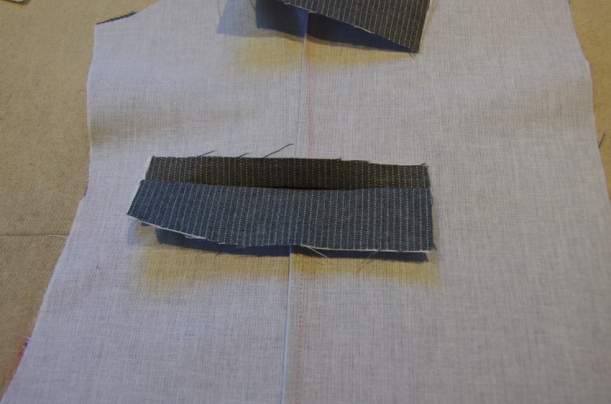
Flip your waistcoat front to the wrong side so that you are once again looking at your welt:

It’s time to do some more pressing! Can you tell how important pressing is to create a professional looking welt? It is essential!
 Underneath the lower part of your welt you will see two seam allowances. Press these open.

This helps to reduce bulk and allow the bottom of the welt to appear crisp.

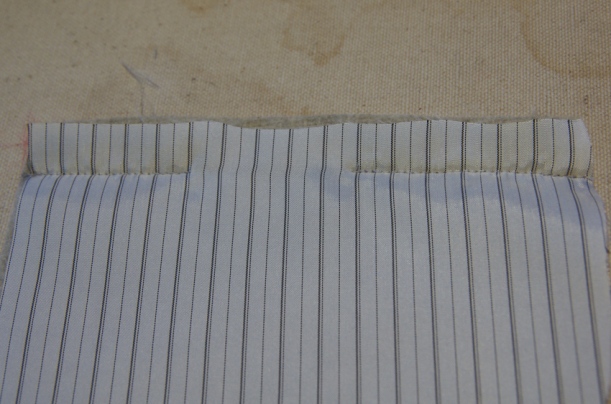
Press the top and the two narrow sides of the welt along the seamline but do not press the bottom any more.

At this point you will have a crisp open window on your waistcoat front. We are now ready to fill it with the welt!

Fold the bottom of the welt upward to cover the open window and then fold downward again so that the raw edge is once again pointing towards the waistcoat hem:

Press the welt so that the fold sits evenly along the top of the window:
From the right side of the waistcoat your welt will appeal almost finished!

To secure the sides of the welt, fold back the waistcoat front to reveal the welt seam allowance and a tiny triangle of fabric that you created when you cut the “Y” earlier.

Stitch through the triangle and seam allowances:

Repeat this step for the other side of the welt.

When stitching these triangles in place it is important to ensure they are pulled taught but do not pull too hard. As you can see on my chest pocket, I pulled the triangle too far to the left which caused the grainline of my welt to become slightly skewed. The stripes are perfectly pattern matched along the bottom of the pocket but then they are pulled to the left near the top of the pocket…woops!

Now that the welt is complete (congratulations!), it is time to attach the pocket bag. Place the pocket bag on top of the welt with the right side of the pocket bag facing the wrong side of the waistcoat. The bag should be upside down so that the straight edge is lined up with the bottom of the welt.

Stitch the pocket bag to the bottom of the welt – I like to place the waistcoat on my sewing machine with the right side up and the front folded out of the way so that the welt seam allowance is visible.

Press the pocket bag down so that it sits in its final position:

Lay the pocket facings on top of the pocket bags and pin them to the welt and pocket bag seam allowances (don’t catch the waistcoat front with your pins).

Stitch around the sides and bottom of the pocket facing using a 5/8″ seam allowance (you do not need to be precise with your seam allowance here, as long as you are closing up the sides and bottom of the pocket so that your phone and change can’t fall out!).

The top of the pocket bag is still completely open. To close this up, lay your waistcoat with the right side facing you and fold the waistcoat down out of the way. This will expose the welt seam allowance and the top of the pocket bag:

Stitch through all layers (but not the waistcoat front):

You are left with a fully closed pocket bags and three finished welt pockets!

Give them one more press from the right side of the waistcoat front to make them appear as flat and crisp as possible. And now give yourself a pat on the back!
If you would like to add our free patch pocket pieces to your waistcoat front for a more casual look, here is how to do so:

Place your pockets and linings with right sides together. Pin across the top of the pocket and stitch using a 5/8″ seam allowance. Leave a gap in the middle (backstitch either side of this gap), so that you can use it to flip the pocket right side out later.

Pull the pocket lining downward so that it is even with the bottom of the pocket. Press along the notched fold line at the top of the pocket.

Stitch around the sides and bottom of the pocket using a 5/8″ seam allowance:

Clip triangles out of the seam allowances along the curved bottom corners.

If you are working with fairly thick fabric, thoroughly trim all seam allowances to reduce bulk as much as possible.

Flip the pockets right side out through the hole that you left in the lining. Press the pockets thoroughly.
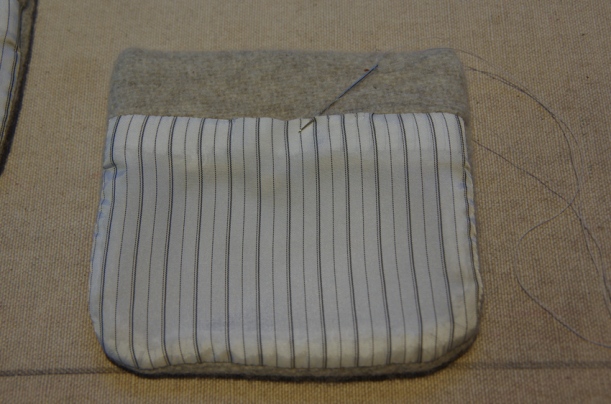
Handstitch the hole in the lining closed.

Determine the position of your patch pockets by using the welt pocket markings as a guide. I like to hold the waistcoat front up to the wearer and pick a position that suits the wearer best. Keep in mind that your pockets will look best if the grainline matches the waistcoat front – this means that the front edge of the pocket should be parallel to the waistcoat centre front.

Stitch the pockets in place using topstitching or you can opt to invisibly handstitch them from a clean and minimalist look.
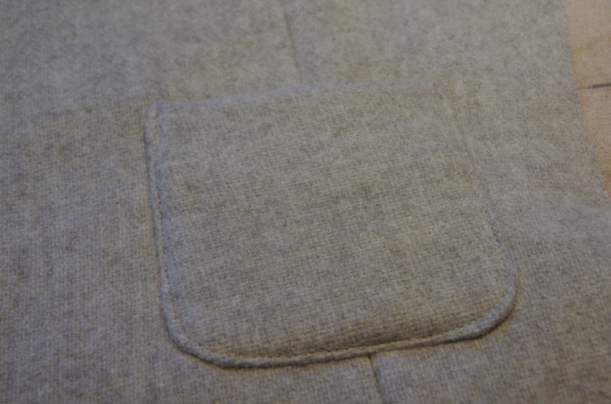
It’s as easy as that!
During our next post we will be finishing the waistcoat fronts by attaching the lining. I find that to be a very satisfying step so I’m looking forward to it!