How to sew on a Button

When I first started sewing I didn’t own too much in the way of sewing manuals and, anyways, they may not have helped me much even if I had them because I am more of a ‘try and try again’ style learner and probably wouldn’t have referred to them as I bumbled along the learning curve to becoming a proficient sewer!
When I began my first semester of fashion design school after spending several years avidly sewing my own clothing, I was very eager to learn the ‘proper’ way to do things thinking that I likely did them all wrong. As it turns out, I’ve since come to the opinion that often the ‘proper’ way of doing something when sewing is the way that works best for the circumstance.
In the case of sewing on buttons, for instance, the ‘proper’ way of attaching them is in any manner that results in a fastener that is strong, will not fall off over time, is easy to use and looks very nice.
So I’ll show you the way that I sew on a button and you can give it a try; if it fills all of the above criteria, then it is the ‘proper’ way for you!

And while I’m at it, I thought I should use some of the Merchant & Mills tools we have in our store so that you can see what is within the beautiful packaging. To sew on this button I’ll be using the measuring tape, the wide bow scissors, ahand sewing needle, a glass headed pin, and most importantly, tailor’s beeswax.

And I’m sewing the button to this pair of linen shorts that I just made for Matt.

The linen is courtesy of the Fabrics-store which is an online shop that specializes in the most lovely of linens. Both linens that I used (for the self fabric and the contrast waistband and fly shield are yarn-dyed. I think yarn dyed fabric has such beautiful depth to it and is so appealingly rustic. Check out the Fabrics-store’s gorgeous selection – it was lucky that Matt was around to pick the fabric because I was totally unable to pick a favorite (they’re all favorites!).

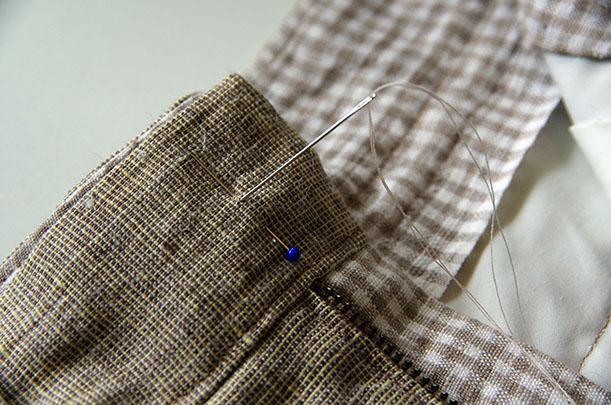
Okay, now lets move on to sewing on the button! First off, I like to determine the perfect button placement. On trousers, the button should sit directly above the zipper. On these shorts that was one inch in from the edge of the waistband. I also measured the halfway point between the top and bottom edge of the waistband so that the button would be centered.

To prepare my thread, I ran it through the tailor’s beeswax. To do that, just pinch the thread between the wax and your thumb and run it along the edge of the wax. Then repeat the process a second time. Finish the application by quickly rubbing the thread between my fingers to work the wax into it. It only takes a couple seconds and makes a world of difference!
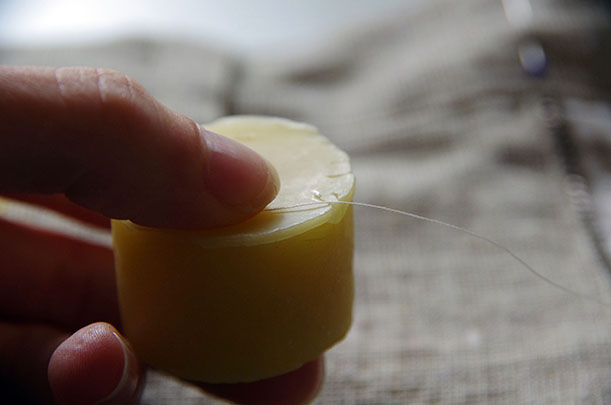
I used to hand sew without preparing my thread, which I now know was a silly thing to do! I was plagued with knots and tangles while carefully sewing hems and my buttons would often (and I mean OFTEN) snap off at the most awkward of times. Beeswax is quick to apply to the thread and helps to make it stronger. It also causes the thread to behave in a completely different manner than un-waxed thread – if it becomes tangled while hand sewing, my exasperating initial reaction of tugging at the knot actually works – the knot doesn’t become tighter, it just magically slips away!
Choose a sewing needle with a long eye – that way you can double up your thread and feed both ends through the eye at once. This may seem an impossible feat (two big fat thread ends through one tiny hole?!) but just give your ends a quick trim and the wax will keep them nice and stiff so you shouldn’t have a problem.

Threading the needle in this manner makes sewing on a button twice as fast…my construction teacher taught me this and I send her a telepathic thank you every time I sew on a button!

Make the thread ends even with the looped end of the thread (so that you will be sewing with four strands of thread) and knot it.

Now this may seem counter-intuitive (at least it initially did to me!): Start sewing on the button from the FRONT of the garment rather than the back. That way the knot is hidden underneath the button.
Once the needle and thread are pulled through to the back, bring the needle through to the front again as close to your original stitch as possible (but not in the same spot or you will simply be undoing your stitch!).

Instead of pulling the threads super tight, leave a gap between the button and the garment like so:

This will later be filled with a shank made out of twisted thread that holds the button away from the garment making it easier to grab and use. If you were sewing on a button with a shank, you wouldn’t have to do this because the shank is already provided!
Repeat this process several times but make sure to leave enough free thread on your needle to create a shank (somewhere in the vicinity of 5″-8″ (12 – 20 cm)).

End with your needle on the right side of the garment and twist the 5-8″ of thread around your stitching (in the space between the button and the garment). Pull tightly to create a solid shank.
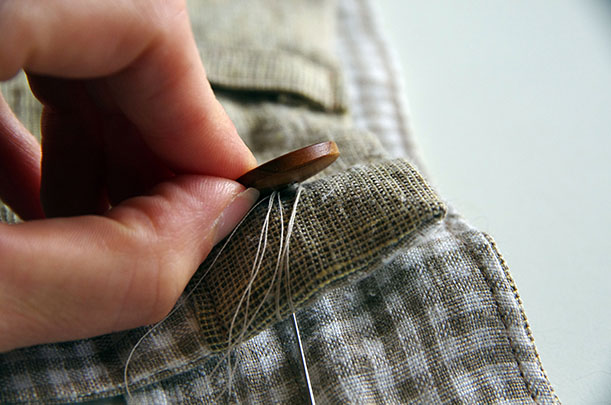
Once your shank has been created, it is time to secure the stitching. To do this, don’t just begin with a granny knot (that’s what I always did and they never held!). Instead, push the needle through the thread shank. It will probably be difficult to do, but you can always push the end of the needle against a hard surface or use a thimble to coax it through.

Now do this again from the opposite direction to lock everything in place.

My teacher said the next step is unnecessary but I can’t help myself – it feels too weird to end a hand-stitching process without tying a knot – so just tie a little knot using the loose ends from when you started stitching and the ends attached to your needle.

Trim off the excess thread and you have a super strong, beautiful and easy to use button!

You can hardly see any thread on the wrong side:
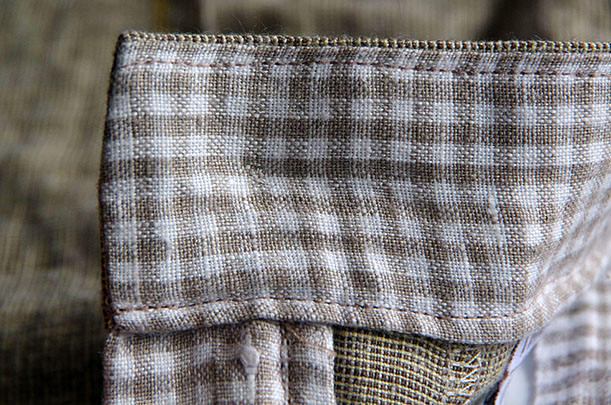
And it is really easy to grab and use:

Is this the process you use to sew on a button? If you do something different, what do you do? I’d love to hear as I imagine there are all sorts of techniques out there with many of them being just as good as what I have come to consider my ‘proper’ way.
Now one more photo of the finished shorts:

I think Matt will be wearing these shorts all summer long (and he reports that the wide legs are perfect for riding his bike to work)!