Comox Trunks Sew-Along: Day 2 - Picking a size and ideas for customizing
Welcome to Day 2 of the Comox Trunks sew-along!
Do you have your fabric picked out? You still have time to pre-wash it as we won’t be cutting out the pieces until Tuesday, April 8th.
Today we are choosing a size and later in the post I will show you some ideas I and a few other sewers have had regarding how to customize your trunks for the perfect fit and style.
First off, when choosing your size, it is important to realize that it is largely the elastic waistband that determines the fit of the trunks. Everyone has slightly different proportions to their waist, hips and butt and they may also have preferences to how tight or loose they like elastic waistbands to be (underwear are a very personal thing!). Also, there are many types of elastic which have different amounts of stretch to them. If the elastic you choose stretches more or less than our sample elastic did, you will end up with a different fit than we did!
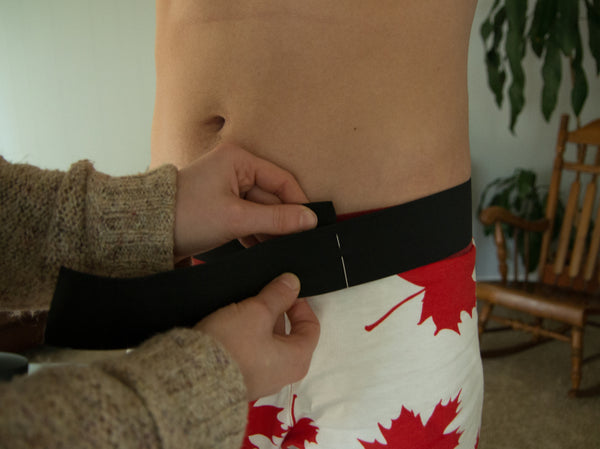
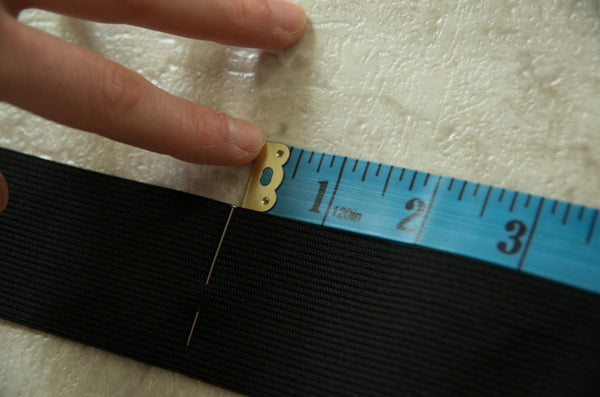
I recommend using our body measurement guide to choose the size for the fabric portion of the trunks as you normally would for a sewing pattern but then wrap the elastic directly around the wearer to choose the length of your elastic. We have provided guideline measurements for the elastic in our “Materials Required” chart in case you prefer to use our estimates (if the trunks are a gift, for example), but otherwise, this is how you figure out how much elastic you will need:
1. Take a length of elastic and wrap it around the wearer’s upper hips (where their boxer elastic normally sits) making sure to wrap it as tight as they would like it to be when they wear the boxers. The elastic should have to stretch very slightly so that their trunks stay up!
2. Mark this length and then add 3/4″ to the length for your seam allowance (two seam allowances of 3/8″).
3. Compare your resulting measurement with our elastic measurements in the “Materials Required” chart. They should match ours or be fairly close. When you sew your trunks, you may have to ease or stretch the top edge of the trunks slightly when attaching them to the waistband. Don’t worry if this results in a few ripples – one the wearer puts them on they will stretch out to perfectly suit their body (due to their custom-fit elastic waistband!).
Now that we’ve determined the amount of elastic we need, here are a couple tips about choosing a size.
1. The trunks are drafted with negative ease. This means they are smaller than the wearer’s body so that they fit like a second skin. For our plus-sizes though (size 39-45) we have graded the pattern differently so that the wearer has more room in their trunks (the grading is larger and the sizes expand wider than the other sizes).
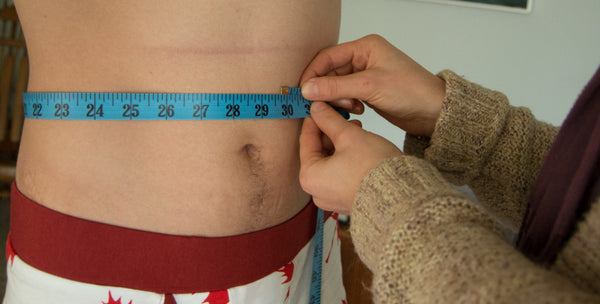
2. Our waist measurements correspond to the wearer’s natural waist. This is approximately at naval level and is NOT where the trunks will end up sitting (those would be some high-rise trunks!).
That’s it! Now lets move on to some ideas for customizing the fit and style. I have four different ideas and would also love to hear your suggestions (leave a comment below with tips and questions!).
Idea #1: Lengthen the legs: Some people may feel a little under-dressed in such tight fitting skimpy little trunks :P That’s an easy fix – simply lengthen the legs for a more conservative pair of shorts! Here is how you do this:
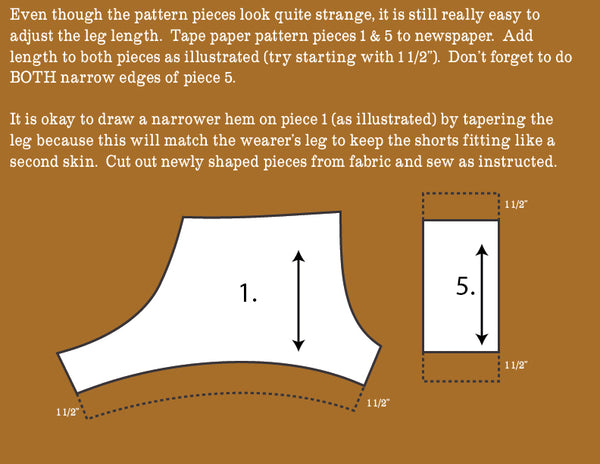
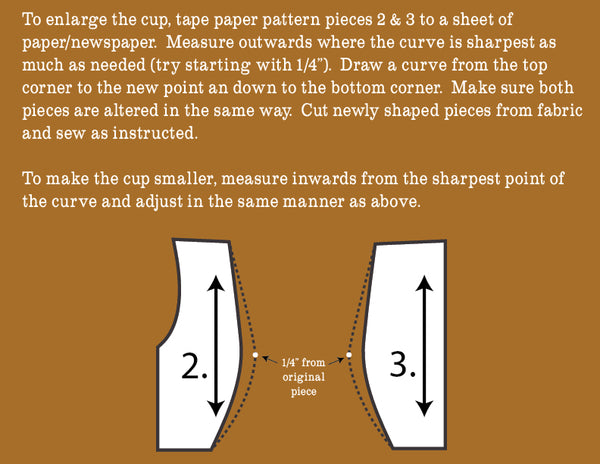
 Idea #2: Enlarge the front cup: Are you sewing for someone who is generously endowed? Our trunks have what I would describe as a “solid medium” size cup. You can very simply enlarge (or decrease) the size of the cup by altering the curve of the front pieces as follows:
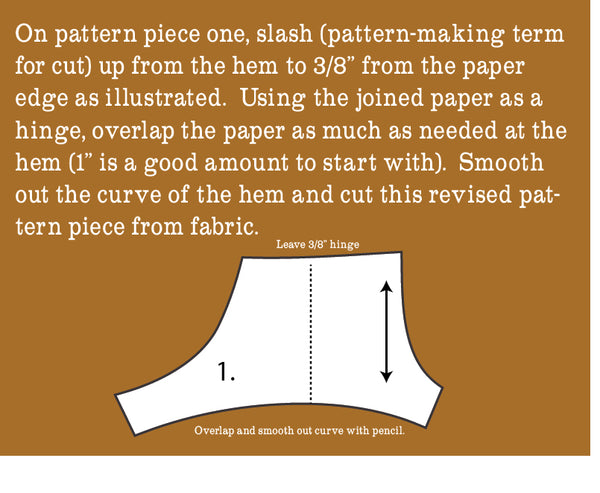
Idea #3: Create narrower legs: Does your wearer have skinny legs? They may be comfortable with the extra room in the legs (after all, no one wants to feel constricted by their undies) but if they would like the second-skin fit that these trunks are designed to have, you can adjust the pattern piece as follows (note that this must be done to the paper pattern rather than the fabric since these trunks don’t have a side seam!):
 Idea #4: Remove the “right exit fly”: This is my favourite idea and is one that has generated some very hilarious discussions at our latest family gathering. I gave my brother-in-law a pair of Comox Trunks for his birthday at a large dinner party. Quickly one of the female dinner guests commented, “Does anyone actually use those tiny little front openings???” I must say that I didn’t really have an answer! We included them as part of the design because they are so commonly found on modern underwear and I didn’t want our design to lack something that ready-to-wear clothing normally has. Fortunately, my brother-in-law had a very confident answer: When in dress uniform/fancy attire (at his job, for example) his shirt has been very carefully ironed and tucked in. In a scenario such as this he, with out a doubt, goes “through the gate.” In casual uniform/regular clothes he is not constricted by his tucked in shirt and most certainly goes “over the fence.” HAHA! As you can imagine, his knowledgeable explanation of the matter, complete with specialized metaphors, gave us quite a laugh :).
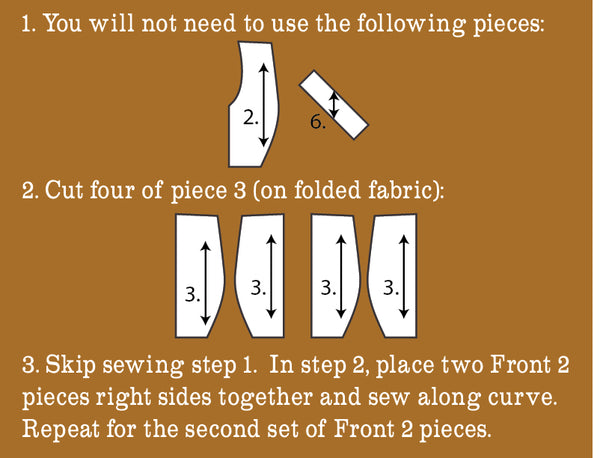
If you see no reason to go “through the gate”, you can save yourself some sewing time by removing the bound entry. Simply adjust the sewing process as follows to create a completely closed front cup (I still recommend keeping it double layered so that the shorts provide nice coverage and are hard-wearing):
Do you have any other ideas to alter the design or fit of the trunks? It’s fun brainstorming these sorts of things for a pattern that isn’t very common. At first examination the design, with it’s unusual seams and close fit, seems quite un-alterable but hopefully you now realize that this is not the case! The Comox Trunks can be altered to create all sorts of menswear underwear styles and can be made to suit the many individual requirements men have for their undies.


