Tailored Peacoat Series: #1
![]()
This week I have a surprise treat for you! A mini sewing series for all you aspiring tailors out there!
This post will be the first of a week long daily series about the Goldstream Peacoat. The Goldstream Peacoat was designed to be the easiest and simplest peacoat possible to sew. The instructions produce a nicely finished coat that is equivalent to those you would find in affordable and good quality ready-to-wear stores. I think that sewers will and do appreciate the simplicity of the pattern. That being said, there is absolutely nothing stopping you from using the Goldstream Peacoat to create a high-end tailored garment that will last the wearer a life time! Indeed, after these seven posts you will be familiar with all the tricks and practices necessary to elevate your peacoat sewing project to a "Tailored" status.
Here is the posting schedule:
I am by no means a skilled and practised tailor. Fortunately, Dana, one of our very skilled pattern testers, is! She has put a huge amount of work into documenting her Goldstream Peacoat sewing process and, you can see by the beautifully crisp results, that all her efforts paid off. I hope that you will be able to benefit from her kind offer to share her knowledge. She has done an excellent job of thoroughly explaining each step she took. Thank you so much for doing this Dana and welcome to the Thread Theory blog!
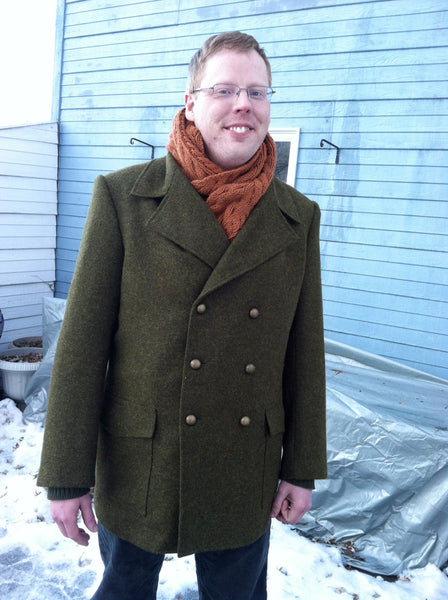
- Dana's beautifully tailored peacoat modelled by Travis.
Now, without further ado, here is Dana with her week long tailoring series:
I’m Dana, and I’ve been doing theatrical costuming for 11 years. I’ve always loved futzy handwork, and tailoring is a great way to indulge in it. The theater I work for has some amazing tailors, and I’ve learned so much about menswear and construction from them. While the patterns we work with are custom drafted, there are lots of tailoring techniques that translate to commercial patterns.
Basic tips to begin creating a tailored Goldstream Peacoat:
Two things you do much more of in tailoring are basting and pressing.
- I baste in white thread or a color that matches my fabric.
- Pressing with lots of steam will help you shape a coat beyond what seams and interfacing could ever do. Since you will use so much heat and steam, it’s important to pre-shrink, or at least steam press, your fabric, lining, and all interfacings and tapes you will use.
Helpful Tailoring Resources and Materials:
I found the wool, lining, and hair canvas at a local fabric store. The buttons are from Mood, and shoulder pads and silk buttonhole twist are from B. Black and Sons. B Black is a fantastic place to get everything you need to make a coat, and their customer service is great.
You’ll also want beeswax so you can wax and press thread for hand-sewing. (If you would like to know more about using beeswax, have a look at this BurdaStyle article.)
The two books I use the most are Classic Tailoring Techniques by Roberto Cabrera and Patricia Flaherty Meyers, and Tailoring Suits the Professional Way by Clarence Poulin. The Poulin book is out of print, but if you can get your hands on a copy it really is a fantastic book.
Pattern Prep and Cutting
-
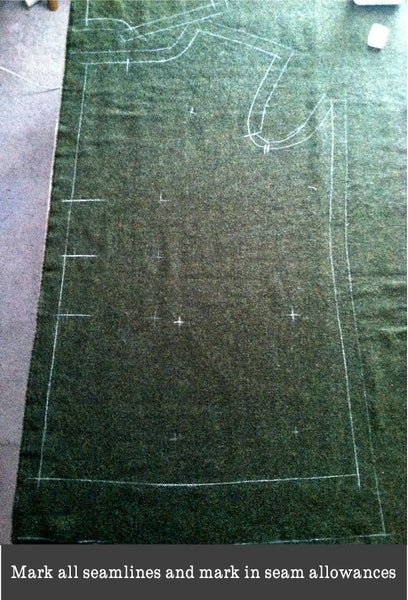
Optional - Adjusting the Seam Allowances: The first thing I did was remark the pattern pieces to have ¼” seam allowance, except at the front edge, neckline, and hems. I cut all the seam allowance off of those. Using ¼” seam allowance is a personal preference, although it really comes in handy when setting sleeves.
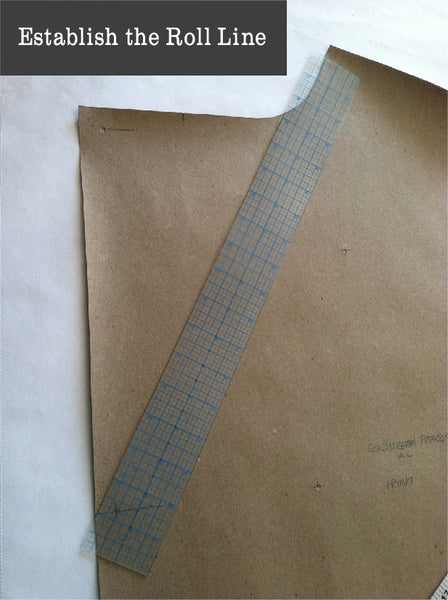
It is very helpful to know where the stitch lines for the front edge, neck, and hems are, though. - Necessary - Finding the Roll Line: You do need to figure out where the roll line is on the coat front (Definition: The roll line is where the collar/lapel folds over on a garment) . The roll line starts at the top button, and is angled towards the neck, coming about 1/2” away from the neck seam line at the shoulder.
The top of the roll line is about 3 ½” from the notch for the end of the collar on a size large.
After I marked my new pattern lines on the fabric, along with all the notches, button placements, etc, I did add seam allowances beyond ¼”, along with 1” on the front and neck, and at least 1½” on the coat and sleeve hems.
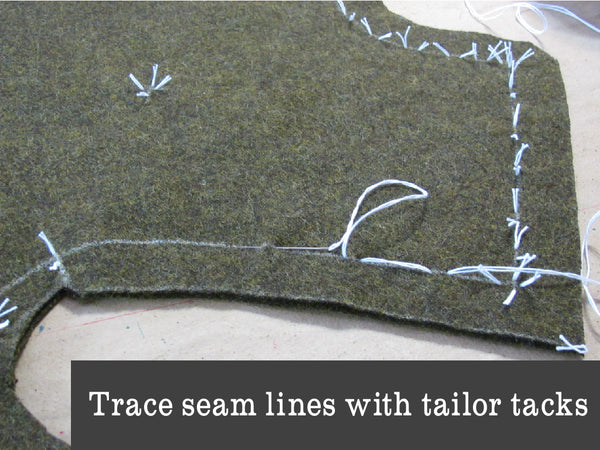
Tailor Tacks (i.e. mark where you will be sewing)
I tailor tacked all the pattern lines (Note: Details on how to make tailor tacks are included in the peacoat instruction booklet); even if you don’t want to make the seam allowance changes I made, I would recommend tailor tacking the front edge, neck edge, hems, and all the notches, button marks, pocket marks, etc. It’s one of the easiest ways to make sure you can see these marks on both sides of the fabric, and if you’re working with thick wool like I am, chalk marks tend to fade pretty quickly. I used crochet cotton for tailor tacking thread because it grabs fabric better than regular thread.
Thanks for this first post, Dana!
That is quite a lot of handwork to keep you busy. Tomorrow we will move on to demonstrating how to adjust the pockets to suit the tailored coat and how to apply horse hair canvas and interfacing.
Are you already learning lots? I know I am!