Jutland Pants Sew-along: Day 3- Assemble Front Legs
We will assemble the front legs in today's portion of the Jutland Pants Sew Along. You will need your front leg pieces, front pocket linings, and facing pieces, and for Variation 2, the front knee patch pieces.
Prepare Front Pieces
We will start by applying interfacing to the wrong side of the left front piece (as if you were wearing them) on the fly extension. Cut a strip of interfacing about 1" to 1.5" (2.5 - 3.8cm) wide and apply it to the wrong side of the fly extension, following the manufacturer's instructions. Trim away the excess interfacing that is not attached to the fabric.


Assemble Front Pockets
Staystitch 5/8" (1.5 cm) from the curved edge around the front pocket facing pieces. These staystitching lines will be helpful when turning the fabric under in later steps. This also gives you a guide on where to clip to.

Clip notches into the seam allowances to the staystitching line. Be very careful not to clip into or past the staystitching lines. Cutting notches into the seam allowances reduces bulk when they are turned under.

Press the seam allowances to the wrong side of the fabric, following the curve of the staystitching lines. Turn the fabric towards the wrong side so you can't see the staystitching lines from the front - or you can remove the stitching if it is still noticeable.

Match the facing pieces to the pocket linings. The wrong side of the pocket facing will match the right side of the pocket lining. Pin in place, aligning the raw edges and ensuring the pocket facing is flat.

Stitch the facing to the pocket lining by edgestitching along the curved edge of the pocket facing.
If you want your stitches to be more visible or pop, use a contrast color or topstitching thread for all visible stitching!

I will now be referring to the "right side of the pocket lining" as the side with the pocket facing attached.
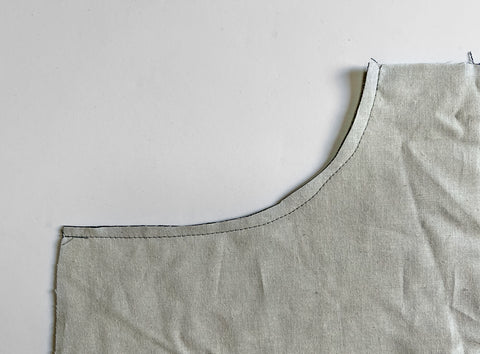
With the right sides together, match one front pocket lining piece to one front leg piece along the curved pocket opening edge. Pin in place, aligning the raw edges.

Stitch together at 5/8" (1.5 cm).

Trim and grade the seam allowances, making the pocket lining seam allowance slightly narrower.
Make small clips into both seam allowances perpendicular to the stitch line. No need to over-clip, clip every 1" (2.5 cm) or so.

Fold the pocket lining away from the stitch line. Understitch along the pocket lining, catching the seam allowances underneath. Understitching helps keep the seam allowances in place while also helping to create a smooth curve when pressing the pocket lining to the wrong side of the front leg.

Turn the pocket lining to the wrong side of the front leg and neatly press the pocket opening. For a professional finish, turn the seam slightly to the wrong side. This will help to prevent the pocket lining from showing from the right side.


To finish the curved pocket edge, topstitch 3/8" (1 cm) away from the curved edge and then edgestitch at 1/8" (3 mm).

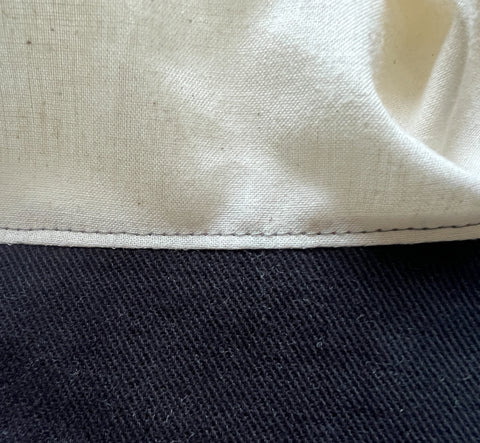
We will now be finishing the pocket lining with a French seam along the bottom of the pocket.
First, fold the pocket along the vertical notches so the wrong sides are together, and the two layers along the curved bottom edge are lined up. Pin.

Stitch from the folded edge to the side seam using a 3/8" (1 cm) seam allowance.

Next, trim both seam allowance edges to be 1/8" (3 mm) wide.

Flip the pocket around so that the right sides are together. Neatly turn the corner and press along the curved seam. Stitch along the curved edge again, using a 1/4" (6 mm) seam allowance to enclose the raw edges. Now you have a tidy French seamed pocket!

Align the top and side edges of the pocket bag and front leg. Baste along the top and side edges to keep the pocket positioned correctly.

Variation 2: Front Knee Patch
Here, I will show you how to add knee patch reinforcement to the front legs. If you would like to create functional knee patches where you can add and remove knee pads, here are two different ways to achieve that! Here is a tutorial on how to make your own knee patches from batting, and here is a tutorial on how to use store-bought knee pads.
Fold under the top and bottom edges of the knee patch pieces at 5/8" (1.5 cm).

Match the wrong side of the knee patch to the right side of the front leg. Align the notches and raw edges along the inseam and side seam. Ensure the knee patch is nice and flat against the front leg and pin in place.

Along the top and bottom edges of the knee patch, edgestitch 1/8" (1 cm) from the folded edge and then topstitch 3/8" (3 mm) from the folded edge through all layers.
Baste along the inseam and side seam edges.
