

Sew-along with us!
Perhaps you'd like some company while you sew? We've sewn up each of our patterns and photographed each step along the way. Find the pattern you're after in the filter drop down below left.
Sew-Alongs

Woodley Tee Sew-a-long Day 2


separating and shifting, zig-zag or serge the edges together. If you do this, you
can also serge or otherwise finish the sleeve opening at this time so you do not
have to worry about finishing this edge once the sleeve cuff has been sewn on.

Press the seam allowances towards the sleeve and the sleeve cuff away from the sleeve. Repeat for the other sleeve cuff and sleeve opening.


OPTION 1: TWIN NEEDLE HEM
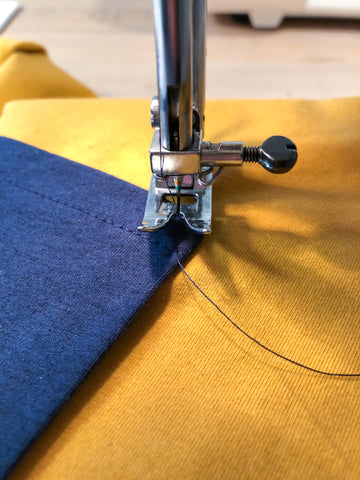
Serge or zig-zag the raw hem edge. Fold the hem up and to the wrong side 3/4" (1.9 cm). Press. With the right side of the shirt facing up, using a twin needle, start at one side seam and stitch around the hem 5/8" (1.6 cm) from the folded edge. Be very careful to let the fabric run easily through your machine with absolutely no pulling or stretching. Press to remove any ripples that might appear.
OPTION 2: FOLDED HEM WITH ZIG-ZAG OR STRETCH STITCH
Fold the raw hem edge under to the wrong side 3/8" (1 cm). Press. Fold to the wrong side again at the hem notch. Press. Pin. Starting at one side seam, with the wrong side of the shirt facing up, use a zigzag or stretch stitch to edgestitch along the top of the folded hem. Be very careful to let the fabric run easily through your machine with absolutely no pulling or stretching. Press to remove any ripples that might appear.
Give your t-shirt a final press and it is ready to wear!
Share your Woodley Tee's with the community on Instagram and Facebook using #woodleytee


Woodley Tee Sew-A-Long Day 1


Woodley Sew-a-long: Getting Started
Today I am going to share some helpful tips and resources to get you set up for success in creating and customizing your Woodley Tee!
To get started, we will:
-Choose which version to make
-Take measurements and determine your size
-Make any fit adjustments to the pattern pieces if needed
-Pick out fabric
-Gather tools and get your work station set up to sew with knits
Choose which version:

The Woodley Tee offers two versions to create. Version one is made from a solid colour with long sleeves and sleeve cuffs. Version two is a colour block t-shirt with short sleeves. Choose which version you would like to make and next we will take measurements!
Take your measurements:

The measurements you will need to determine the best fit for the Woodley Tee are:
1. Bust or Chest circumference
2. Shoulder width
3. Waist circumference
4. Center back length
5. Sleeve inseam
Take these measurements for yourself or for the person you are sewing the Woodley Tee for. Alternatively, you could measure an already made t-shirt that fits you (or the wearer) best and take the same measurements off of that.
Here are some links to similar past sew-a-longs that have more detail on how to take measurements:
- How to measure a man (this is a helpful link for measuring all body types)
- Sayward Raglan Sew-a-long: Choosing a size
- Camas Sew-a-long: Choozing your size and fit
Choose a size:
Refer to the Body Measurement Chart and Finished Garment Chart and compare your measurements. Keep in mind, if you took body measurements to refer to the body measurement chart, and if you measured an already made t-shirt to refer to the finished garment chart.
If your measurements aren't all in one size range, choose a size based off of your shoulder width. It is very simple to adjust the side seam to accommodate the chest/bust and waist circumference of the pattern pieces to match your desired measurements if needed.
Adjust patterns for fit:
As mentioned earlier, for this pattern it is best to pick your size based off of your desired shoulder measurement. I will demonstrate some common adjustments that may need to be made to your pattern for a perfect fit! I will even show you how to adjust the shoulder if that is needed as well.
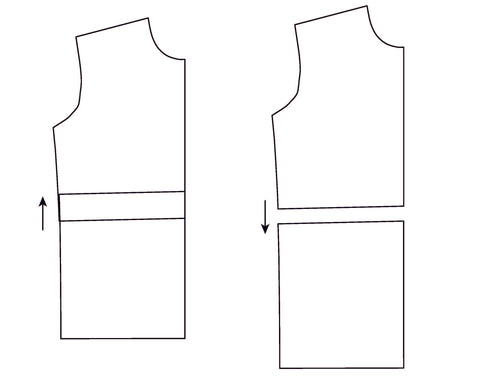
1. Length:
-It is very common for patterns to be adjusted for length! On all of the necessary pattern pieces we have included lengthen and shorten lines that run through the width of the piece. If you need to lengthen or shorten your pattern piece, first determine how much you need to lengthen or shorten. Next, cut your pattern piece along the provided line.

-Spread or overlap the top and bottom pieces at the added or subtracted length measurement. It is best if you trace a new pattern piece so that the center or side lines are blended and smoothed out.
2. Width:
-To add or subtract width from either the body or sleeve, blend in or out at the side seam or underarm seam of the original pattern piece. If widening the sleeve, make sure to also widen the sleeve cuffs so that they fit onto the new sleeve opening.


3. Neck height:
-If your neckline needs to be lowered, mark down from center front or center back how far. Blend from the shoulder seam down to the new neck point, trying as best to keep the same curve shape as the original pattern piece. If your new neckline becomes substantially longer than the original, make sure to add that length to the neckband.


- Easier to sew: More stable knits such as thick t-shirt knits. Interlock or French terry are good examples of stable knits. Cotton blends with 6% or less spandex content are generally easiest to sew.
- More challenging to sew: Very stretchy or thin knits that are prone to curling at their edges. They will still make excellent t-shirts but will be more challenging to sew. Bamboo, cotton or hemp jersey blends, tissue-weight knits, ribbed knits, or athletic materials with a large spandex content are good examples of very stretchy or thin knits.
- Colour block design idea: Use a contrast knit for the front and back top pieces. Consider purchasing two coordinating colours of thread for hemming and topstitching.
- Tip: Use ribbing for the sleeve cuffs and neckband for a more rugged and comfortable fit. Use a contrast colour ribbing for a cool vintage look.
For the Woodley Tee photoshoot garments we sourced knit fabrics from Blackbird Fabrics. For version 1 we used a French Terry knit with color coordinating 2x1 rib knit for the cuffs and neckband. For version 2 samples we used bamboo jersey knit and cotton modal jersey knit.
Get Ready to Sew!
Now that we have most of the important things sorted out, lastly we need to be prepared with proper tools! Here is a link from a previous sew-a-long that explains how to sew with knits and how to set up your machine:
Here are links to some tools in our haberdashery that would be useful for sewing up the Woodley Tee:
- Wooden seam ripper
- Thread Theory Garment Tags
- Sewing Gauge
- Wooden Pin Cushion
- Magnetic Pin Cushion
- Acorn Tape Measure
- Everyday Scissors
- Bell Tape Measure
- Fusible Web
