

Sew-along with us!
Perhaps you'd like some company while you sew? We've sewn up each of our patterns and photographed each step along the way. Find the pattern you're after in the filter drop down below left.


Sew-Alongs
Tailored Peacoat Series: #7
![]()
Today is the last day of the Tailored Peacoat Series! Thanks for following along! Today we are sewing the finishing steps and will have a finished peacoat to present by the end of the post.
Finishing
Topstitch the coat, starting at the edge of the facing along the bottom of the hem, and stopping at the mark for the top buttonhole and roll line. Don’t backstitch, but pull the thread to the back of the coat and tie off. Flip the coat and topstitch from roll line to roll line along the lapels and collar, then flip again and stitch from roll line to the end of the facing. This way, you’re always stitching with the “right” side of the coat facing you.
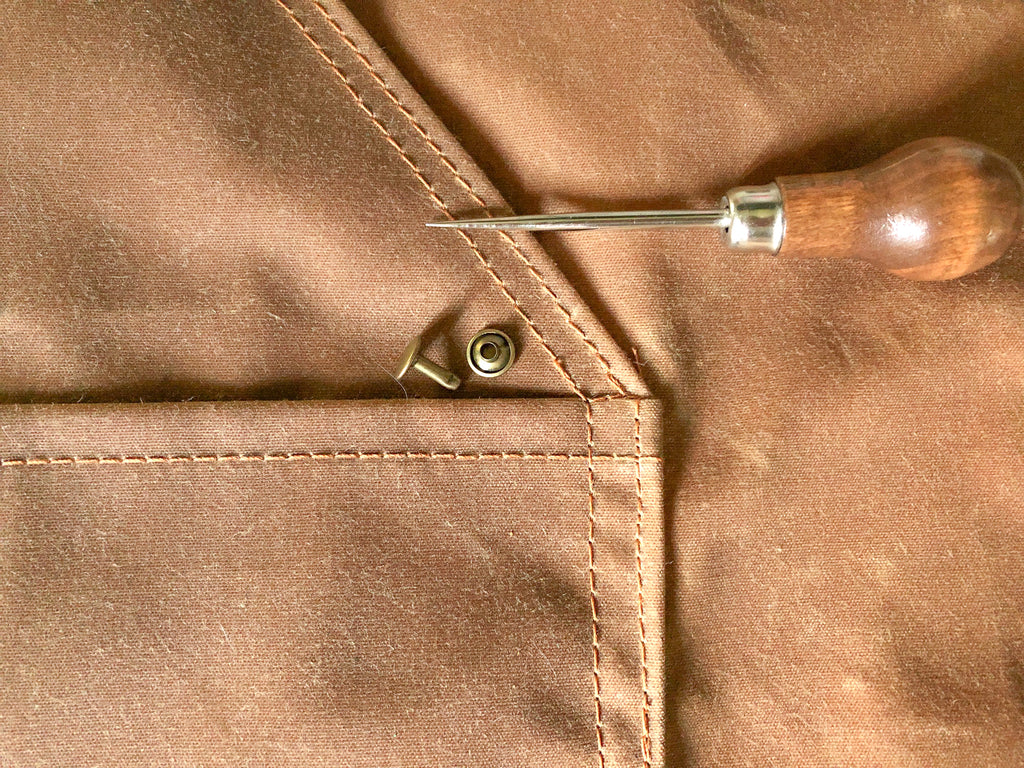
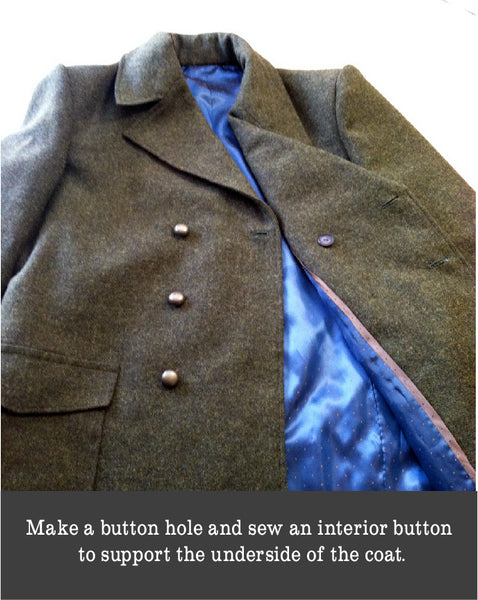
I made buttonholes by hand, and also made a buttonhole on the right side of the coat and sewed a flat button underneath the top decorative button on the left side. This button supports the underside front and keeps the coat hanging nicely. Bonus points if you actually remember to button it when you wear the coat.
Remove all the basting threads and tailor tacks (there are a lot!!!).
Press the coat, working slowly and making sure edges are crisp and seams are flat. Use a clapper to smash out any bulky spots. It can take an hour to properly press a coat.
The finished coat! (Wahoo! What gorgeous results after all of this hard work. Congratulations, Dana!)


Whew, and that's the end! Once again, thank you very much, Dana, for contributing this incredible series - what a resource for everyone planning to sew a Goldstream Peacoat!
As I said in previous posts, I have learned a lot of techniques (and have been reminded of a lot that I had learned in the past but have neglected to do!) during this series. I'm really looking forward to trying out pad stitching and I will certainly be basting A LOT more than I did throughout the last pea coat sewing project! I don't know if I'll have the patience to baste quite as much as Dana did but I really should just slow myself down and force myself to do it. After all, if I am going to put hours and hours of work into sewing a coat for Matt (not to mention all the money for nice wool!), I would like the finished product to look as beautiful and last as long as Dana's coat does and will. Hmmm you just got a glimpse of the boxing match going on in my sewing room: too much excitement to see the finished product vs. the desire to create perfect, quality results.
Now that we are armed with all this knowledge and inspiration, we are completely ready to conquer our fears of tailoring and our habits of sewing only projects that provide immediate results. It's time to begin your big Goldstream Peacoat sewing project! What did you think of this series? Which tips and tricks do you think you will be using?
Tailored Peacoat Series: #6
![]()
Today is the last big sewing day for the Tailored Peacoat Series since tomorrow's post will involve just finishing touches. Get ready to insert your sleeves using a different method than our usual one (no gathering with this one!).
Sewing the Sleeves
I sewed the front seam of the sleeves, then used a strip of bias silk organza as a hem reinforcement, since I don’t have wigan (you can buy this bias cut sewn in interfacing here).
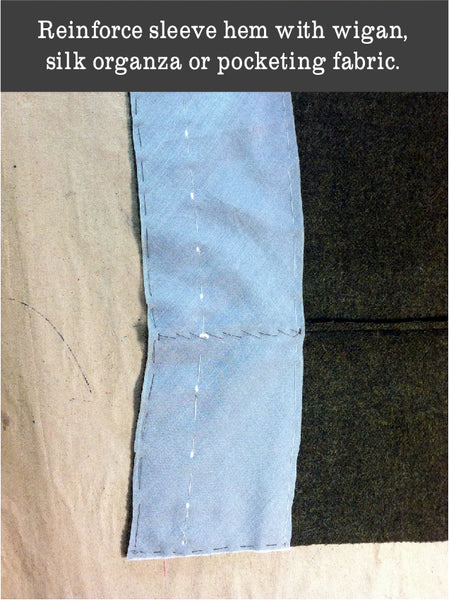
Pocketing might have been a better choice. The sleeve linings were cut with an extra 1 inch of seam allowance at the top of the sleeve (Dana added this extra seam allowance, this is not included as part of the Goldstream Peacoat pattern).
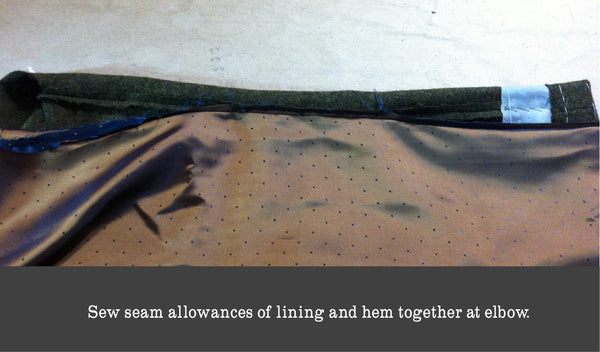
After the sleeves were hemmed and linings assembled, I sewed the seam allowances of the sleeve and lining together for a few inches at the elbow. This keeps the linings from twisting inside the sleeve.
Sew the lining at the hem with an ease pleat, and baste the sleeve and lining together about 3 inches below the top of the sleeve.
Setting in the Sleeves
I was taught to set coat sleeves using a different method than the gather-the-cap method almost every book, pattern, blog, etc, uses. In fact, when I have to gather the sleeve cap (I’m looking at you, 1840’s men’s coats), I usually want to scream/cry/throw things. If that method works for you, great, but I've always had trouble with it.
The sleeves have ¼" seam allowance (The Goldstream Peacoat pattern uses 5/8" seam allowances but Dana has adjusted her pattern to include 1/4"). Mark ¼" seam allowance on the armscye of the coat, either with tailor tacks when you cut the coat, or thread trace it now. Pin the sleeve into the armscye, matching the notches.
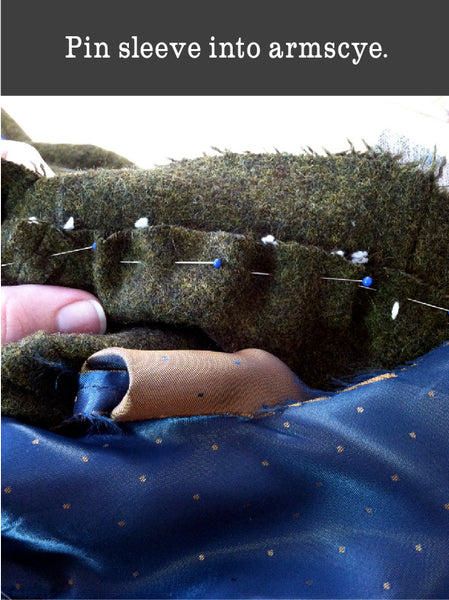
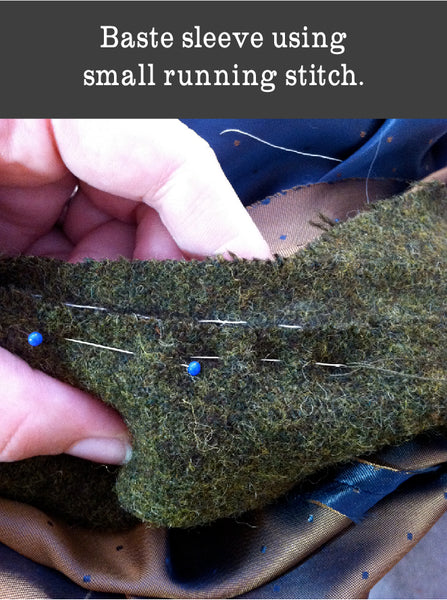
The pins don’t have to be close together, just enough so you can tell how the sleeve is hanging. Don’t worry about extra ease in the sleeve right now. Once the sleeve is pinned, check to see how the sleeve is hanging. The sleeve ease is really well distributed in this pattern, so it should sit well, but feel free to move it around if you aren’t happy. Next, baste the sleeves with matching thread, since this can stay in the finished coat. Use a fairly small running stitch.
This is where you want to ease any wrinkles into the armscye; happily, most wool likes to ease, and using a small seam allowance makes it easier to control the fabric. Check the hang of the sleeve again, and make sure there aren’t any big wrinkles or other unhappiness. If you’re having problems, you can try pressing the seam, just don’t go more than an inch into the sleeve. Hand sewing the sleeve into the armscye instead of machining it also gives you greater control.
Once the sleeves are sewn, baste around the armscye from the exterior of the coat, as close to the sleeve seam as possible and going through as many layers of canvas, shoulder pad, and lining as you can.
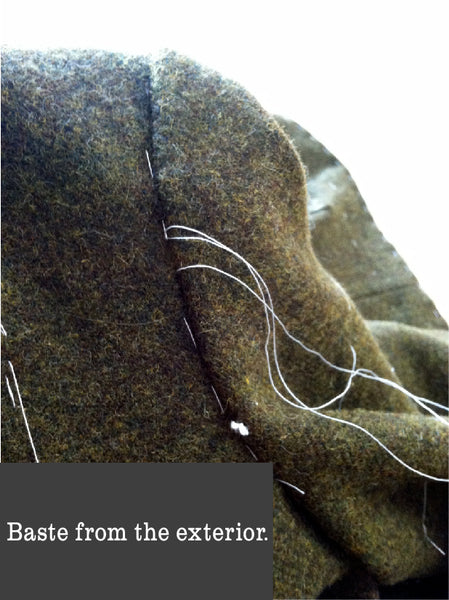
You want to push all the seam allowances of the coat and sleeves towards the sleeves, and to hold all the layers in place. Since there is extra ease in the lining, there might be a few folds when you baste the layers together, just make sure the lining isn’t pulling anywhere. From the inside with the sleeve facing you, backstitch through all the layers close to the stitch line using heavy thread.
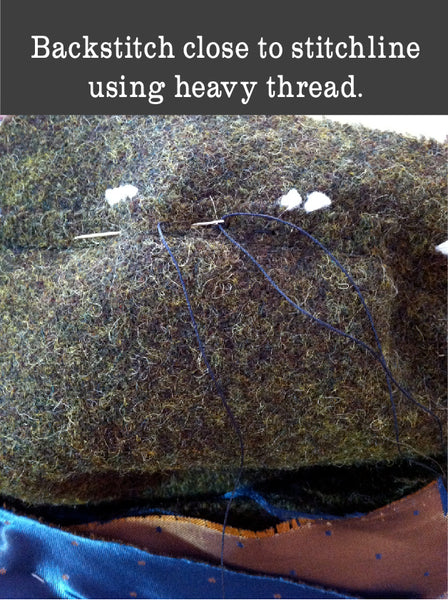
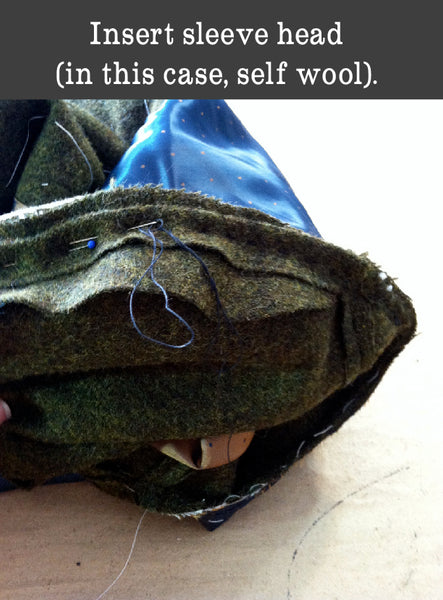
I was able to go through the shoulder pad and catch the lining on the other side, but if your shoulder pads are thick you might have to do a second line of backstitching from the lining side, catching the shoulder pad to the lining. Trim away the extra wool, canvas, lining, and shoulder pad; I usually leave only ¼ inch under the arm and taper to ½ inch at the top and sides of the armscye. Sew a sleeve head in the armscye, starting at the front notch or sleeve seam and going around the top of the sleeve to the back sleeve seam. Sleeve heads fill out the ease at the top of the sleeve and give a smooth look to the shoulder. You can buy them or make your own; I used a bias strip of wool 2 inches wide, folded over about ½ inch and pressed.
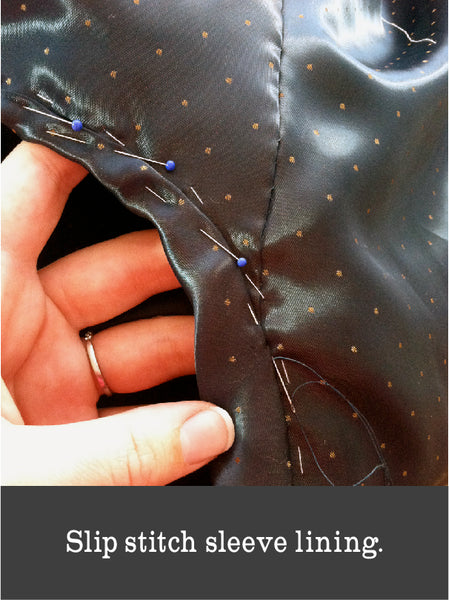
Fold the sleeve lining over ¼" and slip stitch in place, matching seams with the sleeve and just covering the backstitching. Its perfectly acceptable to have small gathers in the lining around the top of the sleeve. Lining rarely eases as nicely as wool.
Tailored Peacoat Series: #5
![]()
I split the under collar at the center back. I cut two pieces on the bias from hair canvas, trimming away the seam allowance, and also cut two bias under collar pieces from wool. If you are suave like Matt (Matt appreciates that statement, thanks Dana! :P) and want to pop the collar of your coat, I would cut the under collar from a single piece, but you can still cut the interfacing on the bias.
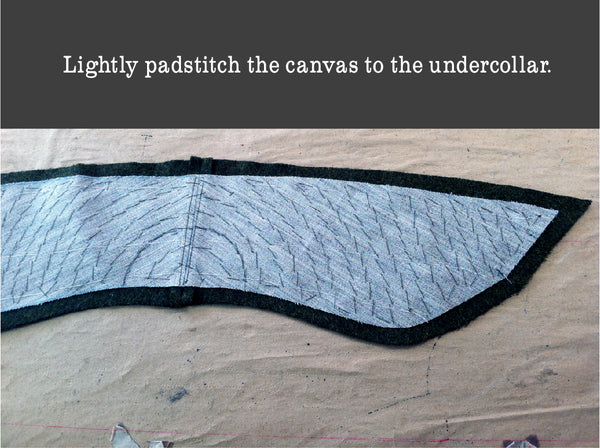
I lightly pad stitched the canvas to the under collar, making sure I didn't go all the way through the wool - but my wool is quite thick and fuzzy, so if your fabric is thinner or has a tighter weave and you’re worried your stitches might show, its okay to skip pad stitching.
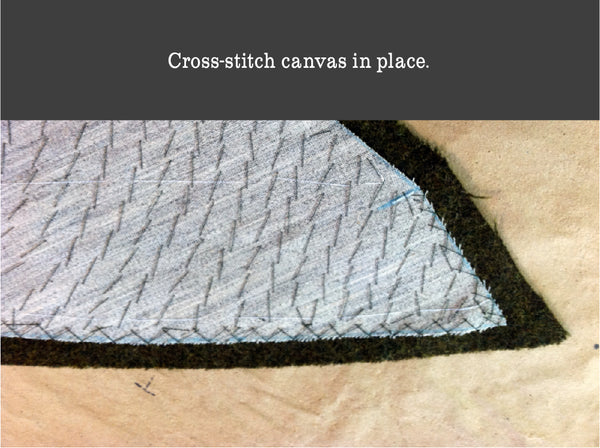
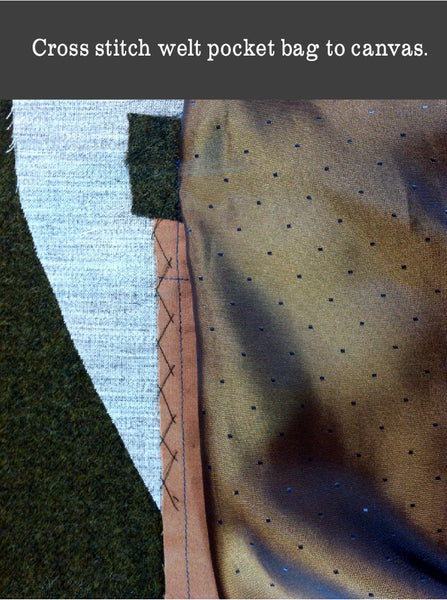
Cross stitch the canvas to the wool to keep the edges in place.
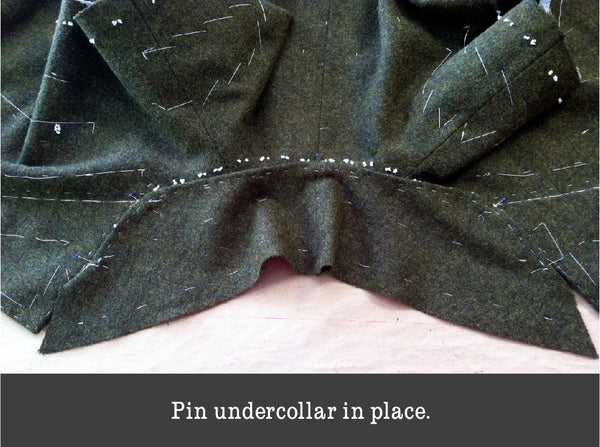
Fold the seam allowance up from notch to notch along the neck edge and baste in place.
Lay the coat out with the neck facing you, and with the wool side of the under collar up, pin the collar to the neck edge matching center back and the notches. I also put a pin at the roll line.
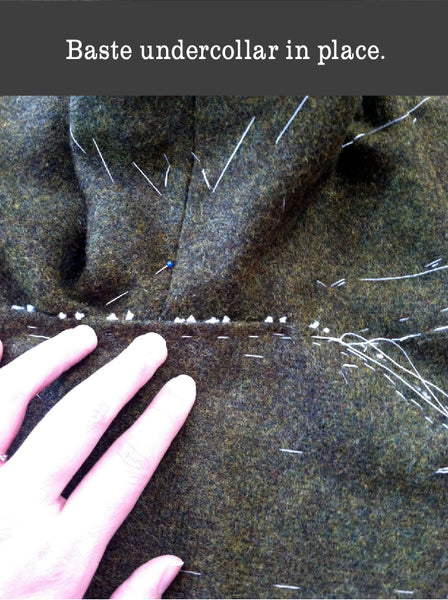
Making sure the canvas and linings are laying nicely inside the coat, and easing as needed along the neck edge, baste the collar to the coat.
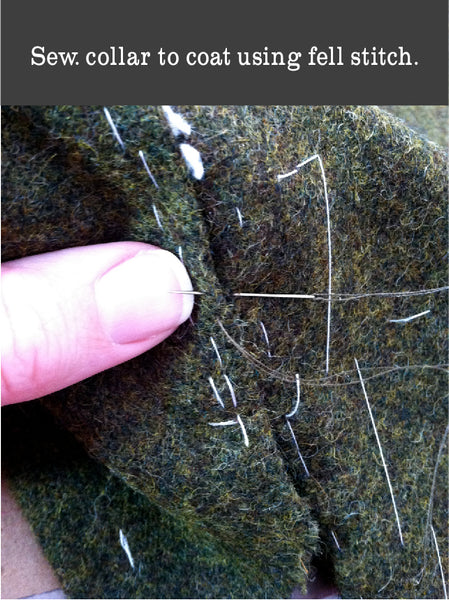
Check to make sure the lining isn't doing anything weird (sometimes it likes to jump around) --- (Remember that Dana didn't use the back neck facing so she is dealing with lining fabric at the neck seam) --- and sew the collar to the coat using a fell stitch and double thickness of thread (to see how to do the fell stitch, have a look at the second stitch on Colette Patterns' "Basic Hand Stitches" guide). Don’t be afraid to catch the facing and lining.
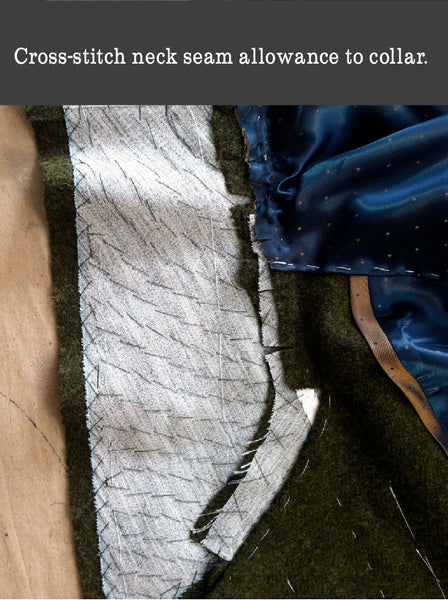
From the inside, cross stitch the neck seam allowance to the collar, clipping where needed to get it to lie flat.
Cut a piece of fabric about 1 ½ inches wider and 2 inches longer than the under collar. Fold it in half, and using a hot steam iron, stretch the top and bottom long edges.
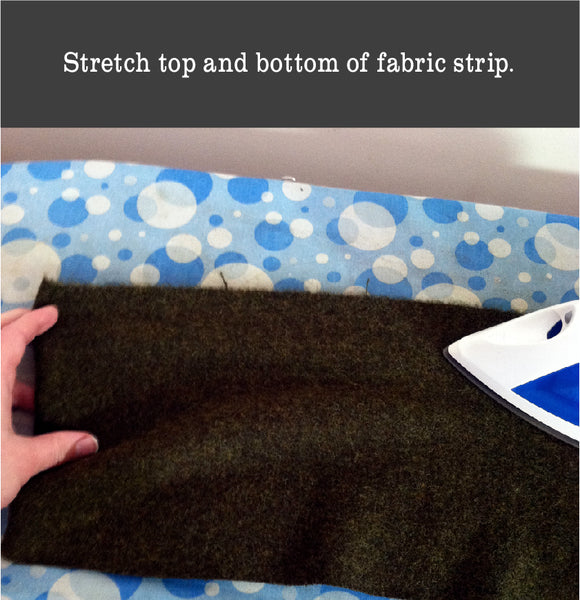
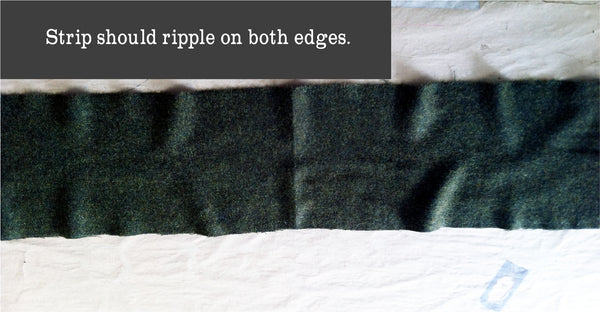
Don’t stretch the center of the strip. When you’re done, it should ripple on both edges.
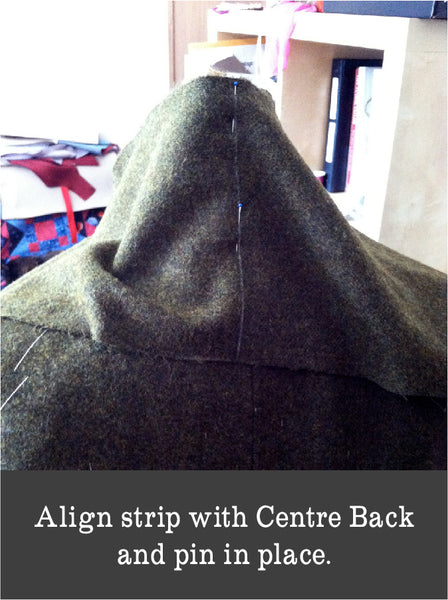
Mark the center of the strip. Align the center of the strip with the center back of the collar and pin in place. Its easiest to do this with the coat on a dress form, but you can also drape it over your knee or hand/arm.
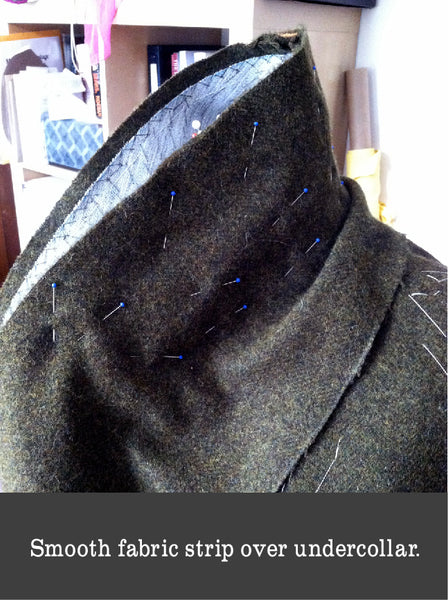
Working from the center back to the front, smooth the fabric over the collar, keeping the straight edge at the top even with the seam allowance of the under collar, and pinning as you go. You’re trying to build some ease into the upper collar so it will roll nicely.
Its okay to trim some of the excess fabric if its getting difficult to work with, just make sure you have plenty for seam allowances.
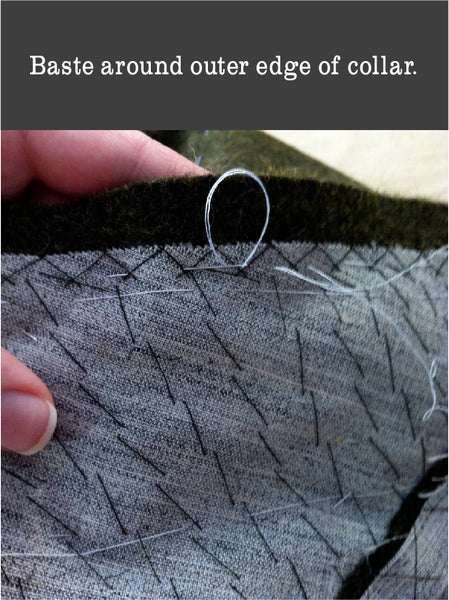
Once the upper collar is pinned in place, baste around the outer edge of the collar, and remove the pins.
Sew the outer edge of the collar from notch to notch with the canvas side facing up, similar to how the front facing is sewn onto the coat front. Press the seam open and grade and trim the seam allowance. Turn the collar right side out, and baste close to the edge, rolling the seam towards the under collar, like the front edge. Put a line or two of basting in the collar, working from the edge towards the coat, then fold the collar under (like the lapels on the facing) and run a line of basting to keep the ease in the upper collar.

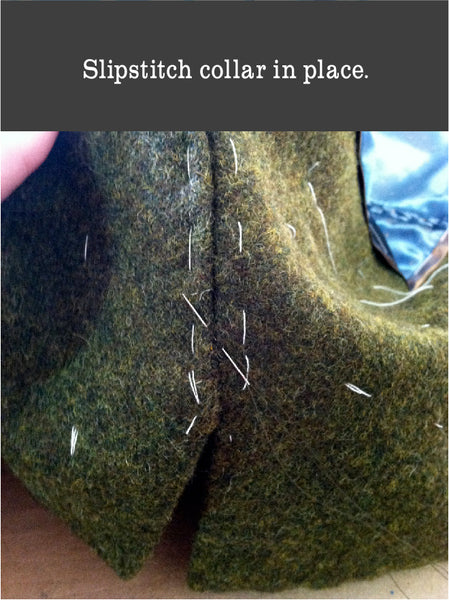
Trim the neck edge of the upper collar so you have 3/8" to 1/2" seam allowance, and turn it under and baste in place. Slip stitch in place.
Well, there you go, the collar is finished! How different from our usual approach to sewing a collar! I look forward to draping my own upper collar when I sew Matt his tailored Goldstream in time for next winter.
Thank you to everyone who has commented via the blog/email/in person about the useful nature of this series. Dana put a lot of work into all of these posts and I am sure many of us will be referring to her teachings for all sorts of coat projects in the future!
Look forward to a post on an alternative approach to setting in sleeves tomorrow!
Tailored Peacoat Series: #4
![]()
Today is a bit of a shorter post during which Dana demonstrates how to securely place the shoulder pads and shows us her method for assembling the side and shoulder seams of the coat and lining. You may notice that the procedure is a little different than outlined in the Goldstream Peacoat instruction booklet because the lining pieces have already been separately basted to their corresponding self pieces. Dana's process involves a lot of hand stitching to complete the lining and I am sure you will agree that this is a very effective way to ensure complete accuracy when sewing such a slippery fabric.
Side Seams (both coat and lining) and Hem
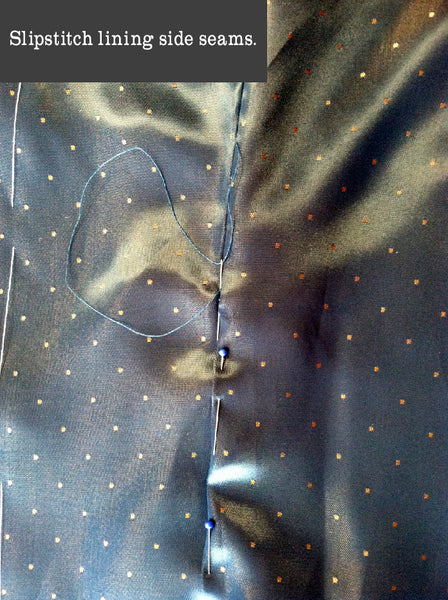
Sew the side seams together and press open. To sew the lining, at the side seams, fold one edge over the other making sure there’s a bit of ease in the lining. Slip stitch the lining seams.
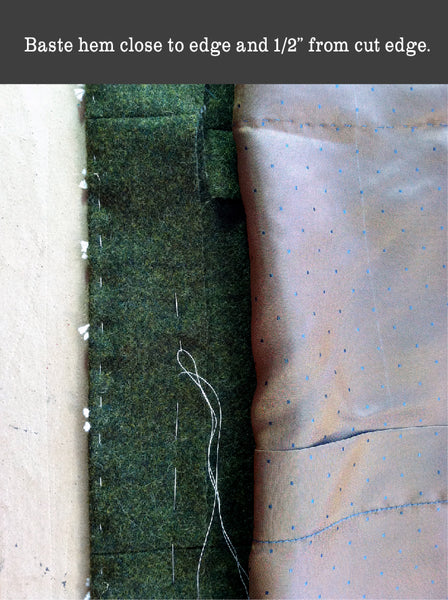
Baste the hem up close to the edge, then again about half an inch down from the cut edge.
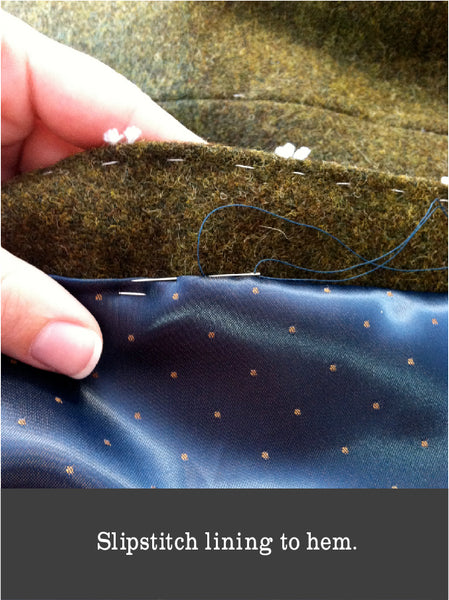
Make an ease pleat in the lining, then slipstitch the lining down.
Shoulders Seams and Pads
Sew the shoulder seams. Since most back shoulders are bigger than the front shoulder, its easiest to sew with the front on top and the back will ease itself in while you stitch.
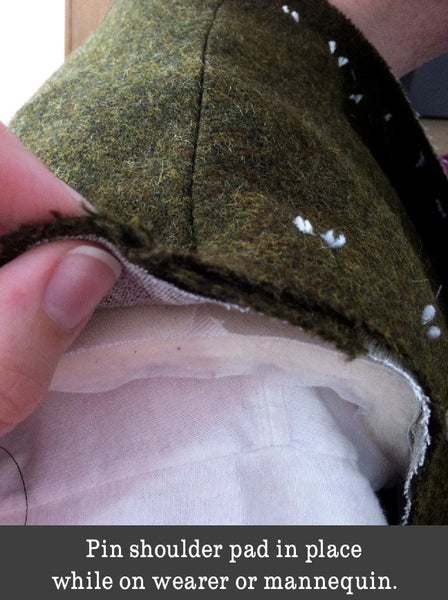
I've found it much easier to place shoulder pads when the coat is on a dress form, or at least on a person. My shoulder pads have a center notch; align this with the shoulder seam, and pin the pad in place.
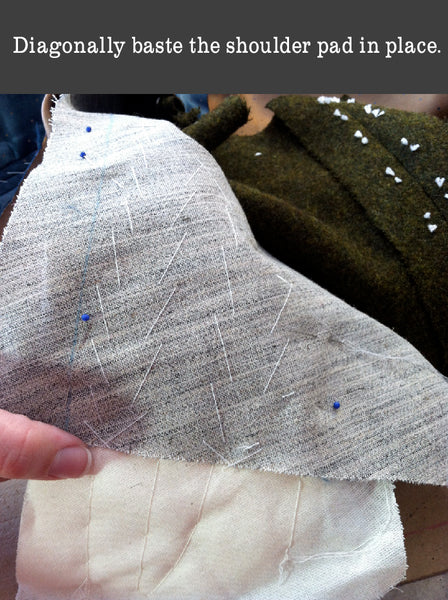
Move the pins so they’re holding the pad to the canvas (separated from the coat fabric), and diagonally baste the pad from the canvas side.
Turn the canvas over, and cross stitch the pad to the canvas.

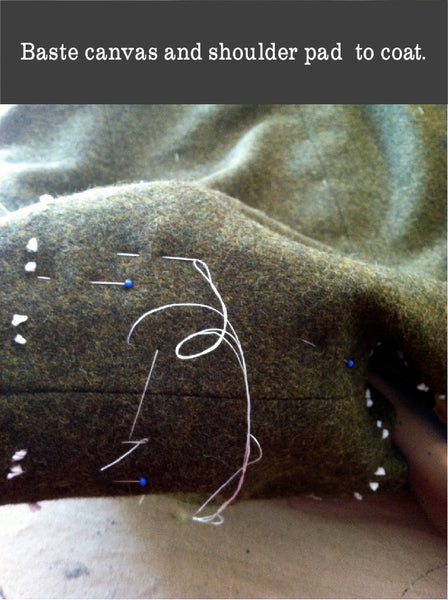
Re-align the canvas and shoulder pad in the coat (its easy to do this over your hand) and baste it in place.
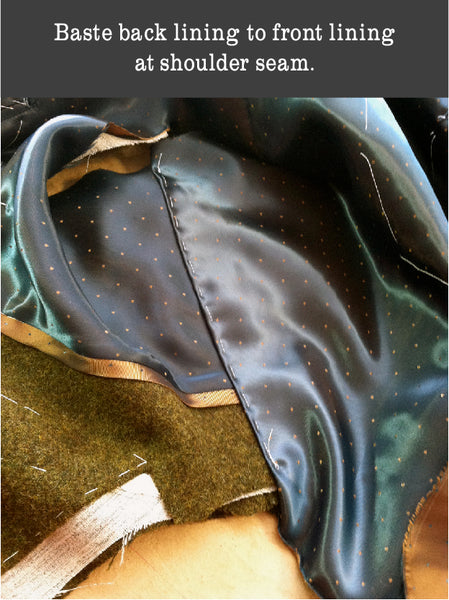
Fold the back lining over the front lining and facing, and baste in place.
Tailored Peacoat Series: #3
![]()
Today, on the third day of our Tailored Peacoat Series, Dana will be teaching a few tricks to put into practice while sewing your Goldstream Peacoat facing and lining:
The Facing and Lining
I overcut coat linings, with the exception of the front edge that is attached to the facing. Fabrics, especially slippery lining fabrics, tend to shift and not always do what you want them to, so its very helpful having a bit of extra fabric to work with. I sewed the front facing to the front lining, stopping about an inch from the hem, trimming the seam allowances to 1/4” and inserting a strip of bias cut from the wrong side of my lining fabric. The bias strip is purely decorative, but can be a nice little bit of color. Instead of doing an interior patch pocket, I made double piped pockets.

Sew the coat front and the facing/lining together, from the collar notch where you stopped trimming the canvas to the end of the facing at the hem. Its easiest to sew with the coat side facing up, and stitching about a needle’s distance from the canvas. Grade the seam allowance and press the seam open. Baste the front edge, rolling the facing to the inside below the top button mark. When you get to the lapel, baste so the seam is in the center.
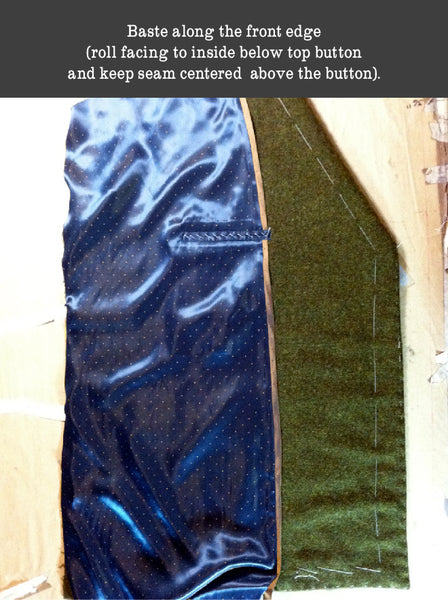
Once the edges are basted, run a line of basting in the center of the lapel, then baste the roll line, stopping about an inch below the neck edge.
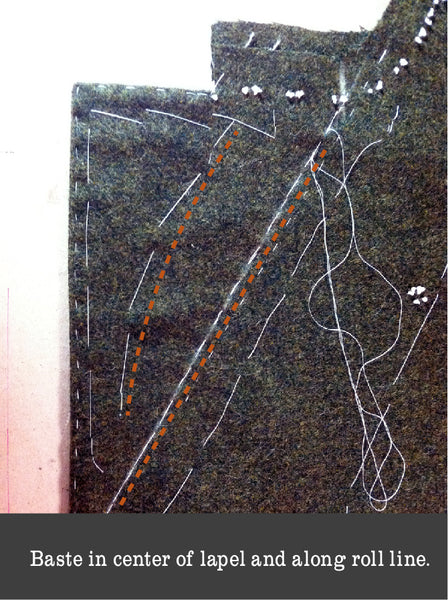
Fold the lapel over, and working from the inside of the coat, baste a couple lines, working from the edge of the coat towards the lining. Folding the lapel will ensure it has enough room to roll easily when worn.
Baste close to the facing/lining seam, then fold the lining back and cross stitch the facing to the canvas, working around the pocket.
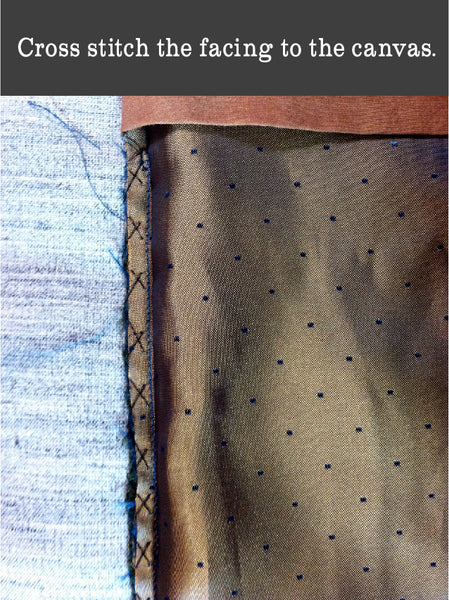
Fold the lining back far enough so the pocket can lay flat, then cross stitch the side of the pocket to the canvas.
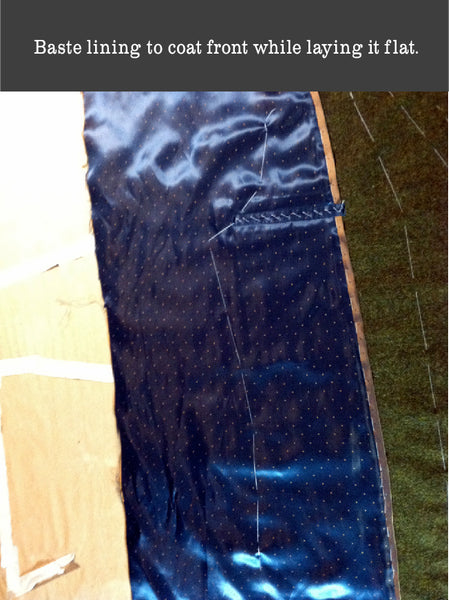
Lay the lining flat, and baste it down, leaving plenty of room for the armscye, side seams, and hem.
From the front of the coat, trim the lining even with the wool around the shoulders, armscye, and side seams.

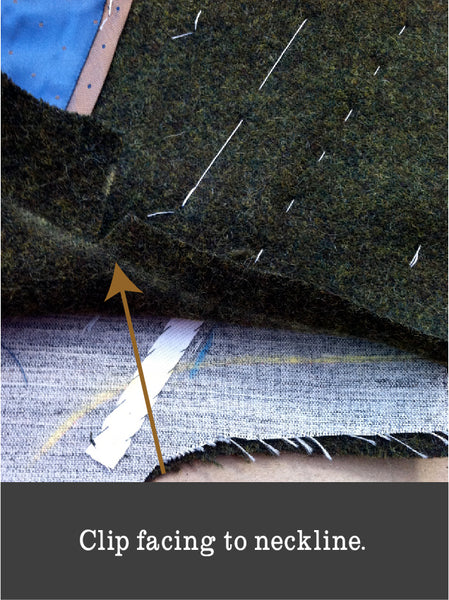
At the neck edge, clip the facing to the neckline about 1” past the roll line.
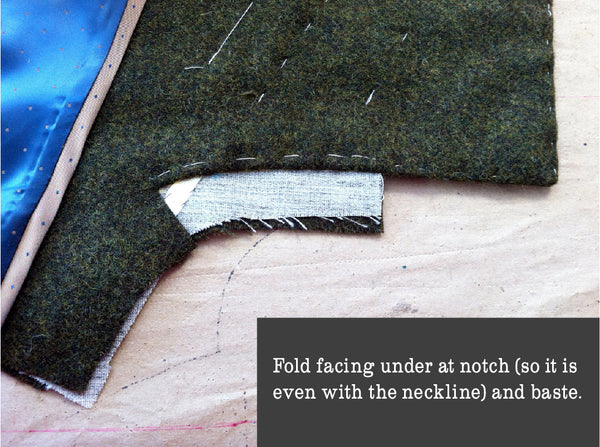
Then, fold the fabric under and even with the neck edge. Baste, then slip stitch, down.
The fronts are done!
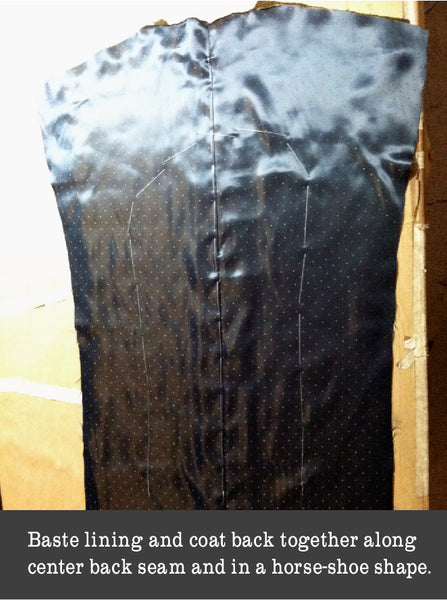
The Back and Lining
I cut the back lining from the same piece as the back, since I’m not using the back facing. I did leave enough in the lining for an ease pleat center back. Once the center back seam and center back of the lining are sewn, baste them together along the center back seam, then in a horseshoe shape, leaving room for side seams, shoulder pads, and hems.
Now that all the lining and facing pieces are assembled and basted to the main coat, we are ready to sew the main coat seams and insert the shoulder pads tomorrow!
Tailored Peacoat Series: #2
![]()
Today, the second day of our Tailored Peacoat Series, Dana is walking us through a couple minor changes to the front patch pockets. She will also be discussing the use of hair canvas to interface the coat front. Okay, lets get right into it:
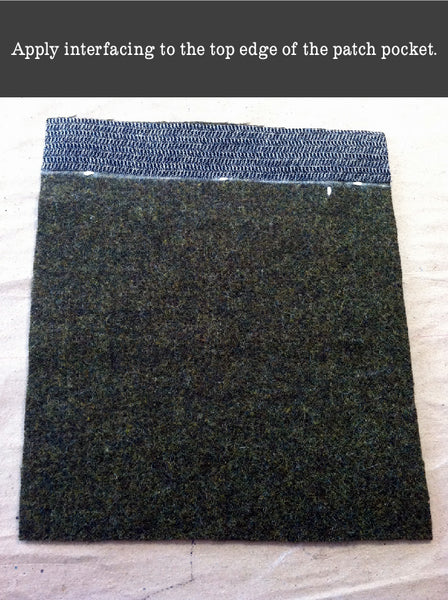
The Front Patch Pockets
The only change I made to the pockets was to fuse a piece of interfacing to the top of the pocket (the part that will be folded over to the back). It will keep the pocket from stretching (this is a great tip, especially if the wearer likes to shove their hands into their pockets quite often). I used weft interfacing.
I basted around the edge of the pocket, making sure the lining rolled to the inside. I also did this for the pocket flap.

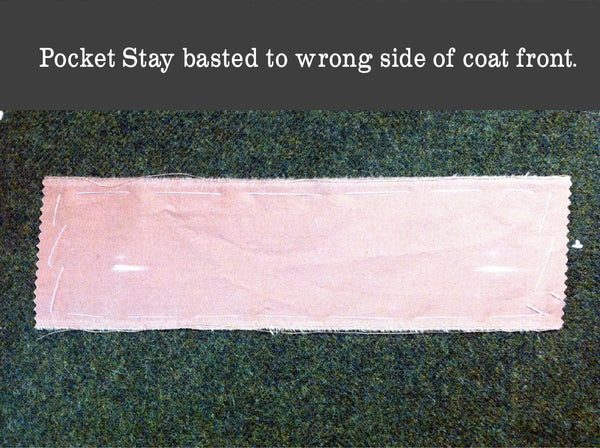
Using the placement markings for the top of the pocket as a guide, I basted a piece of pocketing (I used washed quilting cotton, but there are pocketing fabrics and Silesia out there) on the wrong side to act as a stay for the pocket (Definition: A stay is a piece of material applied to the wrong side of the self fabric to provide extra strength and resilience. An example that is commonly visible in ready to wear clothing is a button sewn to the inside of a garment at the same time as the exterior button is sewn. When used, the button will be pulling on the inside button rather than stretching out and damaging the self fabric). The stay fabric should be about 2” wider than the finished pocket and 3” tall. Position it so it will be behind the flap but still low enough to catch the top of the pocket.
I basted the pocket in place before slip stitching the edge down, then top-stitching. Yes, I do LOTS of basting.
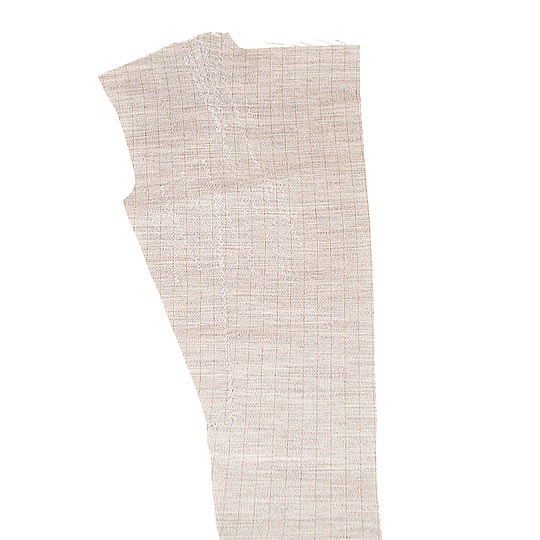
Applying Canvas/Interfacing
In a hand tailored coat, the interfacing is attached to the coat front, not the facing. I used hair canvas for interfacing. You can buy premade coat fronts, or make your own. If you buy one, I’d recommend getting a few sizes bigger than the coat you’re making, so you know it will be big enough. (You can find this one in the Goldstream Tailoring Supplies Kit or you can buy them individually at B. Black and Sons.)
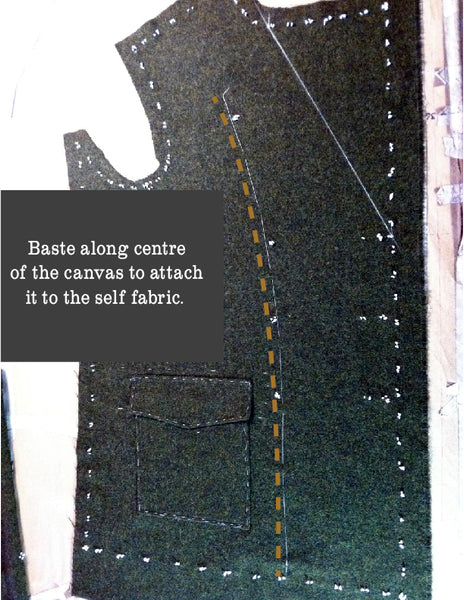
Lay the coat front on top of the canvas, and baste in the center of the canvas, making sure you leave space at the top for the shoulder pads, and don’t extend beyond the hem line.
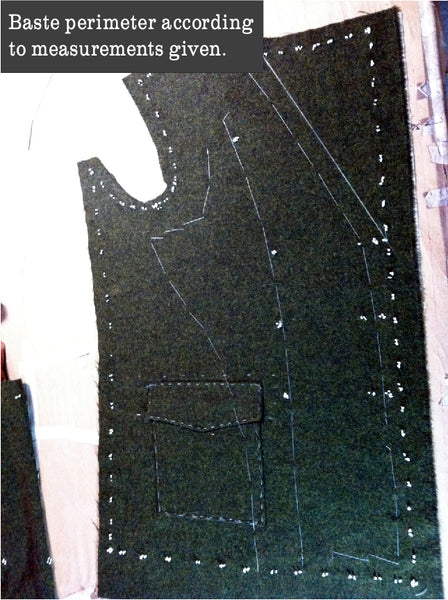
Baste along the front edge, about an inch from the roll line and across the bottom, and at the far edge of the canvas and about 2” away from the armscye so you have room to set the sleeves.
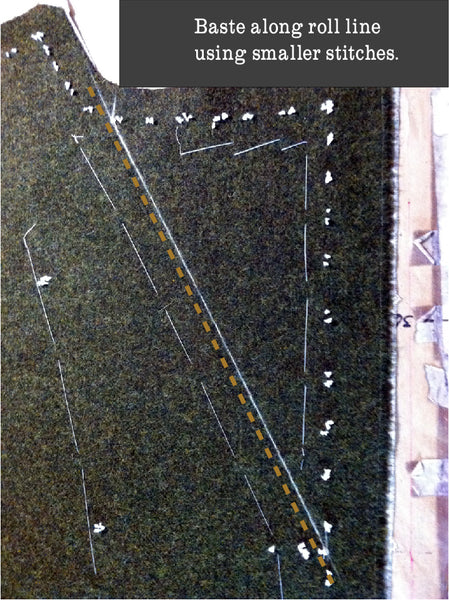
Next, baste the roll line, taking smaller stitches so its easier to see the line from the back of the coat, and baste the lapel. If the canvas extends beyond the fabric in any places, trim it so they’re even.
To pad stitch or not to pad stitch; that is the question (Gertie has written a tutorial on pad stitching as part of her Lady Grey Sew-Along). On a suit coat, you would pad stitch the lapel, shaping the wool and canvas so the lapel rolls and sits nicely on the finished suit. Overcoats, however, are often designed with the lapels to be worn open or closed, and if both sides of the lapel will be visible, you don’t want the stitches from pad stitching to be seen. If you know the lapels will always be worn open and want to pad stitch the lapels, go for it.
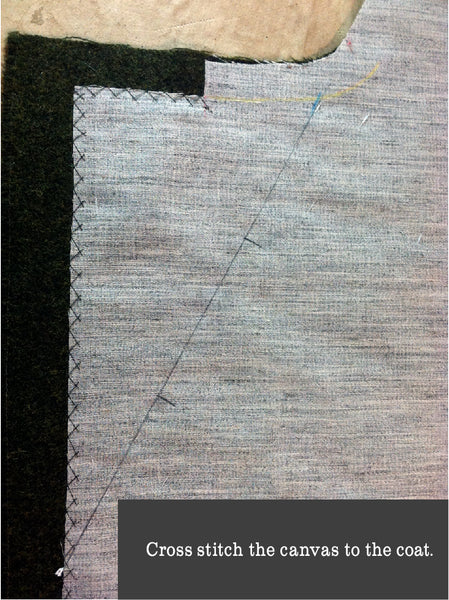
Trim the canvas even with the edge of the front and hem (here’s where knowing exactly where the edge is comes in handy), stopping at the notch for the collar. Cross stitch (also called catch stitch) the canvas to the coat.
Why didn't I tape the front edge? Taping the front edge keeps it from stretching, important if you have any curved edges, and makes a nice crisp edge. However, coupled with heavy fabric, it creates extra bulk, and the top-stitching will reinforce the front edge.
In the last picture, you can see that I divided the roll line into thirds in preparation for taping the roll line. I used 3/8” cotton twill tape. Please use cotton tape, not that poly stuff sold in packages. It doesn't respond well to a hot iron and lots of steam. Pin the end of the tape 1/3 of the way from the front edge, mark the 2/3 spot, then pull the tape 1/4" to 3/8” past the mark, then lay the tape flat along the rest of the roll line. There should be some rippling in the coat.
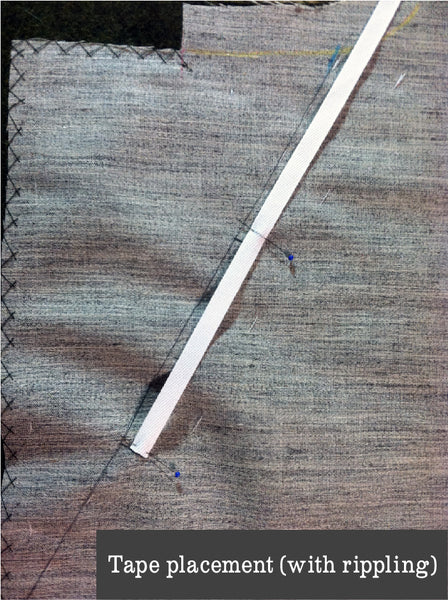
Baste the tape down, easing in the excess.
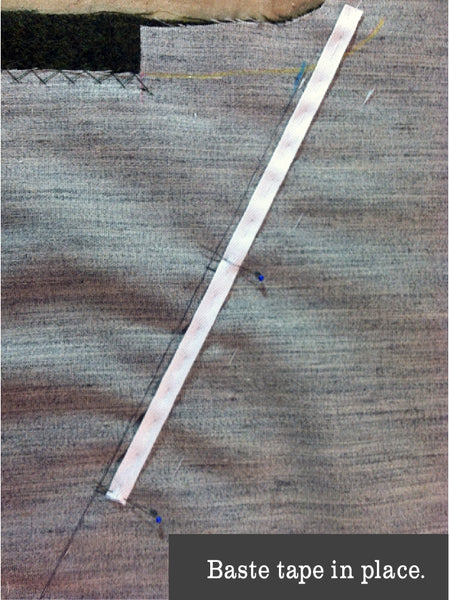
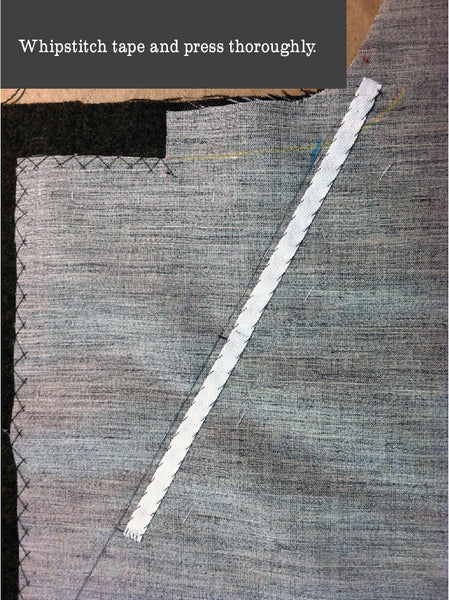
Whip stitch the tape down, catching only the canvas, then press the crap out of it (Nicely said Dana :P). The ease will press out, and the tape will keep the roll line snug against the wearer.
And that's it for today's lesson! Tomorrow we will move on to sewing the facing and the lining. I meant to remind everyone last post, but forgot so will remind you here instead: We have an Encyclopedia Peacoatica that was compiled by us from your wonderful contributions a couple months ago. It's a great place to go to find links to resources when planning to start your Goldstream Peacoat!
Tailored Peacoat Series: #1
![]()
This week I have a surprise treat for you! A mini sewing series for all you aspiring tailors out there!
This post will be the first of a week long daily series about the Goldstream Peacoat. The Goldstream Peacoat was designed to be the easiest and simplest peacoat possible to sew. The instructions produce a nicely finished coat that is equivalent to those you would find in affordable and good quality ready-to-wear stores. I think that sewers will and do appreciate the simplicity of the pattern. That being said, there is absolutely nothing stopping you from using the Goldstream Peacoat to create a high-end tailored garment that will last the wearer a life time! Indeed, after these seven posts you will be familiar with all the tricks and practices necessary to elevate your peacoat sewing project to a "Tailored" status.
Here is the posting schedule:
I am by no means a skilled and practised tailor. Fortunately, Dana, one of our very skilled pattern testers, is! She has put a huge amount of work into documenting her Goldstream Peacoat sewing process and, you can see by the beautifully crisp results, that all her efforts paid off. I hope that you will be able to benefit from her kind offer to share her knowledge. She has done an excellent job of thoroughly explaining each step she took. Thank you so much for doing this Dana and welcome to the Thread Theory blog!
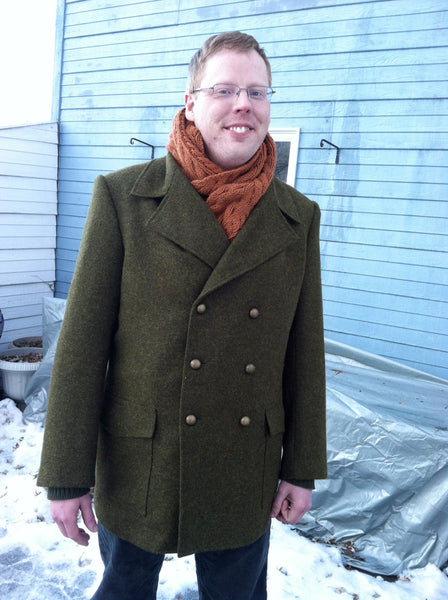
- Dana's beautifully tailored peacoat modelled by Travis.
Now, without further ado, here is Dana with her week long tailoring series:
I’m Dana, and I’ve been doing theatrical costuming for 11 years. I’ve always loved futzy handwork, and tailoring is a great way to indulge in it. The theater I work for has some amazing tailors, and I’ve learned so much about menswear and construction from them. While the patterns we work with are custom drafted, there are lots of tailoring techniques that translate to commercial patterns.
Basic tips to begin creating a tailored Goldstream Peacoat:
Two things you do much more of in tailoring are basting and pressing.
- I baste in white thread or a color that matches my fabric.
- Pressing with lots of steam will help you shape a coat beyond what seams and interfacing could ever do. Since you will use so much heat and steam, it’s important to pre-shrink, or at least steam press, your fabric, lining, and all interfacings and tapes you will use.
Helpful Tailoring Resources and Materials:
I found the wool, lining, and hair canvas at a local fabric store. The buttons are from Mood, and shoulder pads and silk buttonhole twist are from B. Black and Sons. B Black is a fantastic place to get everything you need to make a coat, and their customer service is great.
You’ll also want beeswax so you can wax and press thread for hand-sewing. (If you would like to know more about using beeswax, have a look at this BurdaStyle article.)
The two books I use the most are Classic Tailoring Techniques by Roberto Cabrera and Patricia Flaherty Meyers, and Tailoring Suits the Professional Way by Clarence Poulin. The Poulin book is out of print, but if you can get your hands on a copy it really is a fantastic book.
Pattern Prep and Cutting
-
Optional - Adjusting the Seam Allowances: The first thing I did was remark the pattern pieces to have ¼” seam allowance, except at the front edge, neckline, and hems. I cut all the seam allowance off of those. Using ¼” seam allowance is a personal preference, although it really comes in handy when setting sleeves.
It is very helpful to know where the stitch lines for the front edge, neck, and hems are, though. - Necessary - Finding the Roll Line: You do need to figure out where the roll line is on the coat front (Definition: The roll line is where the collar/lapel folds over on a garment) . The roll line starts at the top button, and is angled towards the neck, coming about 1/2” away from the neck seam line at the shoulder.
The top of the roll line is about 3 ½” from the notch for the end of the collar on a size large.
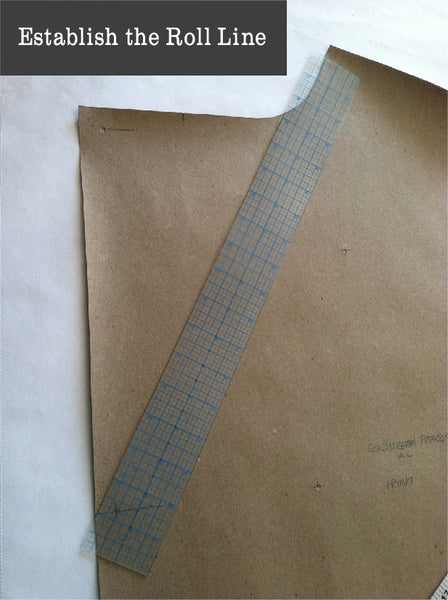
After I marked my new pattern lines on the fabric, along with all the notches, button placements, etc, I did add seam allowances beyond ¼”, along with 1” on the front and neck, and at least 1½” on the coat and sleeve hems.
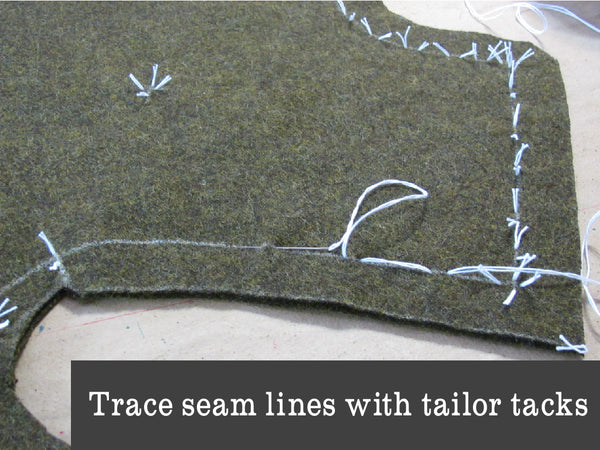
Tailor Tacks (i.e. mark where you will be sewing)
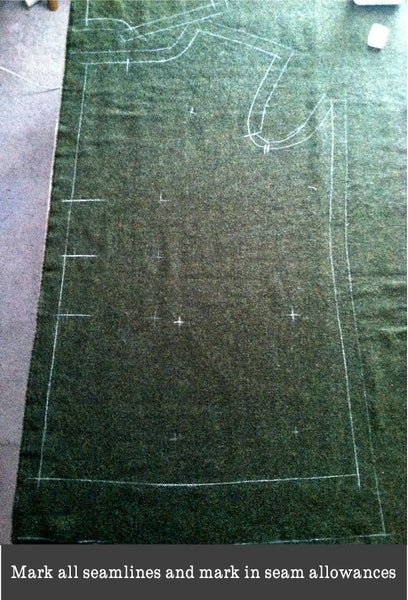
I tailor tacked all the pattern lines (Note: Details on how to make tailor tacks are included in the peacoat instruction booklet); even if you don’t want to make the seam allowance changes I made, I would recommend tailor tacking the front edge, neck edge, hems, and all the notches, button marks, pocket marks, etc. It’s one of the easiest ways to make sure you can see these marks on both sides of the fabric, and if you’re working with thick wool like I am, chalk marks tend to fade pretty quickly. I used crochet cotton for tailor tacking thread because it grabs fabric better than regular thread.
Thanks for this first post, Dana!
That is quite a lot of handwork to keep you busy. Tomorrow we will move on to demonstrating how to adjust the pockets to suit the tailored coat and how to apply horse hair canvas and interfacing.
Are you already learning lots? I know I am!