Sew-along with us!

Perhaps you'd like some company while you sew? We've sewn up each of our patterns and photographed each step along the way. Find the pattern you're after in the filter drop down below left.

Timberland Henley Sew-Along - Day 1: Gathering Materials

Timberland Henley Sew-Along - Day 1: Gathering Materials

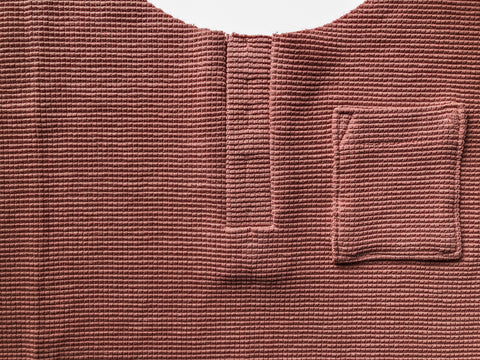
The Timberland Henley, the newest member of our Parkland Collection and women's version of the Strathcona Henley, is a casual everyday wear garment to add to your wardrobe. This pattern comes in two variations, has a scoop neckline, and a curved hem that is lower in the back. You can choose between long or short sleeves, chest pockets, or add a Henley placket to the front neckline. In our sew-along, we will go over detailed instructions on how to assemble a Henley placket in two ways. 

To begin, pick which variation you would like to make. Then, pick your size.

Please refer to your instruction booklet on how to take your measurements and determine which size works best for you. You can also refer to our Woodley Tee Sew-along where we go into similar detail on which measurements to account for, and which ones you can adjust on the pattern. 

If you need to lengthen or shorten the pattern, it is very important to use our lengthen/shorten lines provided on the front and back pattern pieces. Due to the curvature of the hemline, it is best to make adjustments at the lengthen/shorten lines to keep the correct shape of the hem. 


Fabric

When choosing fabric for your Timberland Henley, we highly suggest picking out a cozy light to medium-weight knit fabric that will soften over time. A medium-weight knit will be easier to sew with, especially if you are planning to make the Henley placket detail. A lightweight knit fabric may be a little trickier to sew with but could make for a perfect summer lounge tee. If you are not sure what type of fabric to look for, think of your favorite t-shirt that you already own and check the fabric weight and content. 


When designing the Timberland Henley, we had a vision of a traditional Henley shirt made in waffle knit fabric that could be a great stand-alone or layering piece. Waffle knit fabrics tend to be more available in cooler weather seasons. For our photo sample, we used a waffle knit from Blackbird Fabrics that unfortunately sold out quickly. We hope they bring it back for next fall/winter ;)


Here are some recommendations for online stores that are currently carrying waffle knit fabrics:

Organic cotton waffle knit from I See Fabric

Cotton/spandex waffle knit from Style Maker Fabrics

Here are some non-waffle knit fabrics that are also great for creating the Timberland T-shirt variation:

Hemp/organic cotton jersey knit from Blackbird Fabrics

Mid-weight cotton jersey from Style Maker Fabrics


Some fun bold stripe cotton interlock fabric from Blackbird Fabrics


Optional: Use a matching or contrast ribbing for the neckband of your Timberland Henley or t-shirt. Check your favorite fabric store for their rotating stock on ribbing fabrics. Pictured here is ribbing from Blackbird Fabrics


The only hardware needed for the Timberland Henley is snaps or buttons for the placket variation. You can choose to use sew-on snaps, set-in snaps, or buttons.

Getting Started:

Before our next installment of the Timberland Henley Sew-along refer to our previous tutorials and posts about helpful tips to set up your sewing machine, get your sewing space ready, and how to cut out your pattern pieces from knit fabric:

How to sew with knits

Check out these tools and accessories from our Haberdashery that could help create your Timberland Henley:

July 23, 2024
Timberland Henley Sew-Along - Day 2: Placket #1

Timberland Henley Sew-Along - Day 2: Placket #1

Variation 1: Henley Placket
Following the manufacturer’s instructions, apply fusible interfacing to the wrong side of the two placket pieces. Transfer all markings to the front neckline for the placket.
TIP: Before stitching the placket, baste around the rectangle marking at the center front using a straight stitch. This can help you get perfectly straight lines and corners when sewing the placket in later steps.
Match the two placket pieces to the center front at the markings.
Match the right sides of the placket pieces to the wrong side of the front.
Using a straight stitch, sew the placket pieces to the front. Start at the neckline and stitch down to the bottom edge of the front rectangle marking. 
Press the long edges of each placket piece to the wrong side at 1/2" (1.25 cm). Cut the front fabric onlyalong the centerline. Cut from the neckline to the tip of the triangle marking. Clip from the tip of the triangle at an angle to the end of each placket stitch line, creating a short triangle flap. Be very careful to not clip the placket fabric, or clip past the placket stitch lines
TIP: Clip a taller triangle piece than what is marked by cutting down the center front to about 3/4" (1.9 cm) before the placket stitch lines. Making a taller triangle piece can be helpful when folding this piece in later steps, especially if you are using a lightweight knit
Fold the placket pieces in half, sandwiching the seam allowances.
Push the bottom edges of the placket to the right side of the front through the opening.
Lay the front right side facing up, and position the placket pieces so that the right placket is overlapping the left placket. The placket pieces should overlap each other evenly at 1" (2.5 cm). Re-press the placket pieces if needed so they overlap evenly.
Using a needle and thread, baste the placket pieces in place. Using a slip stitch, sew the folded outer edges of each placket to the stitch lines.
Topstitch along the basted edges of each placket stopping just before the end of the placket stitch line.
Tidy up the bottom of the placket pieces. Clip the bottom edge of the left placket piece to about 3/8" (1 cm). Fold under the bottom edge of the right placket piece so no raw edges are exposed. Press.
Using a needle and thread, slip stitch the bottom edge of the front opening (the top of the triangle cut out) to the placket.
Using a needle and thread, stitch the bottom of the right placket in place, securing it to the front.
On the right side bottom of the placket, use a straight stitch to stitch a square and decorative “X” to reinforce the placket.
July 23, 2024
Timberland Henley Sew-Along - Day 3: Pocket and Placket #2

Timberland Henley Sew-Along - Day 3: Pocket and Placket #2

For this portion of the sew-along have ready the front, two front placket pieces, and the chest pocket.
Press the top edge of the front pocket to the wrong side 1" (2.5 cm).
Using a straight stitch, stitch 3/4" (1.9 cm) down from the folded edge.
Press under remaining front pocket edges 5/8" (1.5 cm). Reduce bulk if desired by trimming corners and even seam allowances to 3/8" (1 cm) or narrower.
Line up the front pocket with the markings on the front. Pin. 
Using a straight stitch, edgestitch around the front pocket. For reinforcement, stitch narrow triangles at the top corners of the front pocket opening. Do this by pivoting at the corners, stitching a few stitches along the top fold of the front pocket, pivot, and stitch at an angle towards the edgestitch line.
Transfer all markings to the center front neckline for the placket.
Cut from the neckline to the tip of the triangle marking. Clip from the tip of the triangle at an angle to the end of each placket stitch line marking, creating a short triangle flap. Be very careful to not clip past the marking lines.
TIP: Clip a taller triangle piece than what is marked by cutting down the center front to about 3/4" (1.9 cm) before the placket stitch lines. Making a taller triangle piece can be helpful when folding this piece in later steps, especially if you are using a lightweight knit.
Fold the placket pieces in half lengthwise, matching the long edges, and press.
With the right sides together match the placket pieces to the front of the placket opening.
Using a straight stitch, stitch from the neckline down to the bottom of the rectangle placket marking at 1/2" (1.25 cm).
Finish the seam allowances together using a zig-zag, serge, or stretch stitch.
Press the placket pieces towards the center front. 
Press the triangle flap and bottom edges of the placket pieces to the wrong side of the front.
With the right side facing up, overlap the right placket piece with the left.
Neatly press and make sure they are evenly overlapped.
Lift up the hem of the front to expose the triangle cut-out and the two bottom edges of the placket pieces. Pin and stitch the layers together using the fold line created from pressing the triangle flap as a stitch guide.
Finish the edges together using a zig-zag, serge, or stretch stitch.
(view from the wrong side of the front)
Optional: To keep the seam allowances in place, topstitch around the placket opening making sure to catch the seam allowances underneath.
July 23, 2024
Timberland Henley Sew-Along - Day 4: Neckband, Sleeves, Hem

Timberland Henley Sew-Along - Day 4: Neckband, Sleeves, Hem

For this portion of the sew-along please have ready the front, back, sleeves, and neckband pieces.
Finish the raw edge of the front and back hem using a serge or zigzag stitch.
Fold the hem to the wrong side of the front at 3/4" (1.9 cm). Press.
Pin in place.
Using a single straight stitch, or double needle straight stitch, sew the hem in place. Repeat for the back hem.
TIP: Before folding the hem, make a basting stitch along the hem allowance line, using a straight stitch and long stitch length. This will make it easier to fold along the curved edge of the hem. Instead of using pins, use fusible tape to keep the hem allowance in place.
With the right sides together match the front and back at the shoulder seams. 
Pin and stitch. Finish the seam allowances together and press towards the back.
Variation 1 Henley Neckband:
Fold the neckband in half with the wrong sides together aligning notches. Press.
Variation 2 Scoop Neckband: 
With the right sides together, match and stitch along the short edges of the neckband so that the strip of the neckband becomes a loop. Press the seam open. 
Fold the neckband in half with the wrong sides together aligning notches. Press.
All variations:
With the right sides together match the neckband to the neckline. Stitch. Finish the seam allowances together.
Variation 1 Henley Neckband:
The center front most edge of the neckband should extend past the placket about 5/8" (1.6 cm).
Fold the corner to the wrong side of the placket and wedge it under the seam allowance. Give it a good press. 
Topstitch along the front neckline to keep the neckband seam allowances in place. Use a long straight stitch or a zig-zag stitch.
Add twill tape or bias binding to the back neck and shoulder seam allowances following the instructions.
With right sides together and notches aligned, match and sew the sleeves to the armholes. Finish the seam allowances together. Press the seam allowances towards the body.
With right sides together, notches and underarms aligned, match the front and back together at one side seam. Sew the seam using a zig-zag, stretch stitch, or serge. Press the seam allowances towards the back.
Hem the sleeves.
Tack down the side seam allowances at the hem.
Make sure to trim all threads and give your garment a good press. 
July 23, 2024