Sew-along with us!

Perhaps you'd like some company while you sew? We've sewn up each of our patterns and photographed each step along the way. Find the pattern you're after in the filter drop down below left.

Woodhaven Apron Sew-Along Day 3: Hardware and Finishing Details

Woodhaven Apron Sew-Along Day 3: Hardware and Finishing Details

On the final day of the Woodhaven Sew-Along, we will go over the steps to complete the apron and how to install and attach the various hardware details to make your apron unique. 
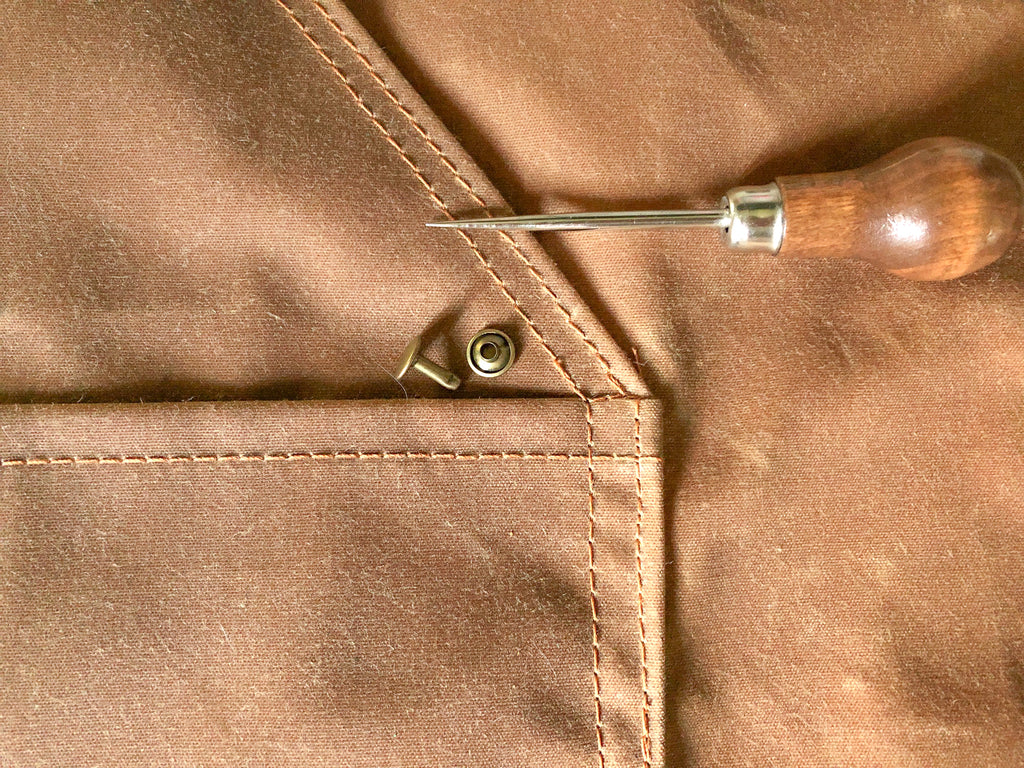
Rivets

For each variation, we recommend adding rivets to the pockets where indicated for extra reinforcement. Depending on the rivet tool you are using there are several ways to install your rivets. Refer to the instructions that come with your rivet tool to install the rivets. 


Due to the bulkiness of the fabric at the pocket corners, it may be helpful to use an awl to make a hole for the rivets. 

 Make a hole in your fabric that is slightly narrower than the rivet stem. 

Following the instructions that came with your rivet setter tool, secure the rivets to your apron.

If you want to add more functional details to your apron, you can use rivets to install additional webbing loops for holding tools, towels, key rings, etc.


Grommets

Similarly to installing rivets, you will want to refer to the instructions on the grommet tool you are using to secure your grommets.

The grommets we used from Emmaline Bags have a screw back to secure the front and back of the grommet, so the only tool needed to install these is a small screwdriver similar to the one that comes with most home sewing machines.


**Tip: It may be helpful to jump ahead and hem the edges of your apron before installing your grommets, depending on the size, so you don't run into any issues with your presser foot.


Align one grommet with the placement marking on the apron. Trace a circle over the placement marking that is the size of the inner circumference of the grommet.

Clip and cut the fabric away inside the circle to create an opening for the grommet.

Install the grommet according to your setter tool instructions.


Hem

Hem your apron following the order in the instructions if you haven't already.

Straps

After installing the grommets, it's time to attach the straps. 

*If you intend to add a buckle closure do not attach the straps to the chest yet

Cut the length of webbing roughly in half.

At the chest, thread the ties through the grommets and either create a large knot so the tie will not slip through the opening or fold and stitch in place to secure.

If you do not wish to install grommets to the chest of the apron, you can stitch the ends of the straps to the apron as shown in the image below.

Thread the straps through the waist grommets. Try the apron on a person or dress form and cut the straps to fit.


Buckle Closure

 If you haven't already done so, cut the length of webbing roughly in half to create two straps.

To attach the slider, thread the webbing through the slider so that you have a tail several inches (centimeters) long. 


Stitch the tail to the webbing to secure the slider in place.


Thread the other end of the strap through one end of the buckle closure.

Thread the end of the strap through the slider and adjust the length.

Repeat for the other strap and buckle closure piece. 

Thread the straps through the waist and chest grommets. Adjust the length at the chest and cut to fit. Secure the straps at the chest following the instructions in the previous steps.


Show us your finished Woodhaven Apron by tagging us on Instagram (@threadtheorydesigns) using #woodhavenapron or send us an email at info@threadtheory.ca 


February 10, 2022
Woodhaven Apron Sew-Along Day 2: Pockets!

Woodhaven Apron Sew-Along Day 2: Pockets!

The Woodhaven Apron comes in three variations that offer options for different styles of pockets. The pattern features a chest pocket for pens and small tools along with three hip pocket designs. Variation 1 includes three layers of divided pockets reinforced with rivets and an extra ergonomic hip pocket perfect for tools that need to be reached quickly and frequently. Variation 2 includes a clever 'kangaroo' pouch with two deep angled pockets and two shallower pockets. Variation 3's divided pleated pockets are ideal for carrying many small things (nails, screws, a phone) in an organized manner.  Today we will be going through the steps to assemble the top zipper chest pocket and the lower hip pockets.
Top Zipper Chest Pocket
With right sides together and notches aligned, match one Top Zipper Pocket - Outer Side piece to the Top Zipper Pocket - Outer Center piece. Stitch together.
Press the seam allowances towards the center, and make a row of topstitching along the seam to keep the seam allowances in place. Repeat for the other Top Zipper Pocket - Outer Side piece.
Tip: Create two rows of topstitching throughout assembling the pattern for detail.
When topstitching, use topstitching thread so the stitch lines are more visible. Try a contrasting color thread for topstitching to make the stitches pop even more!
Hem the top edge of the outer pocket.
With the right sides facing up, place the Outer Zipper Pocket onto the Top Zipper Pocket piece, matching notches. Baste the outer pocket in place within the seam allowance so that the basting will be hidden in later steps.
Match the narrow side of the Top Zipper Pocket Flap to one side of the zipper tape, with right sides together. Stitch the Top Zipper Pocket Flap to the zipper using a zipper foot and stitch along the length of the zipper tape.
Fold the Top Zipper Pocket Flap up and away from the zipper but do not press.
Stitch the other side of the zipper to the top of the pocket. 
Press the zipper right side up, along the pocket edge.
Fold the Zipper Pocket Flap down covering the zipper and top portion of the zipper pocket. Fold the Pocket Flap up along the fold line, so that the wrong sides are together. The folded edge of the Pocket Flap should match with the edge of the Outer Zipper Pocket.
Baste the short edges of the Pocket Flap to the zipper and pocket pieces following the basting line on the pocket.
Press the outer edges to the wrong side at 5/8 (1.6 cm). Match the chest pocket to the apron aligning with the placement markings. Topstitch around the outer edges of the pocket unit and flap.
TIP: If the edges are too bulky and difficult to turn, trim the inner seam allowance edges to reduce bulk. For a nice curved edge, try basting along the seam line and then turning the edges, using the basting line as a guide. Remove the basting stitches after. You can also use the rubber mallet to hammer around the edges to reduce bulk.
Variation 1 Hip Pockets
For the three center pocket pieces, start by hemming the top edge of each pocket piece.
Press the outer edges of the small pocket piece to the wrong side at 5/8 (1.6 cm). Match the small pocket piece to the middle pocket piece, aligning with the placement markings. Topstitch around the small pocket to secure. Match the middle pocket to the large pocket, aligning notches and lower outer edges. 
Baste the outer edges of the pocket unit together. Press the outer edges to the wrong side at 5/8" (1.6 cm) and set aside. We will not be attaching this pocket unit to the apron yet!
Hem the top edges of the lower side pocket pieces.

Match the square pocket to the angled pocket. Baste the outer edges together.
With the pocket unit facing right side up, press the RIGHT outer edges of the pocket to the wrong side at 5/8" (1/6 cm). Press the bottom edge of the pocket to the wrong side at 5/8" (1.6 cm). Leave the LEFT outer edges as is.
For simplicity, all pockets for the Woodhaven Apron are the same size and have not been graded. Depending on which size you make, you may need to trim the outer edge of the lower side pocket to fit your apron.
When attaching the lower pockets, it is important to attach the lower side pocket first. This is because the center pocket unit will enclose the pointed edge of the lower side pocket. Refer to the diagram in the instructions and the image below.
Match the lower side pocket to the apron aligning with the placement markings.
Topstitch around the pressed edges of the lower side pocket first to secure. 
Match the center pocket unit to the apron aligning with the placement markings and overlapping the pointed edge of the lower side pocket. Topstitch around the pressed edges to secure.
Once you have attached the center pocket unit, stitch along the center of the pocket unit, through all layers, from the top hem of the large pocket to the bottom of the pocket unit to create smaller pockets. 
Variation 2 Hip Pockets
Assembling the lower pockets for variation 2 is very similar to assembling the center pockets for variation 1. 
First, hem the top edge of the small rectangle pocket. Then hem the angled edges of the large kangaroo pocket.
Match the small rectangle pocket to the kangaroo pocket matching the lower outer edges. Baste along the lower outer edges. Press the lower outer edges of the pocket unit to the wrong side at 5/8" (1.6 cm). Press the top edge of the kangaroo pocket to the wrong side at 5/8" (1.6 cm).
Match the pocket unit to the apron aligning with the placement markings. Topstitch along the top pressed edge of the kangaroo pocket, and the lower outer pressed edges, to secure.
Stitch along the center of the pocket unit, through all layers, from the top of the kangaroo pocket to the bottom of the pocket unit to create smaller pockets. 
Variation 3 Hip Pockets
Two narrow rectangular pieces are overlapped and skewed to create the hip pockets for variation 3. These pockets are great for carrying smaller narrower items, such as brushes, a tape measure, nails, a cellphone, etc. 
On both lower pocket pieces, create pleats following the directions in the instruction booklet. With the pieces right sides facing up, the left fold creates a knife pleat. The two center fold lines create narrow box pleats. Press the pleats thoroughly to create sharp folded edges.
Unfold the pleats. Hem the top and bottom long edges pocket piece. Fold the pleats back in place. 
There are notches on the short edges of each pocket piece. With the right sides facing up, overlap the pocket pieces. Align the top finished edge of the outer pocket piece with the notches on the short edges of the inner pocket piece. Baste along the short edges to connect the pockets and create a larger pocket unit. Press the short edges to the wrong side at 5/8" (1.6 cm).
Match the pocket unit to the apron aligning with the placement markings. Topstitch along the pressed side edges and bottom edge of the lower pocket to secure. 
In the center of each pleat create a small vertical bar tack to create the smaller pockets. You can also choose to create these smaller pockets by adding a rivet to the center of the pleats as shown in the image below (which we will go over on the third day of the sew-along).
Day 3 of the Woodhaven Apron sew-along will detail how to install hardware and straps to complete the apron.
February 05, 2022
Woodhaven Apron Sew-A-Long Day 1: Gathering Tools and Materials

Woodhaven Apron Sew-A-Long Day 1: Gathering Tools and Materials

The Woodhaven Apron is a fun pattern to experiment with mixing and matching materials and hardware. This apron is all about the details. On this first day of the Woodhaven Apron Sew-A-Long, we will go over choosing a variation, what materials and tools you will need, and some pattern adjustments.
February 02, 2022