

Sew-along with us!
Perhaps you'd like some company while you sew? We've sewn up each of our patterns and photographed each step along the way. Find the pattern you're after in the filter drop down below left.


Sew-Alongs
Goldstream Sew-Along: Fit and Style
Did you come across any exciting fabrics and notions during your hunt for Peacoat materials? Today we are continuing our prep work by determining the fit and style that you would like to acheive.

Variations
The Goldstream Peacoat comes with two variations - Variation one includes long darts at the front, classic details such as epaulets and sleeve tabs and flaps over the patch pockets. Variation two is a more relaxed fit with no front darts. It features a removable hood and simple square patch pockets (no flaps). All of these style elements can easily be mixed and matched on the base garment. For instance, someone might want a very classic navy Peacoat with epaulets but would love the option to wear a hood occasionaly and prefer to leave off the sleeve tabs since they find them cumbersome. Another person might like the casual look of variation two but prefer the slimmer silhoutte created with the front darts. Customize to your heart's content!

Both variations include a two piece sleeve, a shaped center back seam, a narrow double breast (only one row of buttons is functional so that the Peacoat can be worn open and still look symettrical and attractive). Both variations are fully lined and have an inner patch pocket.
I designed the Goldstream Peacoat with a new coat sewist in mind. I wanted it to be a simple sew (as far as outerwear goes) and easy to fit. The center back seam allows you to take in or let out the back to perform small fit adjustments across the shoulder and waist. The darts can easily be sewn wider or narrower to take in or let out the coat at the waist and hips.
Mock Up

Image credit: This very practical and thorough mock-up was made by SewAndrew using upholstery fabric - a great heavy material choice! He sewed the collar and added the facing. This is a good idea if you want to see how the finished collar looks (perhaps if you are toying with the idea of making the collar smaller) but it isn't necessary to determine fit. Be sure to look at his thorough blog post featuring all the fit and style considerations that he made.
I highly recommend sewing a very simple mock-up before you cut into your wool fabric as you probably plan to invest a considerable amount of money in the best quality wool your budget can afford...not to mention the time you will be investing in this project! An evening spent mocking up the pattern prior to the real deal is well worth your time.
To mock up a wool coat, it is most accurate to choose a material that has the some of the same properties as your finished coat. You can use a sturdy muslin fabric but I would not recommend a lighter muslin or my usual mock-up fabric of choice - thrift store bed sheets. If you are going the thrift store route, I would instead look for an old blanket (wool or otherwise).
First, choose your size and grade between sizes if need be. Here are tutorials that will help you out if you are unfamilar with measuring a man or grading between sizes.
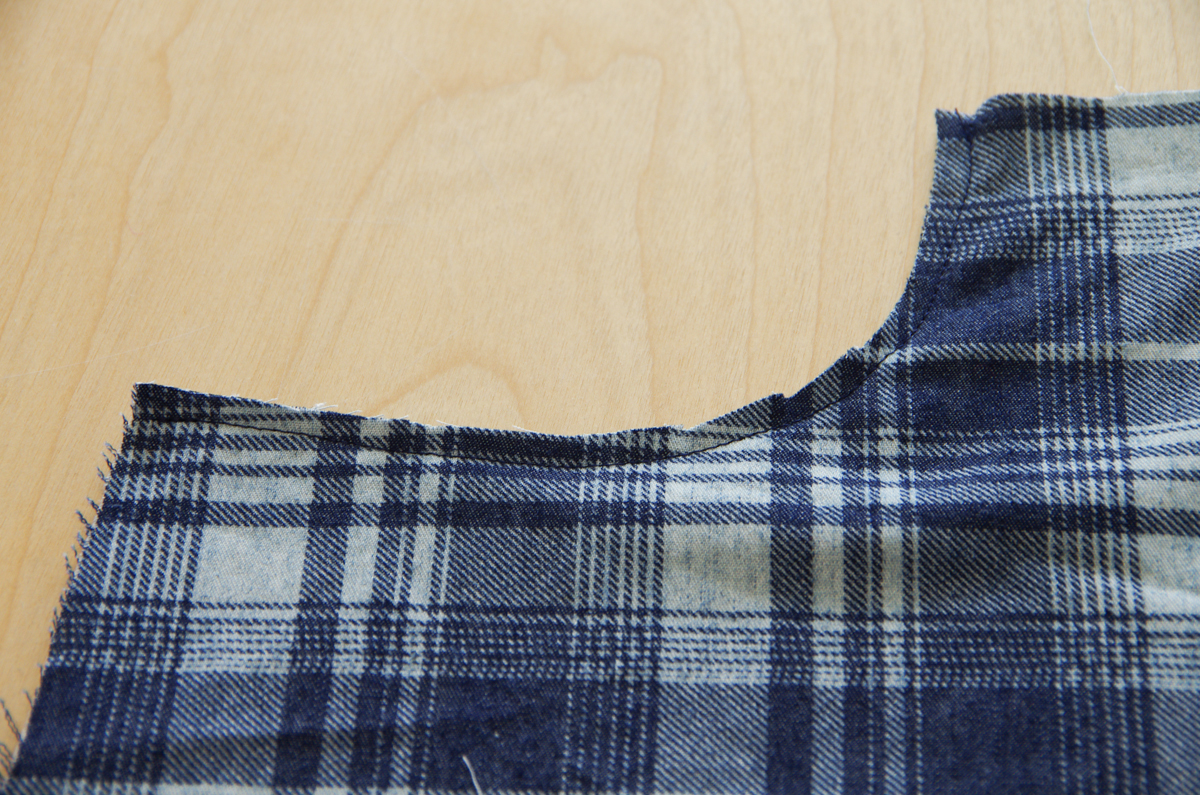
Cut out the Peacoat Front, Back, and one or both sleeves (it is nice to fit with both sleeves but if you are short of fabric, it is possible to fit with one). It is not necessary to cut out the lining or facings or any of the design details such as sleeve tabs or the hood.
Fitting
When you sew the pieces together you can leave one dart unsewn so you can see the difference the dart makes in the fit and choose which effect you like best. Put the mock-up on the wearer and pay attention to any folds and drag lines in the fabric. Take your time pinching different seams and thoroughly pinning them or open up any seams to give more room where needed. In the photos below, Matt is wearing our original size small sample which fits him very well except for the arm length. We’ve pulled the fabric taught or loose to demonstrate fit issues for the purpose of the sew along.
Common problem areas to watch for include:
Across the shoulders: Have the wearer put their arms out in front of them and ask if they feel constrained (this is where it is useful to have two sleeves).

If they feel constrained the fabric will look too taught across the shoulder blades (even if it doesn’t but the wearer says the coat feels right, now is the time to add some room at the center back seam to suit the wearer’s preference).

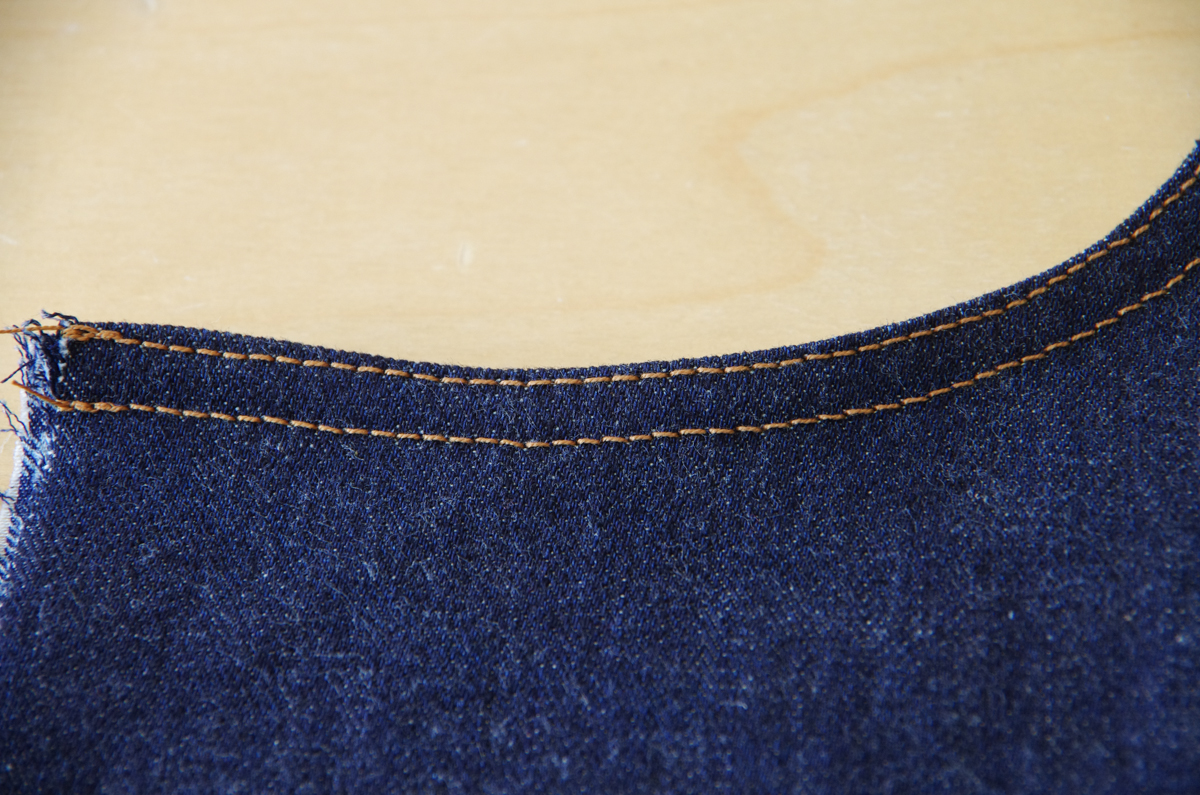
Open up the center back seam across the shoulder blades to give more room. Or, if the mock-up buckles across the back and looks too roomy, take in the center back seam.

Taper your adjustment so that there are no changes made to the neckline or it will change the way the collar fits on the neck.
The small of the back: If the fabric is pooling at the small of the back, the coat is likely too tight across the hips so the fabric is not able to fall smoothly down the back.

Let out the center back seam and the angled side seams to give more room around the hips. You can also exaggerate the curve of the center back seam by bringing in this seam at the small of the back to create a very fitted appearance (this is a style choice). Avoid the temptation to overfit - remember that a warm wool coat is usually worn over bulky winter clothes. Have the wearer try on the mock up with a sweater underneath.
Sleeve and hem length: It is very easy to create the perfect length of sleeve. Matt clearly needs some length added to his sleeve!

Our Garment measurement chart includes the sleeve underarm length - this is not measured on a sleeve seam since it is a two piece sleeve. Measure from the wearer's underarm, over their ever so slightly bent elbow to the base of their thumb. If this measurement matches our garment chart, you are good to go! If it doesn't, use the provided lines and our Lengthen or Shorten tutorial to create the perfect sleeve and lining length. As for the coat hem, you might want to lengthen or shorten the hem to fit a particularly tall or short person, or, you might want to adjust the length to suit a style that you are after. You can lengthen the Goldstream to duster length if you so desire! You could shorten it to jacket length for a very jaunty look. Right now the finished coat is designed to fall to mid hip. Keep in mind that you may need to add a center back vent to allow the legs a full range of movement if you lengthen the coat a lot.
To see an inspiring lengthened version, head here. To see an amazing shortened version, head here.

If you need help fitting your Goldstream, please email me (Morgan...pictured above in a very old photo from the early days of Thread Theory!) at info@threadtheory.ca and include pictures of your mock up on the wearer. A straight on back view and straight on front view are most useful to me. I would love to help you out!
The next sew-along post is an exciting one - we are going to cut out and mark our fabric!
Goldstream Sew-Along: Gather Materials

I’m so glad you’re joining me for the Goldstream Peacoat Sew-along! Tackling a big project like a wool coat is so much more approachable if the steps are broken down and we just think about one aspect of construction at a time.
As you can see from the schedule in my last post, it will still be a number of days before we actually start sewing. The prep work is just as important as the actual sewing when it comes to sewing a professional looking Peacoat!
Today let’s talk about assembling our supplies so that you have time to make your decisions and gather materials before construction begins.

First up, your material:

Most people choose a medium body pure wool for their Goldstream Peacoats (have a look at many beautiful wool versions by searching #goldstreampeacoat on Instagram or simply entering ‘Goldstream Peacoat’ in your search engine). I prefer a very dense wool for this project because it creates the most crisp looking coat. Looser wools will tend to drape more against the body to result in a casual looking coat...which could be a great look for Variation 2 as this style with a hood is meant to be casual!
Other materials will also work well though! Look for any ‘coating’ material with enough body to create a crisp collar but avoid anything that is too thick to sew multiple layers with your sewing machine. When we attach the facing to the neckline we will be sewing through four layers of wool plus the interfacing used on the collar. Perhaps test out your prospective material by buying a small piece of yardage or asking for a swatch and then running multiple layers through your machine.
Next, the lining:

Image Credit: A cozily lined Goldstream Peacoat sewn and blogged at Cecile Bricole.
When lining your Goldstream, there are a couple of things to consider:
- How does the weight of your chosen material interact with the weight of your chosen lining? If you are sewing with a heavier wool, choose a more substantial lining so that the final effect does not seem flimsy and cheap when contrasted to the outer shell of the coat. If you are sewing with a light weight wool, avoid choosing a heavy quilted lining that might weigh the outer shell down and cause it to sag over time.
- What purpose will your Goldstream serve? Will it be a winter coat designed to keep the wearer very warm on a daily basis? Choose a quilted or flannel-backed lining. Or will it be a special coat that is worn for semi-formal occasions? Choose a beautiful bemberg lining or perhaps something with a bit of flair (pinstripes, paisley, a twill weave, etc.)

Now let’s pick our interfacing! You will want to use a pretty substantial interfacing for this project - far heavier than would normally be chosen for the average shirt or dress sewing project. Horsehair interfacing is ideal as it has the perfect amount of structure and body to pair with wool but, failing that, look for a medium to heavy weight woven interfacing - it could be fusible or sewn-in. I usually prefer sewn-in interfacing when working with wool because fusibles don’t tend to fuse very thoroughly.

When sewn as instructed, the Goldstream features a fairly minimal amount of added structure. The collar and facings are interfaced but the coat front is left unsupported. This keeps the project simple and approachable for those new to sewing a coat. It is very easy to add more structure to your Goldstream if you desire! Purchase sewn in interfacing or horse hair canvas and cut out two coat fronts. You can cut the entire coat front or you can cut a shape as illustrated in the diagram above so as not to add bulk to the dart. You will need double the stated interfacing if you plan to cut two coat fronts.

When my mom sewed a Goldstream for my dad, she experimented (for the very first time!) with hair canvas by following the directions in my handy Reader’s Digest sewing book (I share some of the relevant pages in our Belvedere Waistcoat sew-along). Structure is added to the key areas on the lapel and chest only so it is not necessary to buy very much hair canvas for this method. You can read about her sewing experience here.
Whatever level of interfacing you choose (your coat will still look wonderful if minimally interfaced as instructed!), apply the interfacing by fusing as instructed, or baste it to the coat within the seam allowances. Add even more structure by hand stitching across the entire surface so the interfacing stays adhered to the wool (this is called ‘pad-stitching’ and you can find more details on how to do this in our Tailored Peacoat Series).
![]()
In addition to interfacing, shoulder pads help to add structure to the Goldstream Peacoat. If possible, avoid those bulky wedge shaped shoulder pads that are often found hanging on the wall in the notions section of big box fabric stores as they add quite a severe shape (unless, of course, this amount of shaping is what you are after!). A more subtle, modern shoulder pad is suitable for the Goldstream.

Tailored coats usually include shoulder pads made from layers of fleece, hair canvas, and batting. You could make your own, find a pair from an online tailoring shop (scroll down to link to the shops I recommend), or scavenge a pair from one of the numerous tailored menswear garments in your local thrift store!

Lastly, it’s time to choose our buttons! I love a classic black peacoat with discrete black fouled anchor buttons. The fouled anchor design references the garment’s military provenance but being black instead of a shiny brass, the finished coat is a more versatile piece.

If you want to create a true classic though, brass fouled anchor buttons are the way to go! If you are created a more casual duffle-style coat, a leather or wood button would be lovely. I’ve always been a fan of braided leather buttons.

Select seven 1” buttons in your main style. Find four ½” buttons to coordinate (in the case of Variation 1 where they will be featured on the epaulets and sleeve tabs) or blend in with the wool (in the case of Variation 2 where they will be more or less invisibly adhering the removable hood to the neckline).
Resources
Here is a list of some excellent North American resources for wool, lining, stabilizer and buttons:
Wool:
Stylemaker Fabrics: (US) A wide variety of wool blends in lovely colors (and there are even a few nice plaids and prints!)
Sultan’s Fine Fabrics: (Canada) High quality 100% wools which, at the time of publication, are new in the shop and deeply discounted!
Mood Fabrics: (US) An enormous selection all conveniently organized in one ‘coating’ section.
Lining:
Mood Fabrics: (US) They have a nice selection of rayon twill linings including some heavier weight ones which would be ideal for the Goldstream.
Club Tissus: (Canada) Their Kasha lining has a satin right side and flannel wrong side to create a warm coat that still looks dressy.
Stabilizer:
Black & Sons: (US) Excellent selection of tailoring supplies with both fusible and sewn-in coat weight interfacings. Also, they carry double breasted coat fronts that can be pad-stitched onto the Goldstream front and trimmed to fit the specific style of the pattern if needed.
Shoulder Pads:
Black & Sons: (US) If you are purchasing your stabilizer from this online shop, you might as well purchase some shoulder pads too!
Make your own: Here’s a tutorial from Closet Case Patterns!
Find some at your local thrift store (any wool blazer or coat will have some that you can use!
Buttons:
Thread Theory: (Canada) I love our sustainably produced tagua nut fouled anchor buttons! They were designed for the Goldstream Peacoat and are the perfect size and lustre.
Black & Sons: (US) A wide variety of metal anchor button designs.
Lots of Buttons (US) A great place to go if you are searching for something specific as their selection is huge and their site features many ways to search.
Before you run off in search of fabric, keep in mind that I will be posting about styling and fitting in two days! During that post I will share RTW inspiration, past customer projects and we’ll also talk about how to make a muslin (and what type of material you should use for it). Some of these discussions might affect your final fabric choice!
Goldstream Peacoat Sew-Along: Schedule

If you're nervous about sewing the Goldstream Peacoat (perhaps this is your first coat project?), then this is the sew-along for you!
I will be walking you through each step within the instruction booklet by giving you lots of process photos and detailed advice. Care to join me?
September 30th: Assemble your supplies
Oct 2nd: Choose a size, fit and style considerations
October 4th: Preparations (cut and mark fabric)
October 7th: Sew the details (darts, epaulets, pockets)
October 9th: Sew the collar and hood
October 11th: Sew the facing and lining
October 14th: Sew the Peacoat body and sleeves
October 16th: Attach the lining to the coat
October 18th: Topstitching and buttons
October 19th: Styling and care
All posts will be shared here and newsletter recipients will receive a Friday round-up of the week's sewing progress in their inbox.
If you are looking for a more advanced coat-making project, head over to our Tailored Peacoat Series.
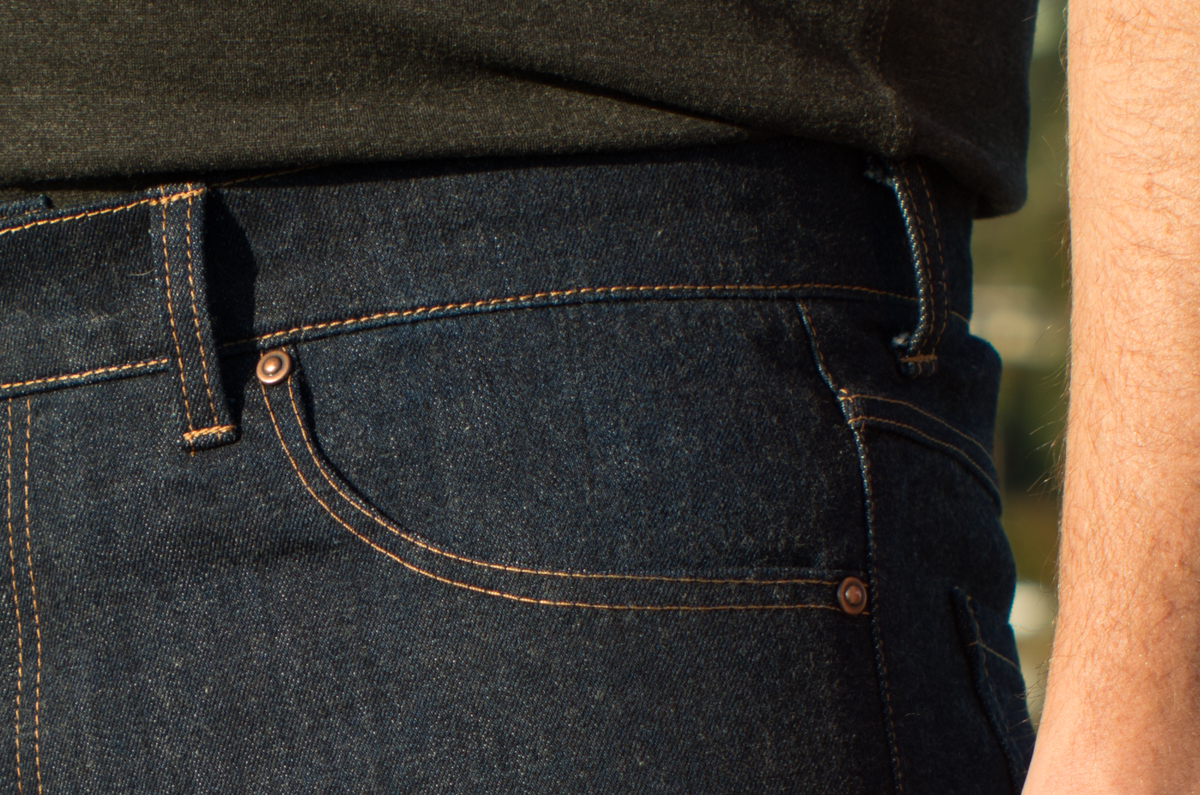
Jeans Sew-Along: Finishing Details
Today we will finish our jeans! These are the most satisfying steps of the whole sewing process: We will add the belt loops, add the optional tag and hem the legs.
Let's start with the belt loops.

With the wrong side facing you, finish the right side of the long belt loop strip using your choice of a serger or a zig zag stitch.

Fold the long raw edge towards the center of the belt loop and press.
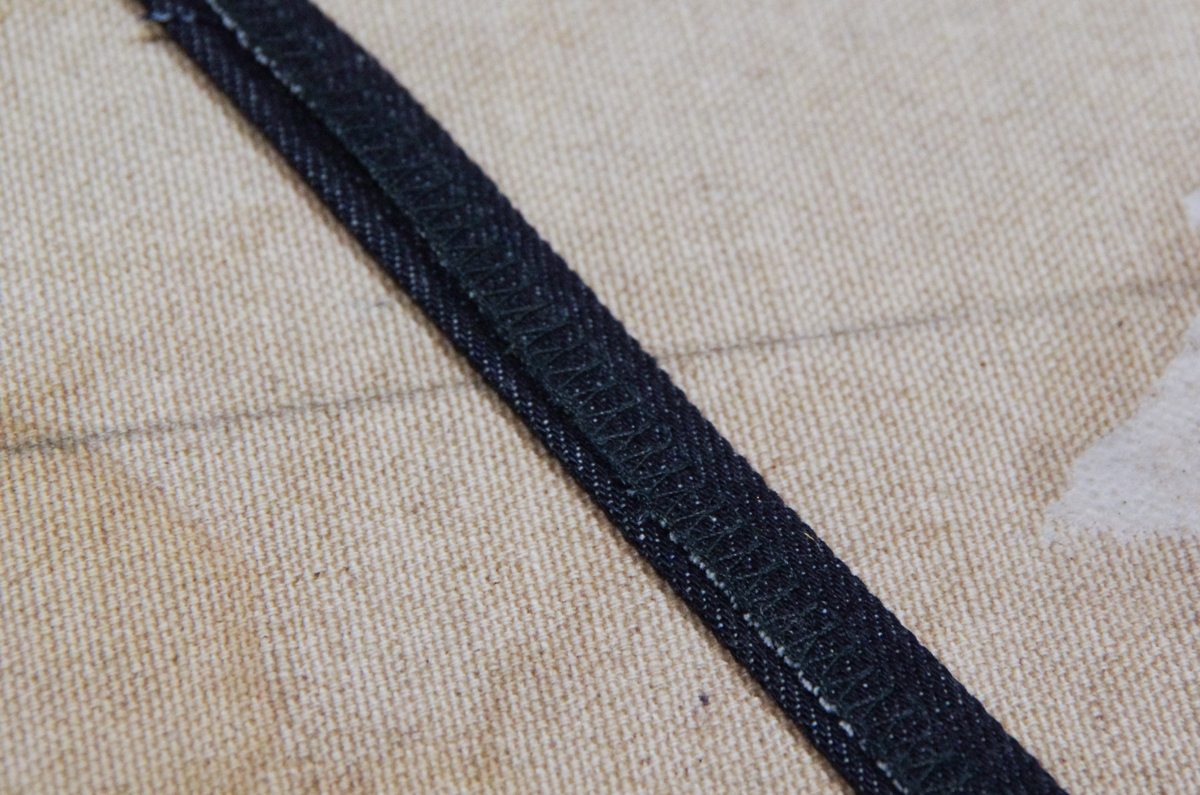
Fold the finished edge over the raw edge so that the belt loop is pressed in thirds.

From the right side of the belt loop, topstitch along either edge. Be sure to catch all three layers of fabric. I usually topstitch just a little less that 1/4" in from the folded edge (rather than edgestitching) to ensure I've caught the serged edge.
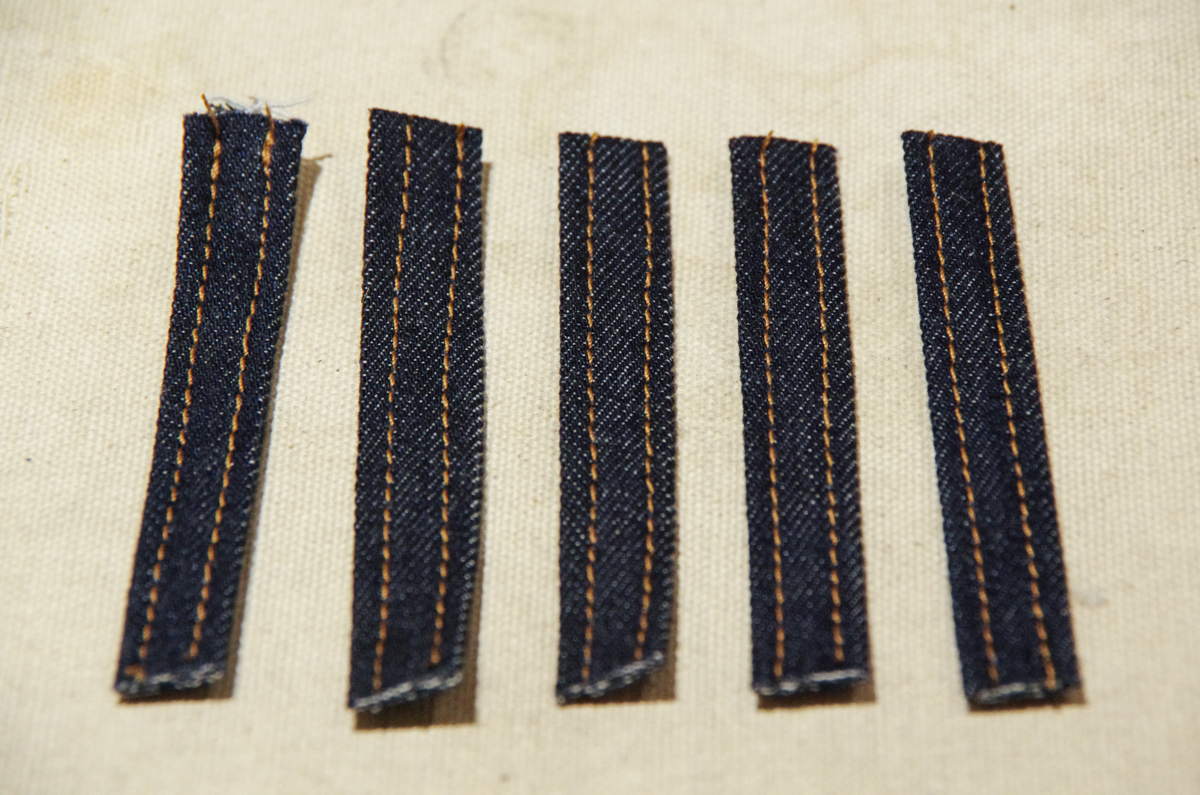
Cut the belt loop strip into five equal lengths.

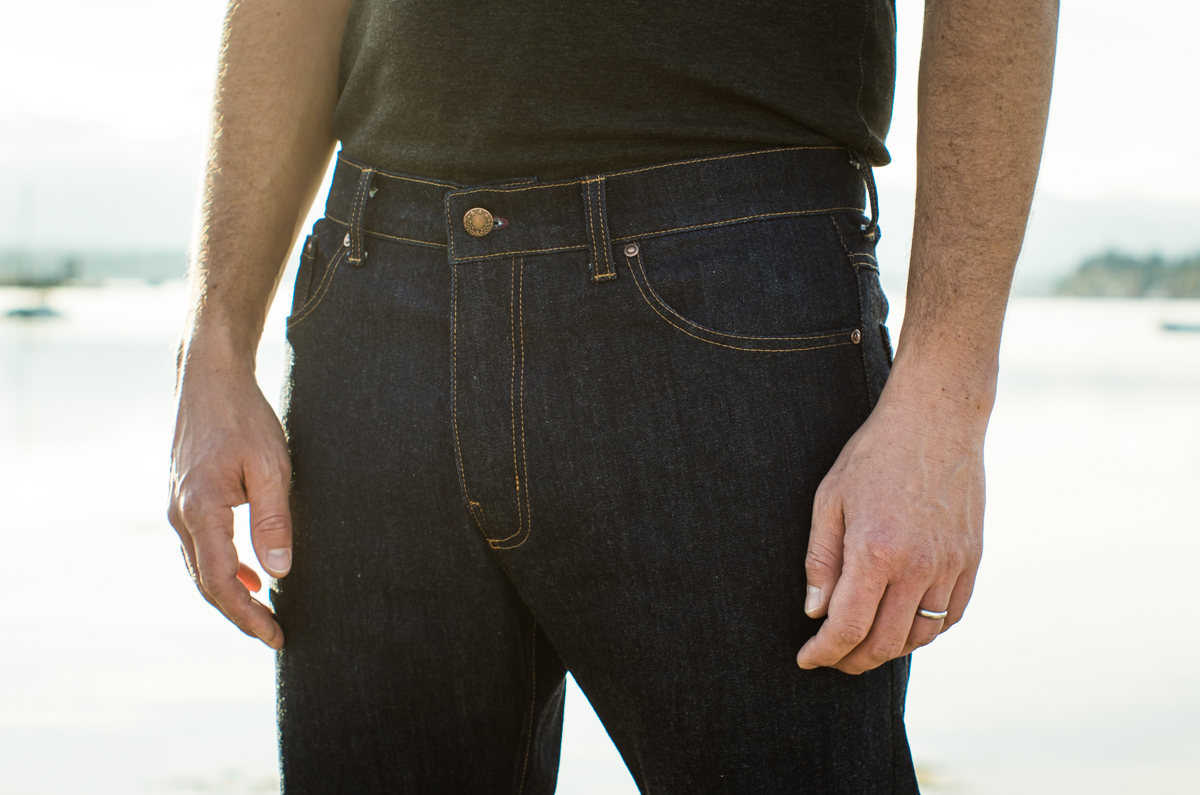
Place the belt loops as per the diagram in the instruction booklet. They should be extending above the waistband with right sides together. They are positioned as follows: 2 are on the front of the jeans about 1/2" from the front pockets (so there is enough room to add a rivet to the front pocket later), 1 is at center back, and 2 are about 1.5" back from the side seams.
Stitch the belt loops in place in line with the waistband topstitching.


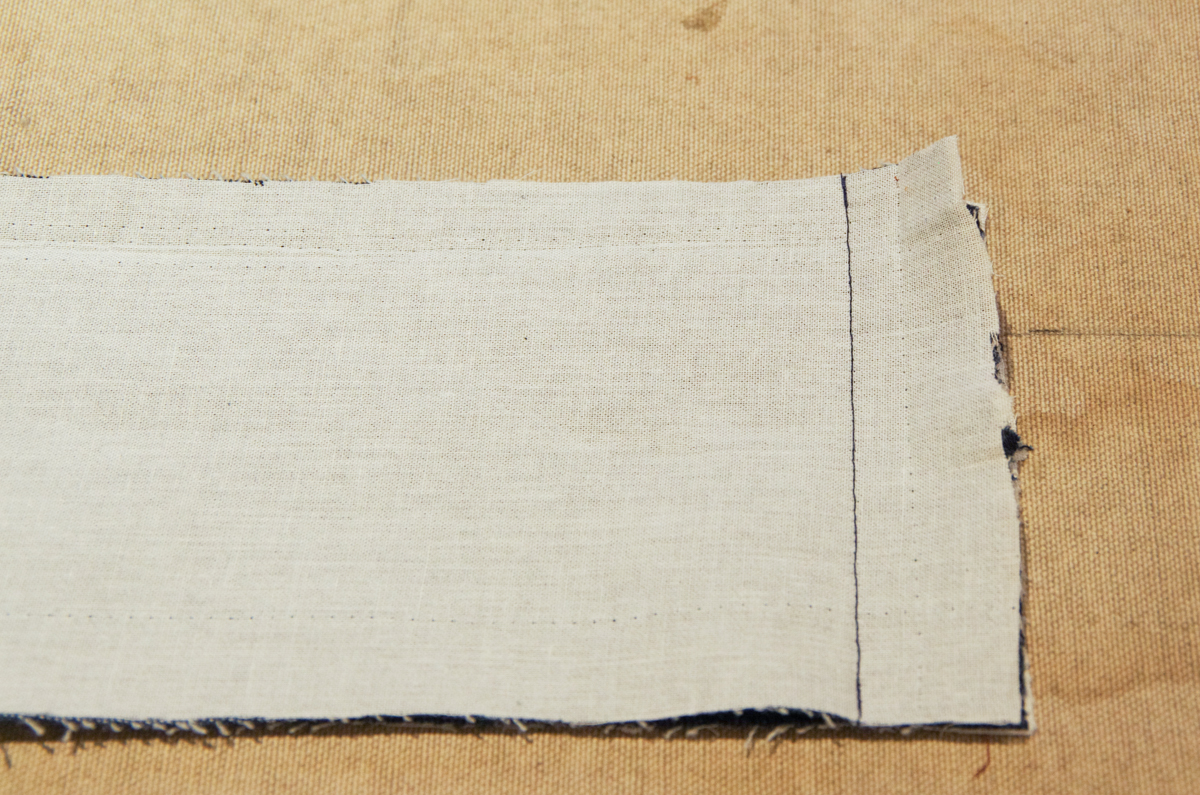
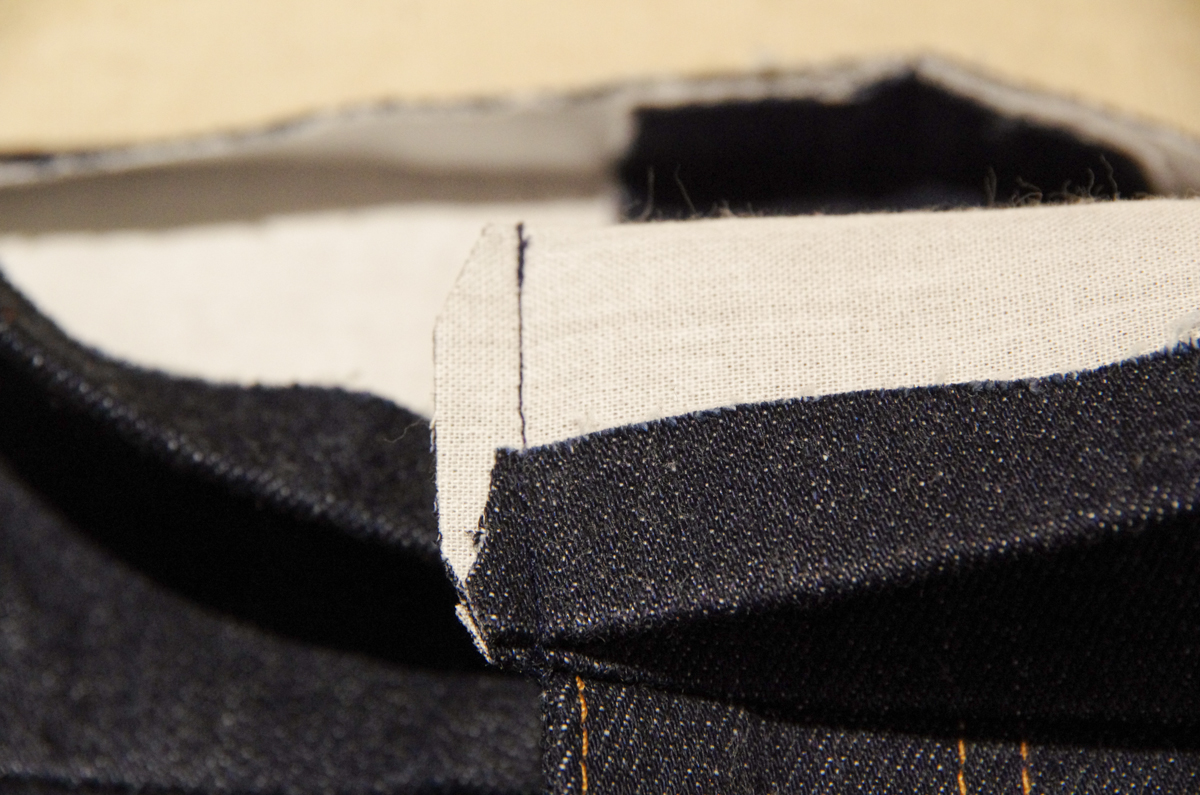
Fold the belt loops down and curl under the raw end of the loop 1/2". Stitch across the bottom of the belt loop with topstitching thread. Stitch across the top of the belt loop with topstitching thread - line up this stitching with the waistband topstitching.

And now are belt loops are finished!

Before we hem the jeans, it's a good idea to try them on the recipient to check for the perfect length. Make sure they are wearing their favorite shoes. You can also compare the length to their favorite storebought jeans if you are trying to keep the jeans sewing project as a surprise gift! Make any small length adjustments as necessary by trimming a little off the hem or by sewing with a slightly smaller hem allowance.

Press the hem up - the Quadra jeans need to be pressed up 3/4" and the Fulford Jeans need to be pressed up 1/2".

Press up once more to enclose the raw edge (again 3/4" for the Quadra Jeans and 1/2" for the Fulford Jeans).

From the right side of the jeans, edgestitch around the hem. Give the hems a nice press to finish them off.
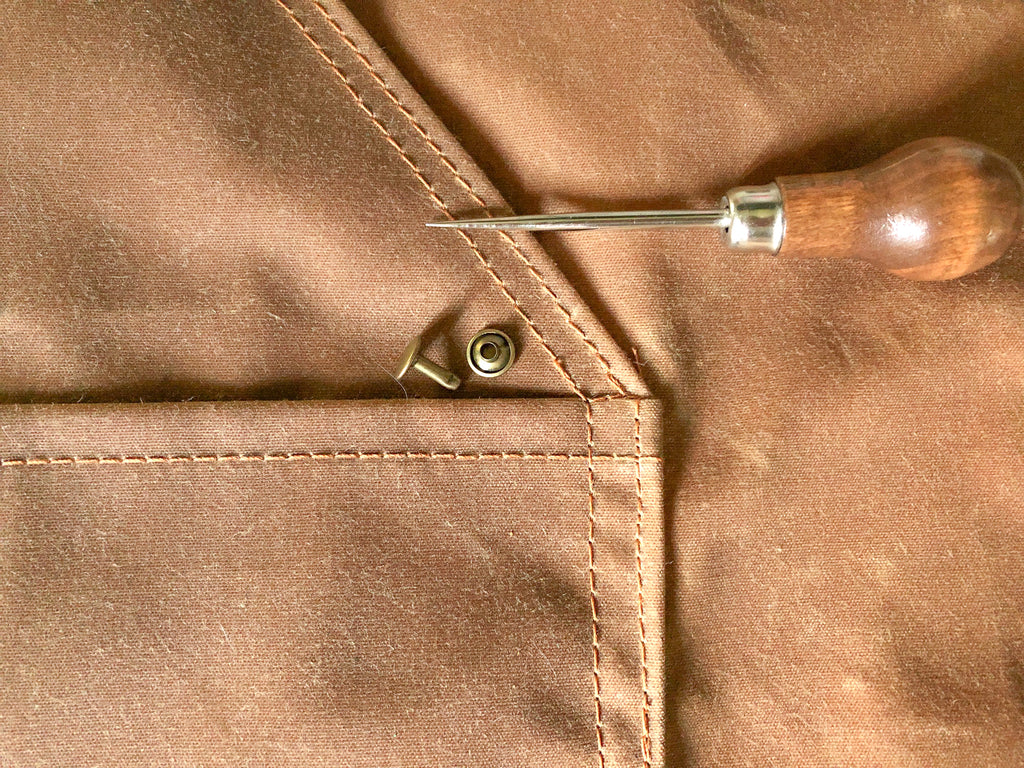
And now we can apply our rivets!

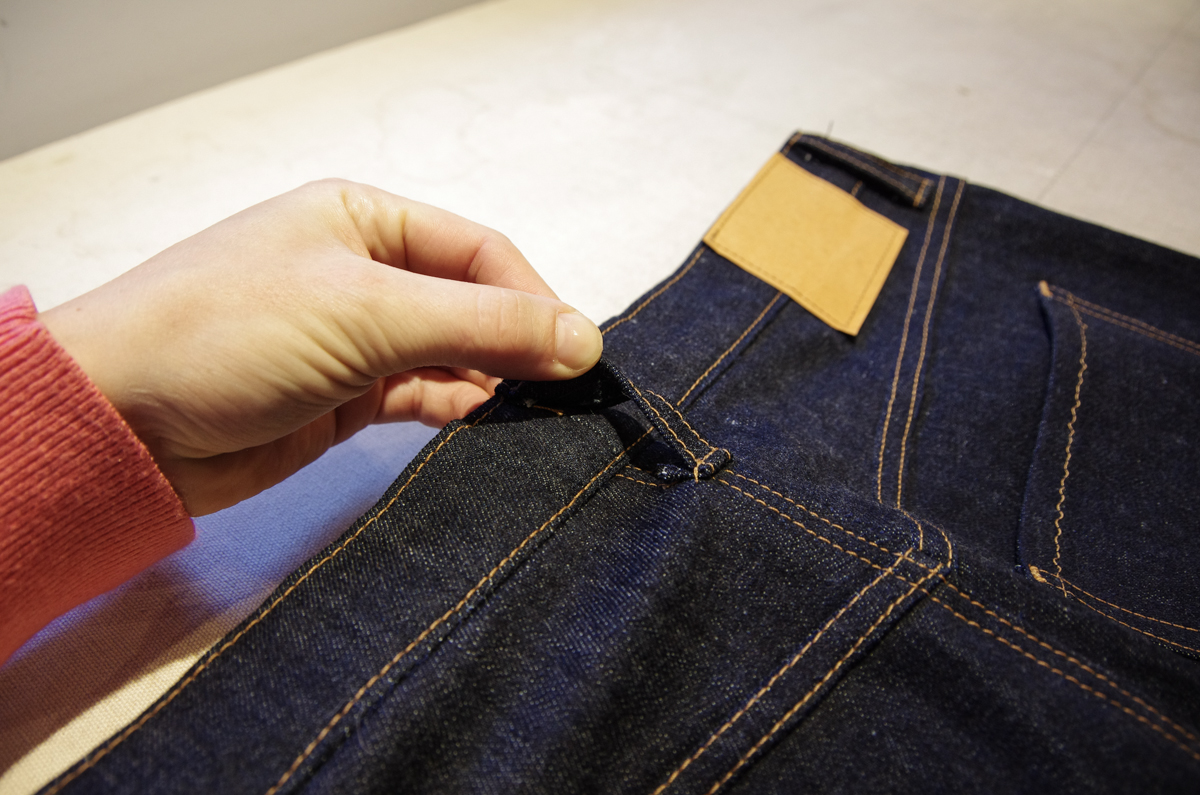
Add rivets to all of the front pockets - the two front pockets and the coin pocket. Use the manufacturer's directions. Here I am using the Prym rivets that we stock in the shop with the included tool. Since jean rivets are quite a ways from the fabric edge, I simply use a cutting board instead of folding over the other half of the rivet application tool. I still use the purple holder and the top half of the tool for the right side of the rivet as this helps me to hold it securely in place and prevents me from squishing the shaped metal.

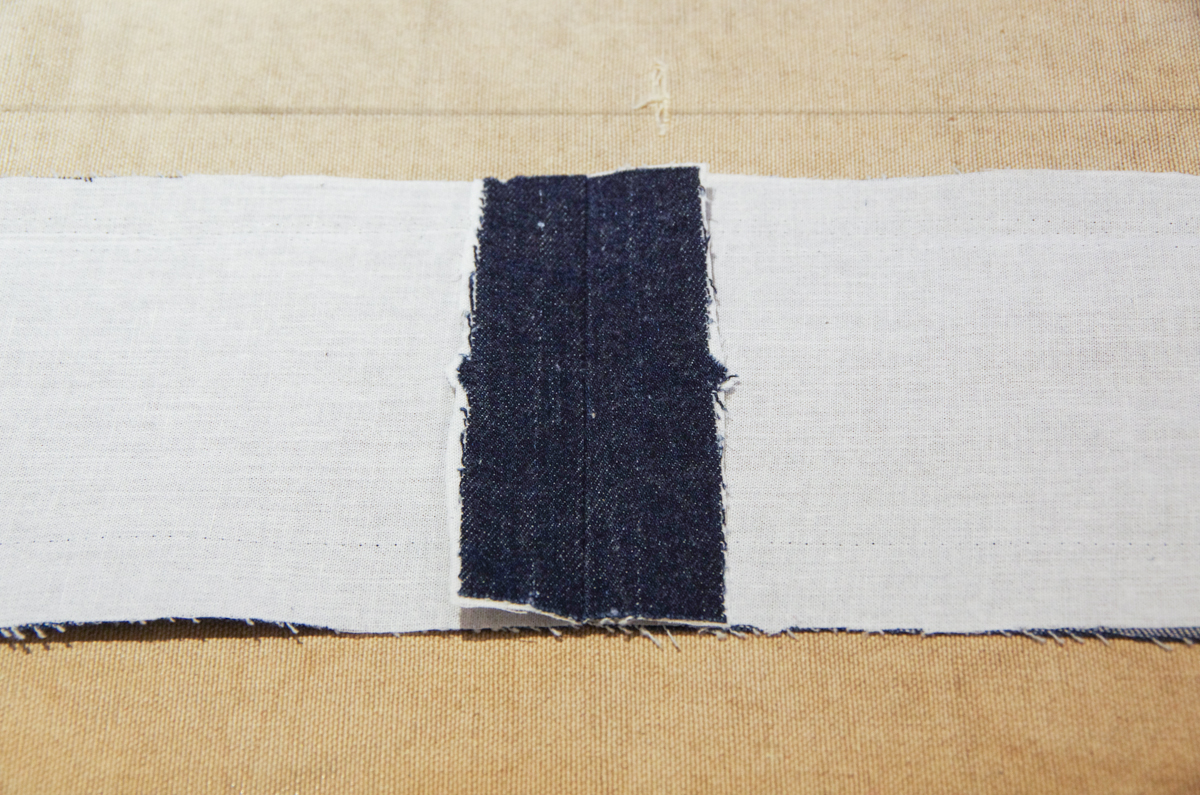
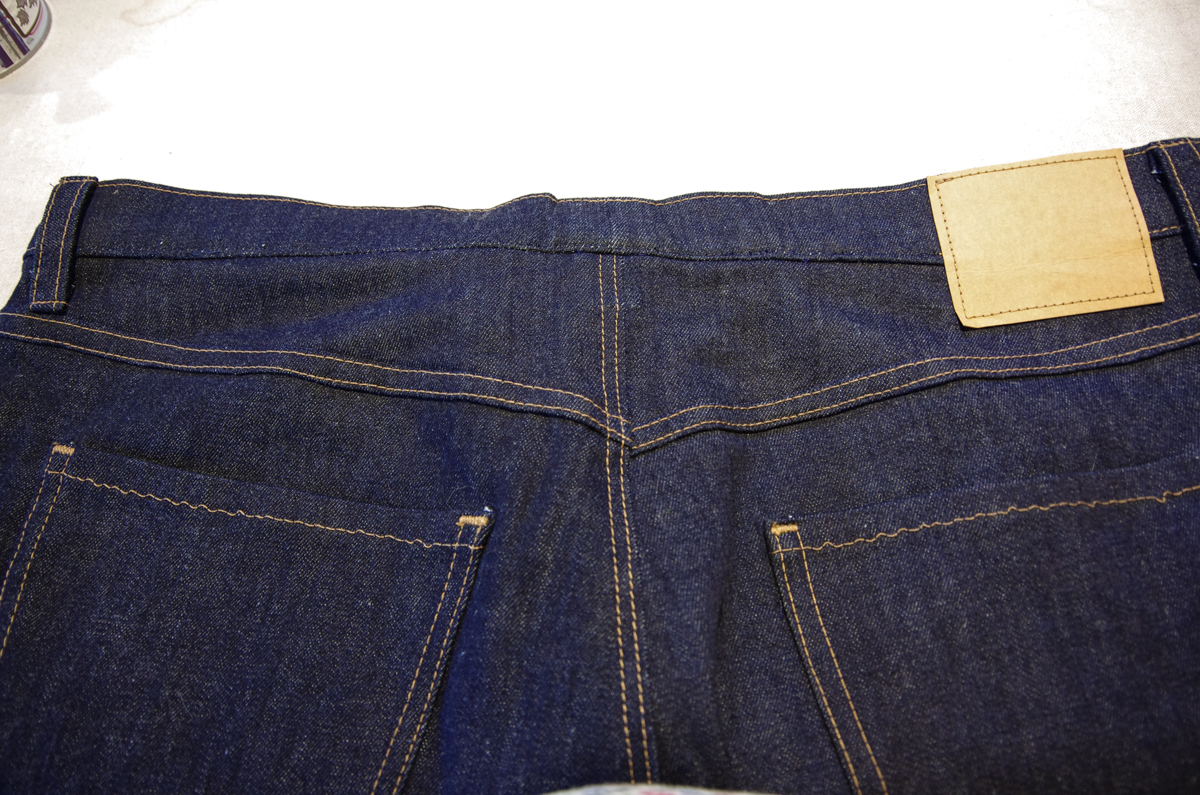
Aren't you amazed how professional these little details have made your project look? If you really want to pull out all the stops, you can add one last detail to your jeans: a leather or Kraft-tex (washable paper) label to the back of the waistband.

Cut a label measuring 3" X 2 1.2" and position it about 3 1/2" to the right of the center back belt loop. Edgestitch around it using topstithcing thread.

I love the cheeky statement this blank label makes..."Look, I made this myself...there's no brand!"
We're now done our Quadra or Fulford Jeans! Way to go! You might like to give them a wash before they are worn to give them that soft, worn in look (new jeans can look a bit too pressed and stiff).
Congratulations on finishing such a big project! Thanks for sewing along with me.
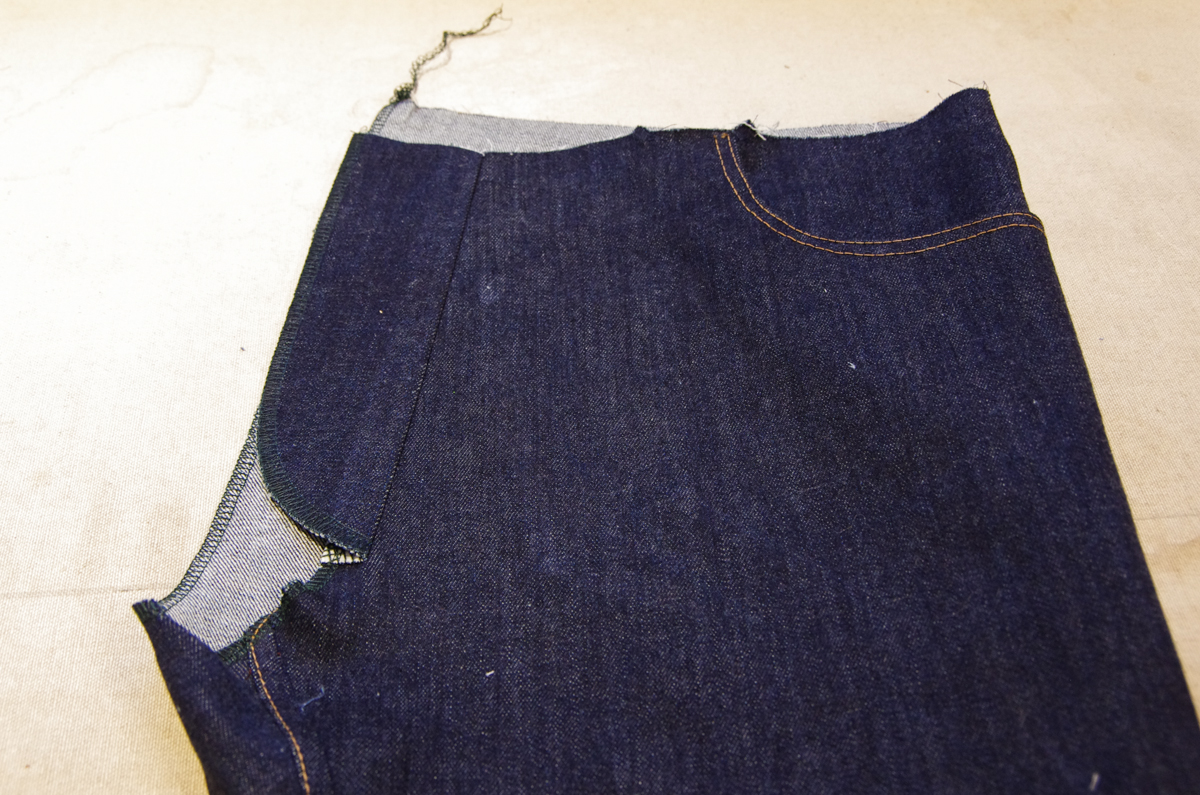
Jeans Sew-Along: The Waistband (and how to adjust the waistband fit after the jeans are finished)
We're on the home stretch now! Today we will be sewing our waistband and attaching our jeans button.
Begin by ensuring that your waisband pieces are interfaced. Note that if you are working with a denim with quite a bit of stretch, you may want to consider using a knit interfacing so that the interfacing doesn't stabilise the waistband so much that it no longer comfortably stretches! I've used a woven interfacing here because I decided I didn't want my waistband to stretch (I only wanted the denim to stretch when extra room for movement is needed through the legs).

Place the right and left waistband with right sides together and pin along center back.
Stitch using a 5/8" seam allowance. If you found you needed to take in the waistband slightly when you fitted the jeans to the wearer, you can do so at this point. I took the waistband in a total of 1/2" (by stitching 1/4" in from the seamline) but I left the extra wide seam allowance untrimmed in case the wearer's weight fluctuates and he needs the waistband let out at a later point. We will go over how to do this at the end of this post!
Press the seam allowance open.
Press up the bottom of the waistband 5/8". Be sure to have your waistband laid out so that the left waistband is to the left, the right is to the right and the wrong side is facing you - this way you will be pressing up the correct edge of the waistband.

Pin the waistband to the jeans with right sides together. Match the center back seam, the side seams to the notches, and then allow the waistband to extend 5/8" beyond either side of the fly. Pin thoroughly. You will notice that the jeans and the waistband are slightly different lengths, we will be easing as we sew to provide a very nice fit (no gaping waistband).

Stitch using a 5/8" seam allowance.

Grade the seam allowance. I like to trim the bulky jeans seam allowance narrower and leave the waistband seam allowance wide as this reduces the most bulk.
Press the seam allowances towards the waistband.

We will now be finishing the front edges of the waistband. Fold the waistband in half with right sides together. Make sure the seam allowances stay tucked up towards the waistband. Pin through all layers (both layers of the waistband and both seam allowances).

Create a vertical line of stitching along the edge of the waistband. Make sure it lines up as perfectly as possible with the edge of the fly.
Trim the seam allowance thoroughly to remove as much bulk as possible. Notice how I've clipped in towards each corner and graded the seam allowance.
Repeat this process for the other end of the waistband.

Flip the waistband right side out and press in half thoroughly. We will now be stitching the waistband close. It really helps to take a few extra steps at this point to ensure your topstitching catches both layers of the waistband and hides the seam allowances entirely. I like to very thoroughly pin on the wrong side of the jeans and then baste the waistband in place, also from the wrong side of the jeans.

From the right side of the jeans, start the edgestitching on the right front (the fly underlap) so that backstitching is not visible when the button and fly are closed. Edgestitch around all edges of the waistband.

Doesn't that look lovely?

Here you can see the backstitch on the right front - nicely hidden from view when the jeans are worn:
With our waistband complete, we just need to add a buttonhole and button!

Mark your buttonhole with chalk. Remember to adjust the length of the buttonhole to suit your chosen button. Create a buttonhole that is big enough to make it easy to slip the metal shanked button through. You might like to test the size out on a scrap since I find metal shank buttons need more room than you would normally expect!
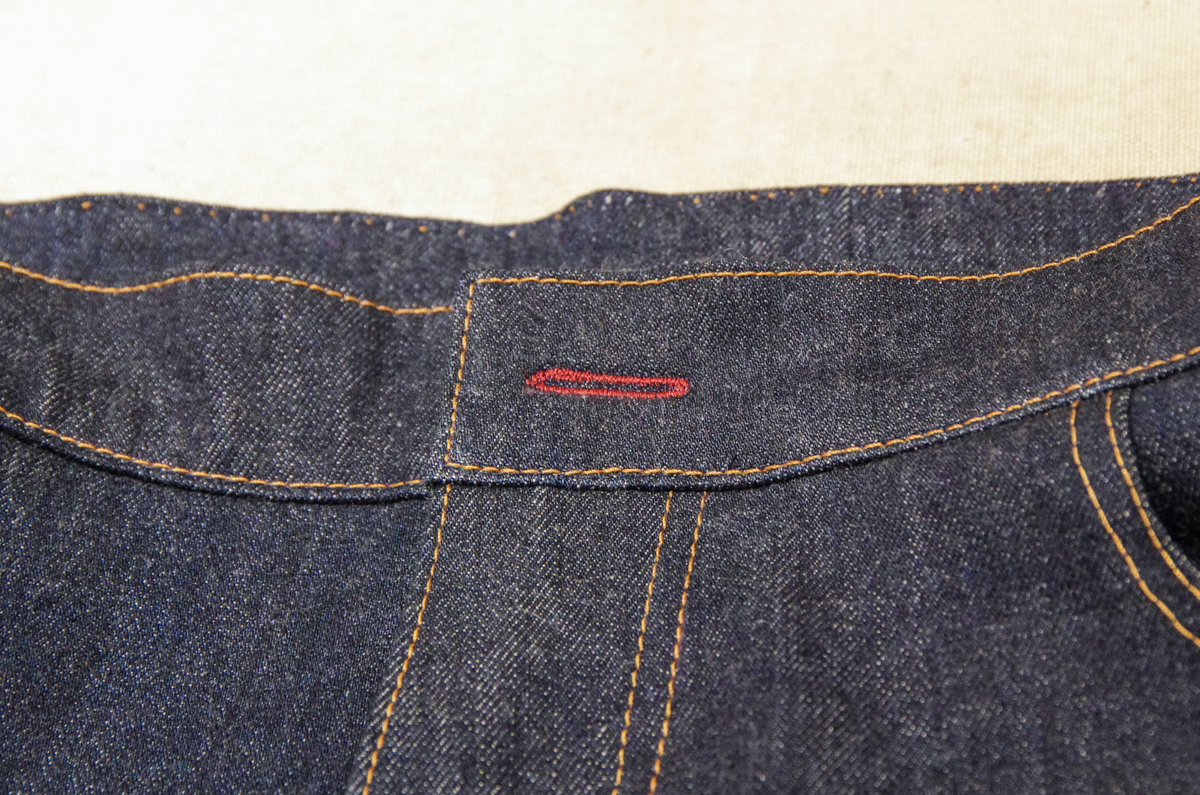
I like to stitch a contrast buttonhole as is often found on storebought jeans. Nice contrasting colors include red or brown but you could customize to match your pocket bag colors of your recipient's favourite color!

Open the buttonhole using a button hole chisel or a seam ripper. I love using the buttonhole chisel as I am far less likely to rip into the buttonhole stitches with it...I always manage to break a few of the zig zag stitches when I use a seam ripper!

Now it is time to apply the button. The button is placed directly above the zipper on the right hand side of the jeans. I'm using the pliers and Prym buttons that we stock in our shop. You can also use a hammer and a sturdy surface to apply jeans buttons (such as a cast iron fry pan, for instance). I find a sturdy surface is very important when I am not using some sort of application tool in order to ensure a strong application.

And there you have it, a finished waistband!
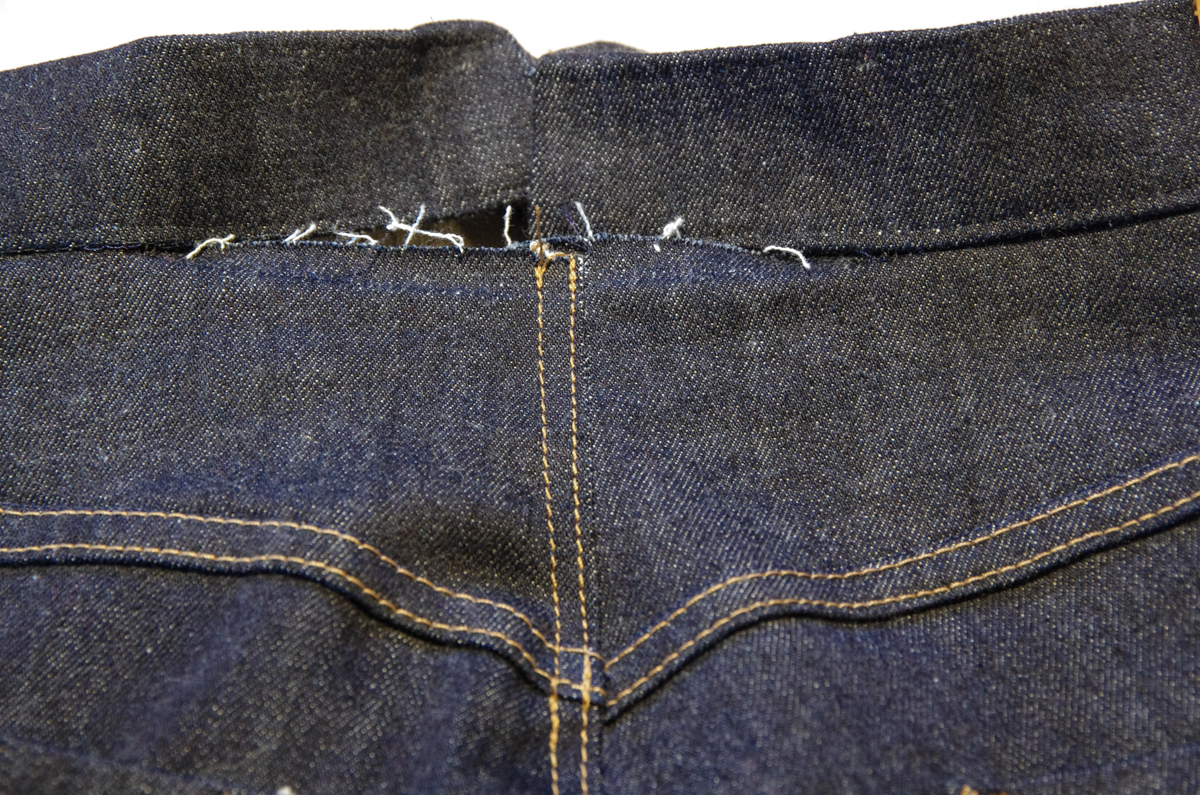
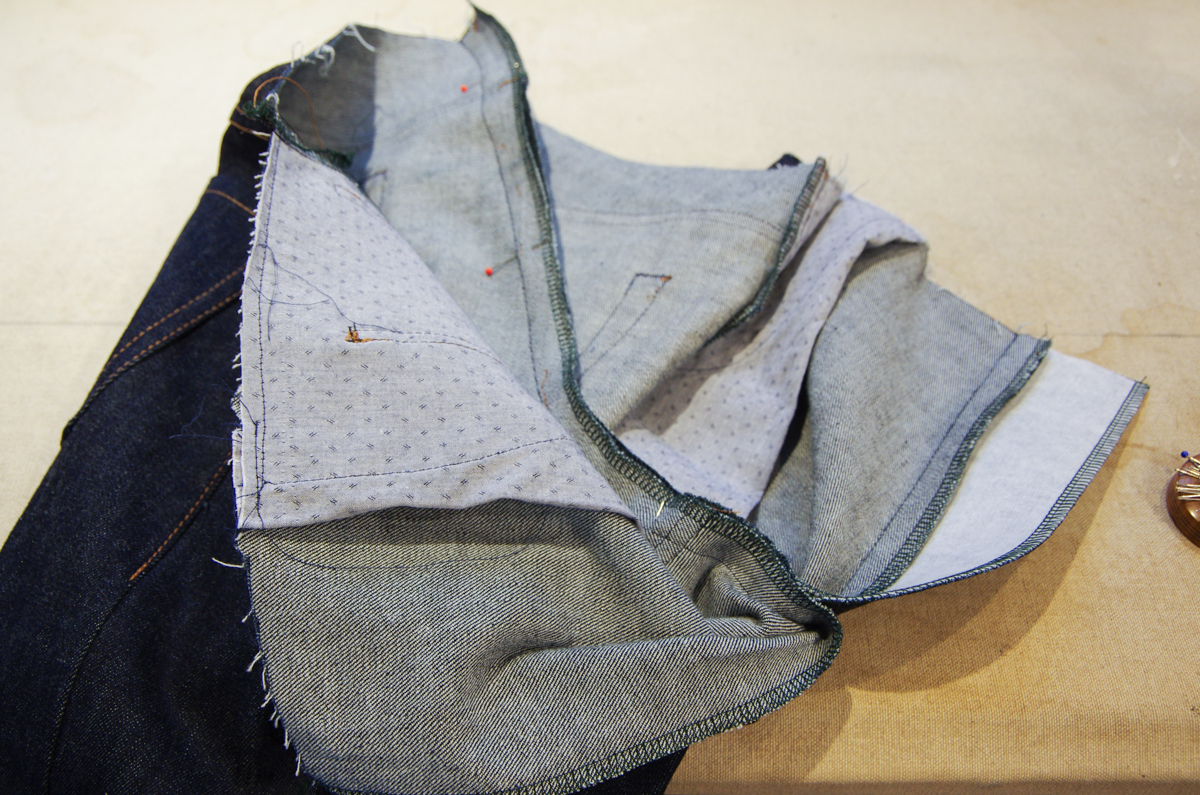
Now, before we finish up for today, I want to show you how useful the center back seam design can be for men with fluctuating waists. It is also helpful if you plan to sew these jeans as a surprise gift and are not able to fit as you go.
Normally, finished jeans are VERY unpleasant to alter because the entire waistband must be removed (including all that topstitching!) in order to bring the waistband in and you really can't let the waistband out since it is necessary to grade the seam allowances at the front edge of the waistband so thoroughly.

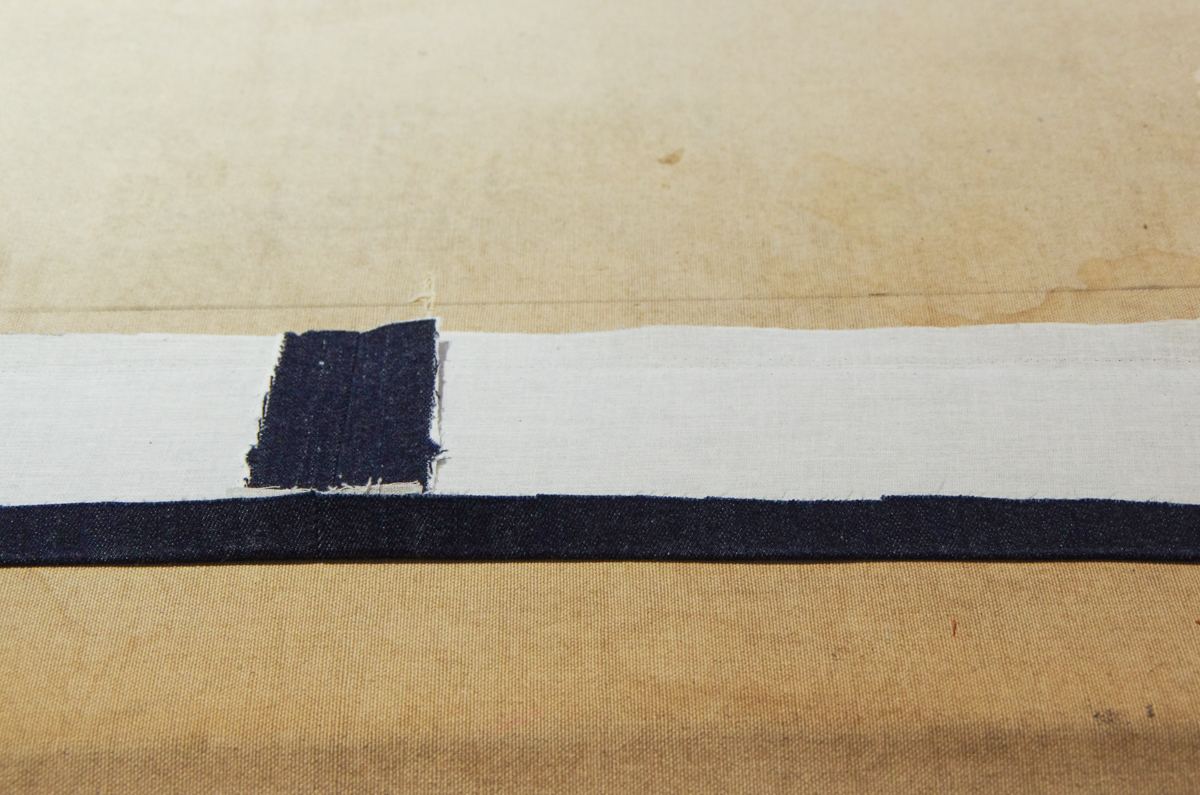
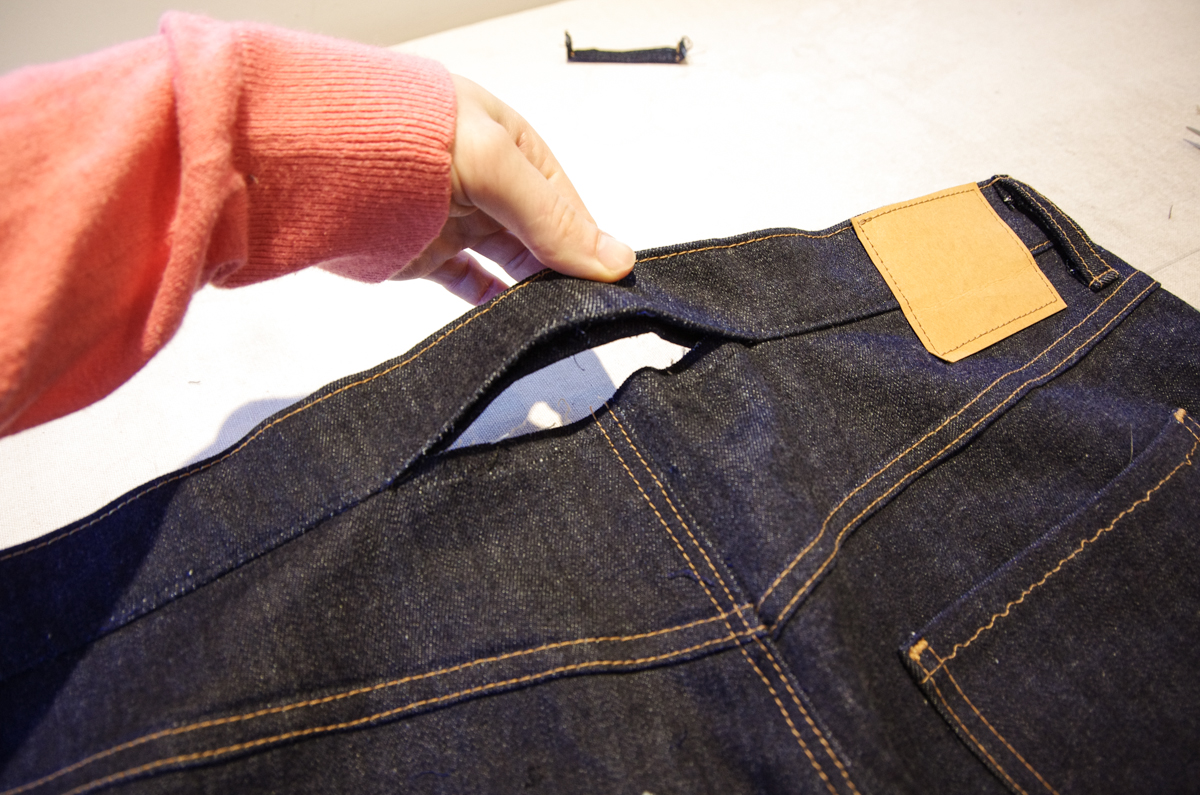
With a center back seam everything is simplified! We can bring the waistband in or let it out by removing the center back belt loop.
We then just need to remove some of the topstitching. Here I've chosen to remove the topstitching all the way until the side belt loop (left in the photo) and the tag (right in the photo) so that I can hide my backstitch when I re-topstitch under the belt loop and somewhat under the edge of the tag. Be sure to remove the topstitching from the top edge of the waistband at the same time. I didn't do that here but needed to do so when I opened up the centre back of the waistband in a couple of steps...so you may as well remove that stitching now too!
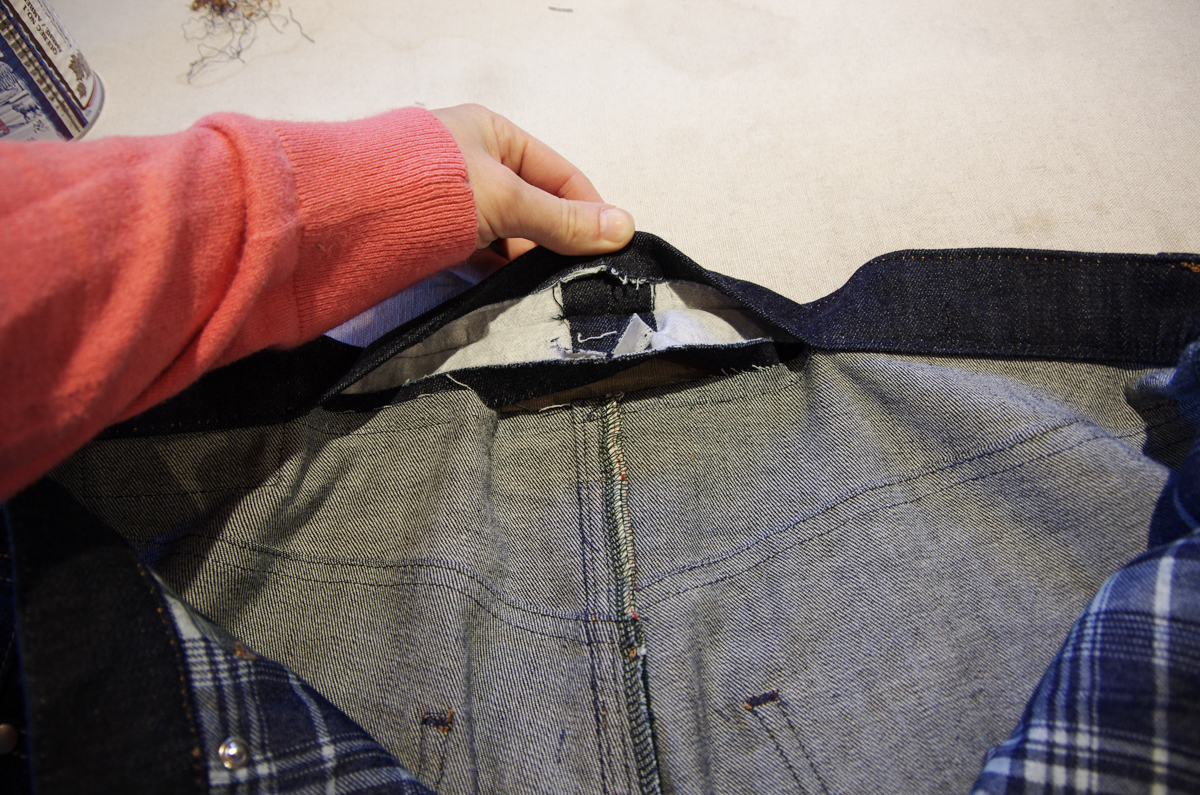
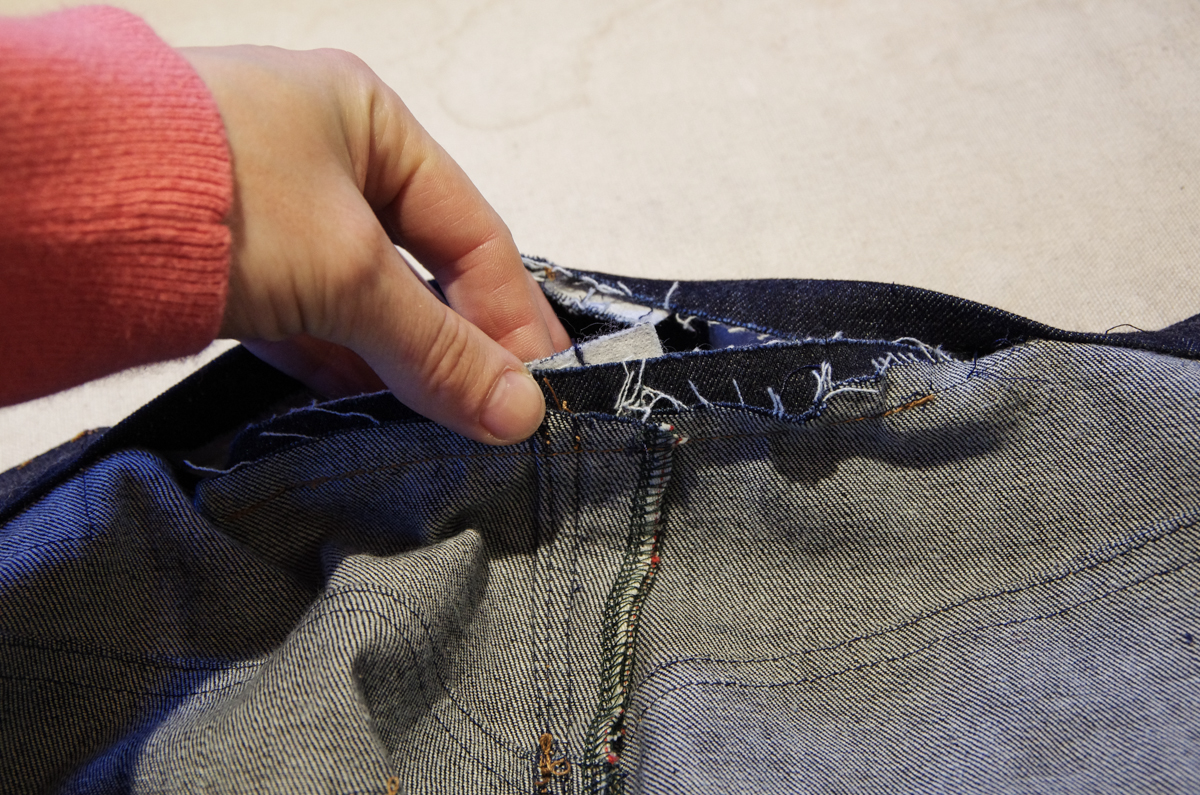
Open up the waistband and stitch rip the original seam. I am only bringing in this waistband 1" so I didn't need to rip very far.

Now open up the center back waistband seam.

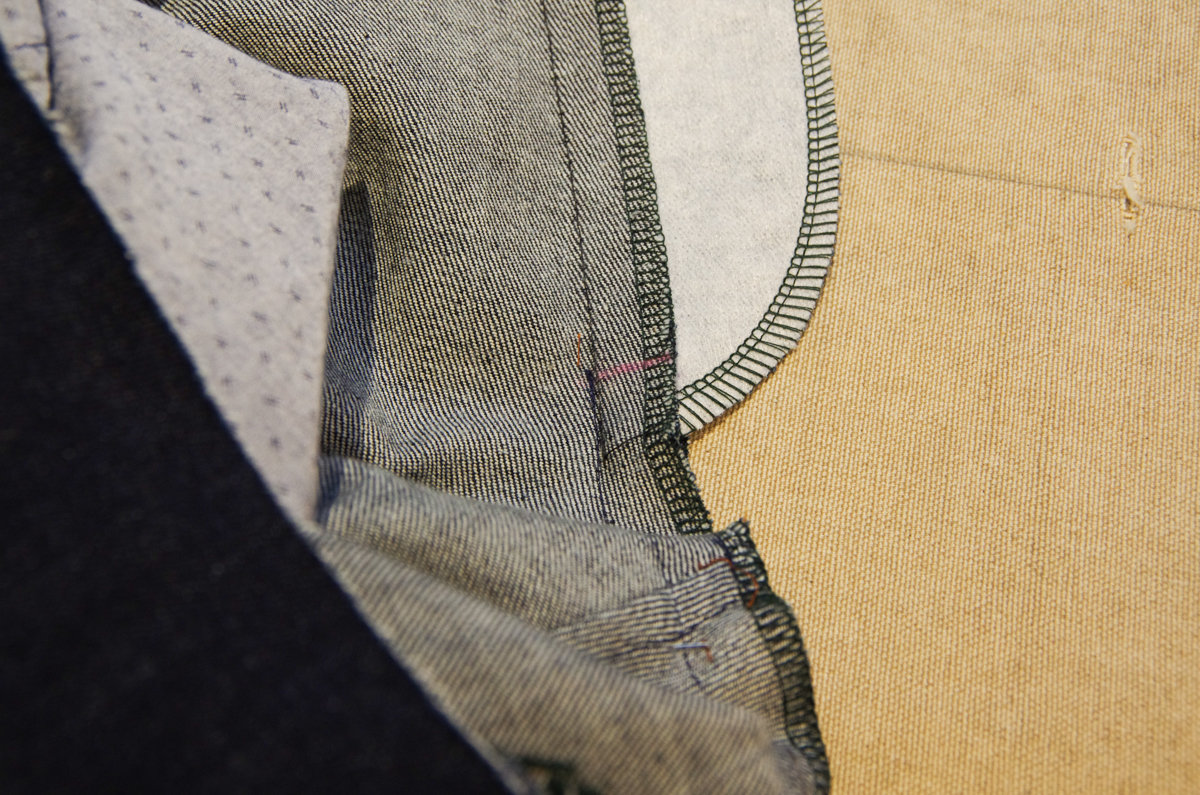
If you are adjusting only a small amount you may be able to ease the new waistband length back on to the jeans without changing the seat seam at all. If you are changing things a bit more, open up the seat seam...this adds a fair amount of work but isn't impossible! Stitch rip the topstitching either to the yoke seam or all the way to the inseam so that you can hide your new backstitching down there. I chose to just rip to the yoke seam but in retrospect, I think this was too short of a distance to taper the seam (as I was removing 1" which is 1/2" from each leg) and this resulted in too steep of an angle when I stitched the seam up again. I would recommend doing the small bit of extra work to stitch rip all the way to the inseam so you can create a smooth curve when you take in or let out the seam...it will save you the work of having to re-do your adjustment when you see the seat seam no longer sits well against the wearer's body!

Stitch rip the seam as far as necessary in order to smoothly taper the new seam when you take in or let out the jeans.
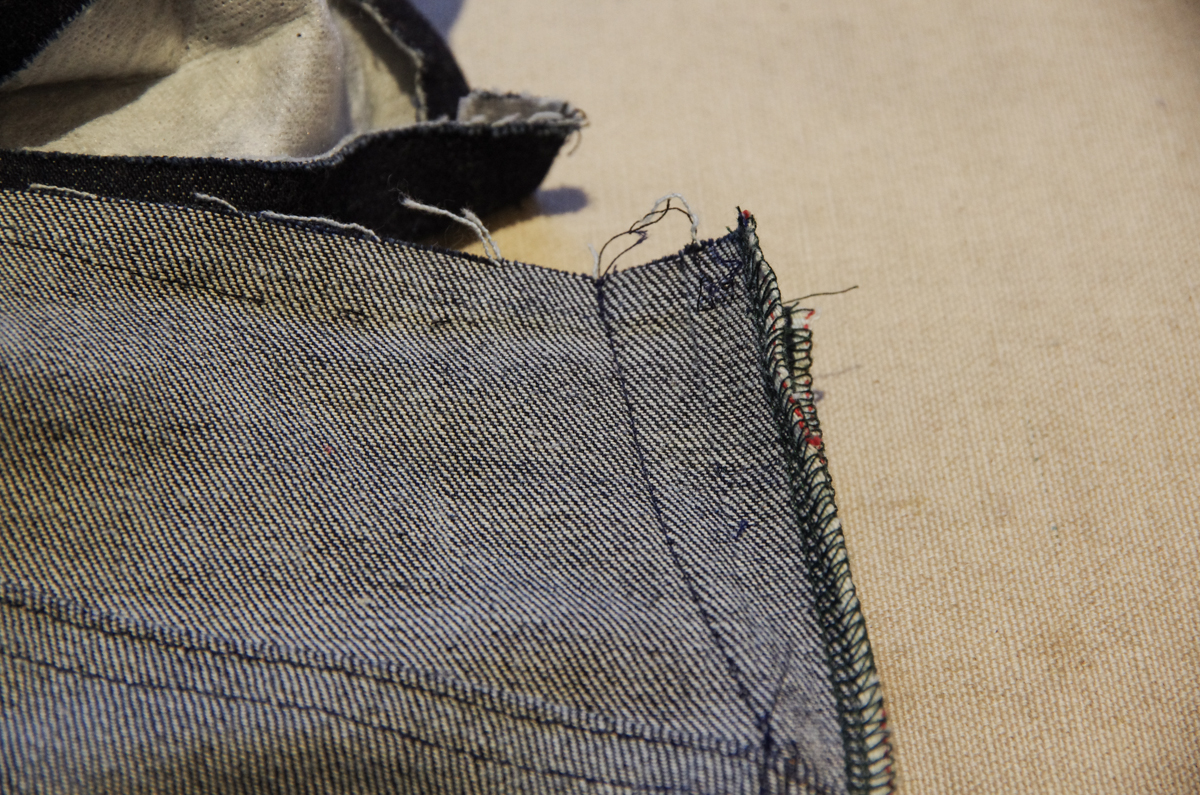
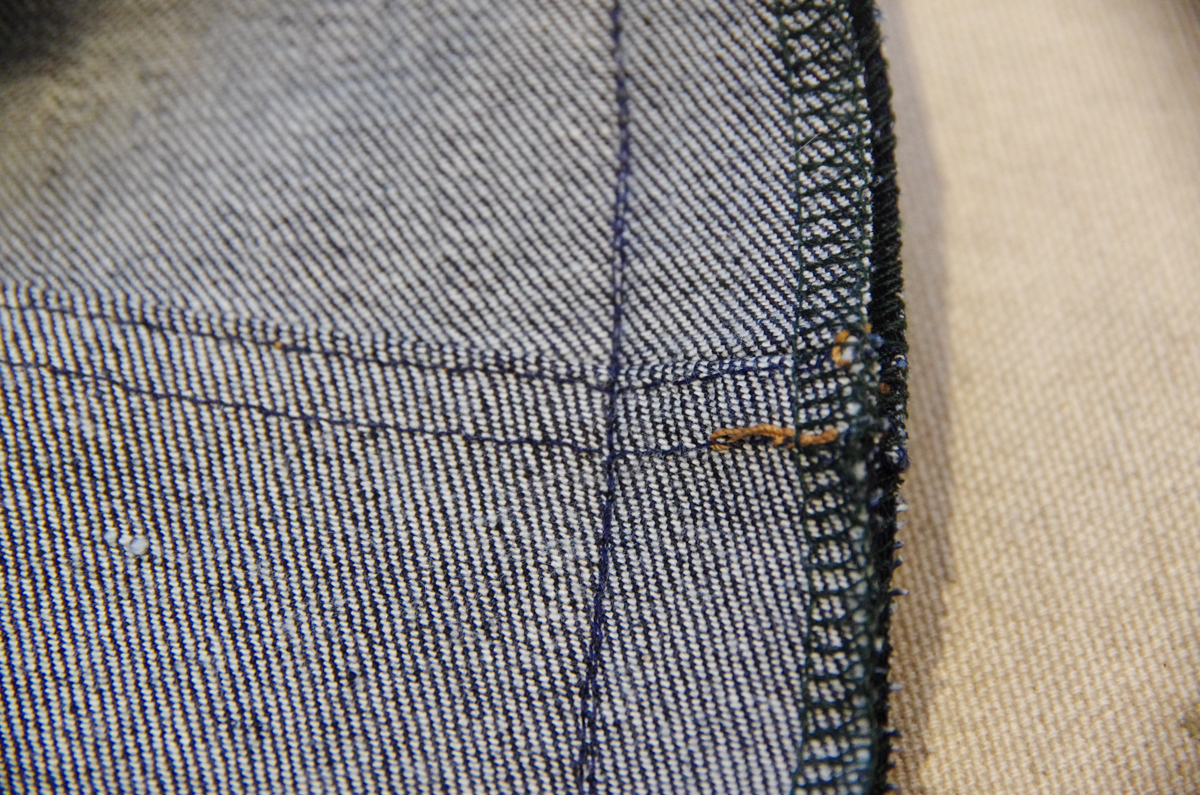
Ok, now we are ready to reassemble! Stitch the seat seam starting with 5/8" at the point you chose (here I am stitching from the yoke seam, but again, see how sharply I had to taper? It would have been better if I created a smooth curve by tapering all the way to the inseam). Taper to the necessary amount by the time you reach the waistband. If you are letting the jeans out to make more room, taper to a smaller seam allowance. If you are taking them in, like me, taper to a larger seam allowance.
Re-do your edgestitching and topstitching along the seat seam.

Stitch the center back of the waistband. Be sure to take it in or out the necessary amount. Check that it will nicely match the jeans when you go to stitch the waistband back on.

Press the center back seam open.
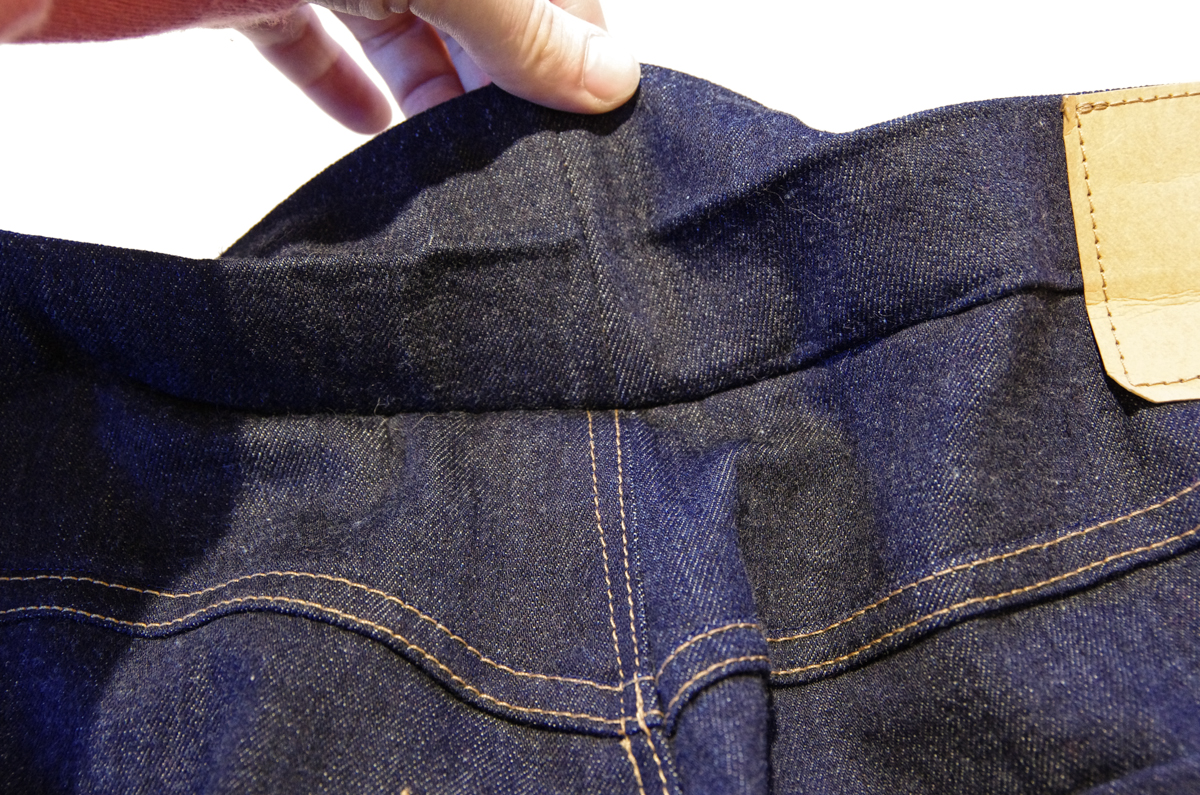
Reattach the waistband to the jeans and press the seam allowance towards the waistband.
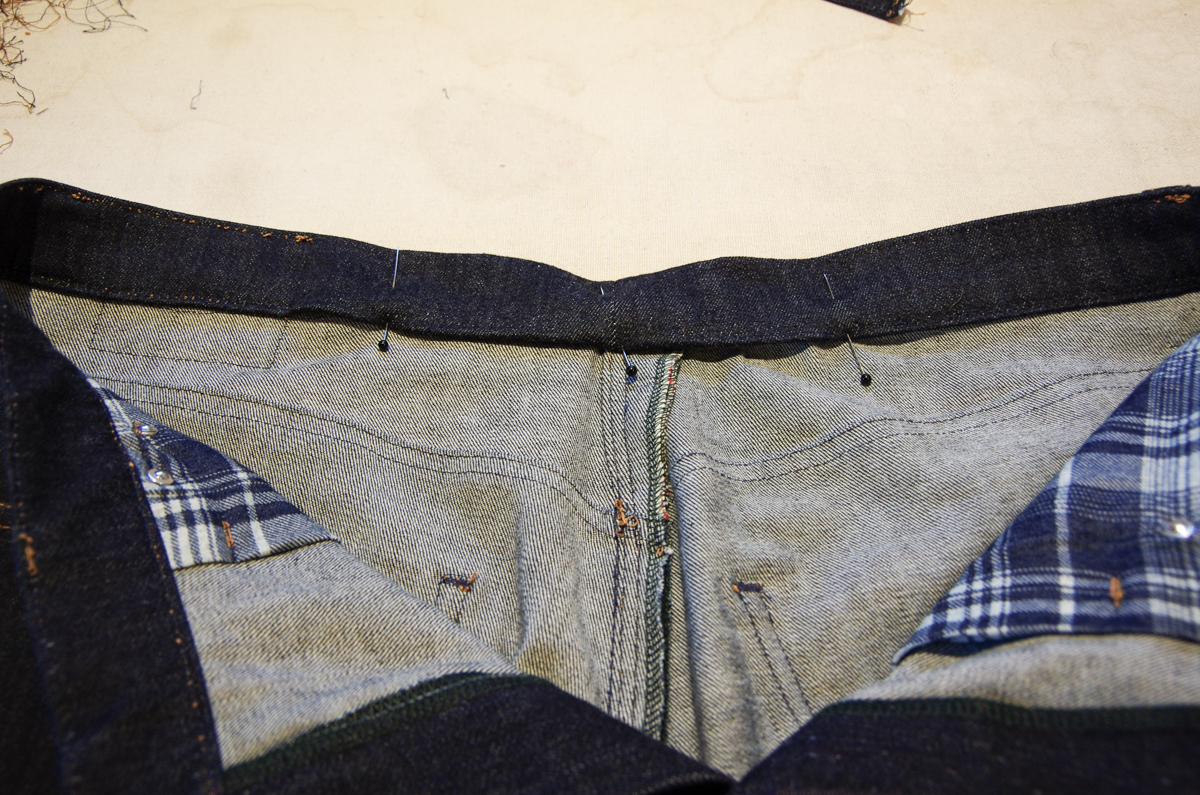
Fold the waistband over and press to enclose all raw edges. Baste it in place.

Re-topstitch from belt loop to belt loop.

And lastly, reapply your belt loop.
And now your jeans should fit perfectly, even if the wearer's waist has fluctuated an inch or so since you originally sewed the jeans!
Jeans Sew-Along: The Fly
As part of our Men's Jeans Sew-Along, today we will be tackling the zipper fly. During the last post we prepped our fly extension and inseam. Today we prep the zipper shield, attach the zipper, and perform all the necessary topstitching!

Grab your zipper shield piece. The above zipper shield is from the Quadra Jeans pattern. The Fulford Zipper shield looks a little bit different (narrower and less angled on the bottom) but you will still need to perform the same steps.
Fold the shield in half with right sides together.

Stitch along the bottom angled edge of the zipper shield using a 1/4" seam allowance. Trim if desired to reduce bulk and then flip your shield right side out and press.

Finish the long, straight edge of the shield with a serger or zig zag stitch.

Using the template provided on the pattern piece, mark the zipper tooth placement line and the zipper notch on the shield. The photo above (and the rest of the sew-along post) features the fly pieces from the Fulford Jeans so you can see the difference to the shape of the Quadra zipper shield.

Align the zipper on top of the shield with the teeth centered over the marked line. The left zipper tape will likely line up with the edge of the shield but the marked line is there to guide you in case your zipper tape is wider or narrower than the zipper tape I used!
The bottom of the zipper stop should line up with the zipper placement notch.

Stitch down the zipper along the left side using a zipper foot.

Place the zipper shield unit under the right front (the left side of the jeans when you are looking down at them on your work surface).
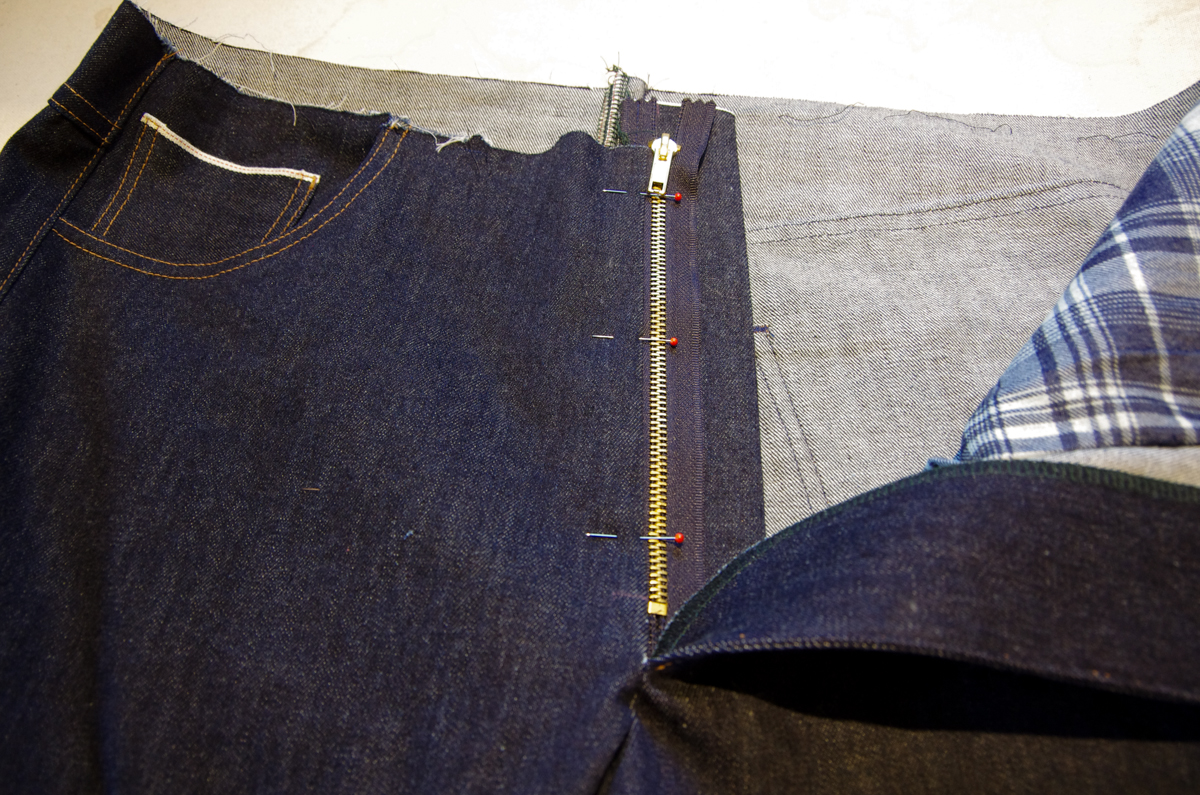
Make sure to line up the bottom of the zipper stop with the zipper placement mark on the right front. Pin the length of the zipper in place. Don't worry if the zipper shield and zipper extend over the top of the jeans! This is just because you are sewing a smaller size (and the shield fits all of our sizes). I will show you how to shorten these momentarily.

Edgestitch along the zipper using a zipper foot until the zipper placement notch.

If you need to shorten your zipper, you can do so now, as I've done on my Quadra sample below, or you can do so just before you add the waistband (as I did for my Fulford sample). I'd actually recommend shortening them as late in the sewing process as possible to avoid the risk of accidentally pulling the zipper to far closed and thus pulling the slider right off the zipper (ug!!). No matter when you shorten it, though, the process is the same:

Use narrow scissors or a knife to cut off the excess teeth and tape. I like to use my sturdy little Merchant & Mills wide bow scissors for this job. They are already handy since they are my thread clips and they cut between the teeth easily.

You can also remove teeth with pliers along the seamline where you will be attaching the waistband. Many sewists like to do this to ensure their stitching will not have to go over the metal teeth when they attach the waistband. I usually avoid this step by hand cranking my machine any time I am stitching near the zipper - this removes the risk of breaking a needle on the metal teeth because I can subtly shift them out of the way if I feel the slow hand-cranked movement of the needle come against a tooth.
Anyways, now we've talked about the ways to shorten the zipper and avoid broken needles, let's proceed with the fly!
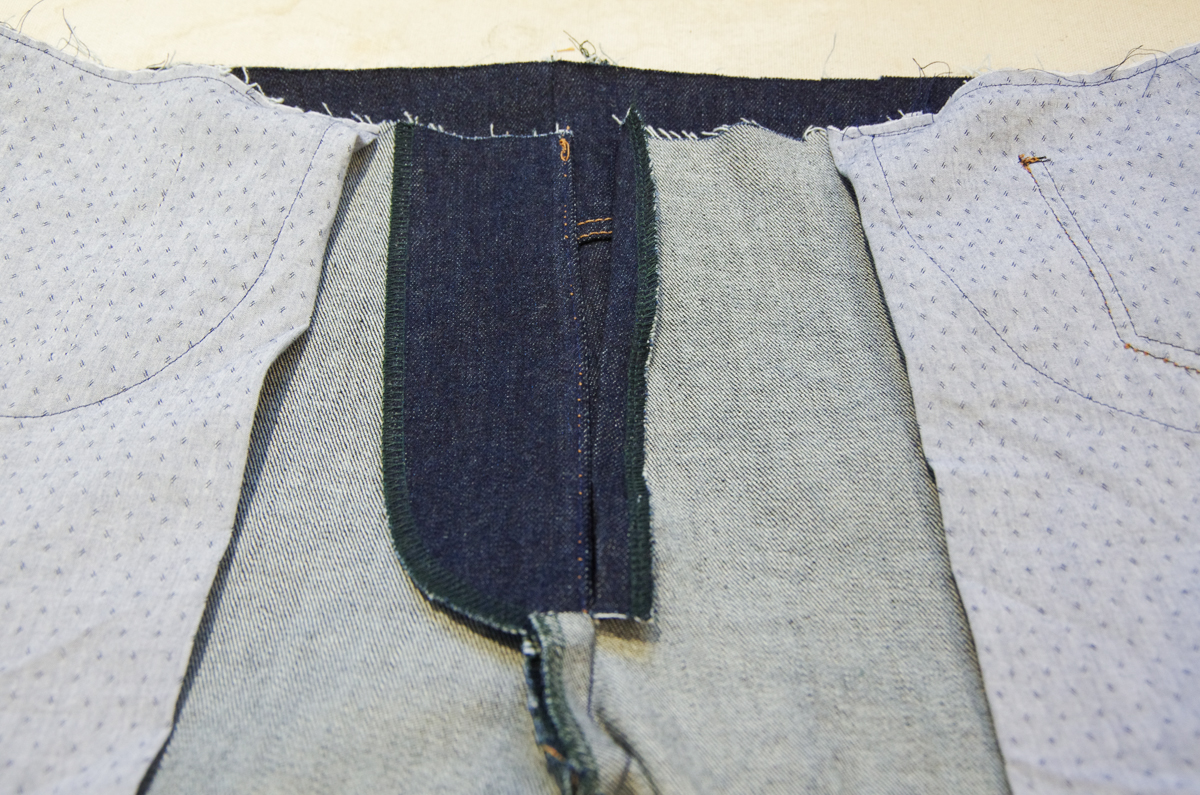
With the right side of the jeans facing you, close up the fly as it will look when it is finished. Make sure that the left front completely covers the zipper (since there is a 1/4" overlap). Pin in place at the top of the fly through all layers.

See how the zipper is nicely hidden under the left front?

Flip the jeans inside out so you are looking at the wrong side of the fabric. Fold the jeans to the right so that you are looking at only the fly elements and the rest of the jeans are out of the way.

Lay the zipper flat so you are looking at the underside of it. The fly extension is beneath it and extends to the right. Adjust the extension until it is sitting straight beneath the zipper (using that pin we placed as a guide for where the extension should sit). Pin the zipper in place.

Stitch the zipper tape down to the fly extension (no other layers should be in the way).

Now both sides of the zipper are secure, let's complete our fly topstitching! Flip the jeans right side out and place the fly topstitching guide on the left front. Line up the bottom of the guide with the fly notch. You'll notice that the bartack marking sits just below and just to the left of the zipper stop so you won't need to worry about stitching over metal teeth when you are making your bar tack.
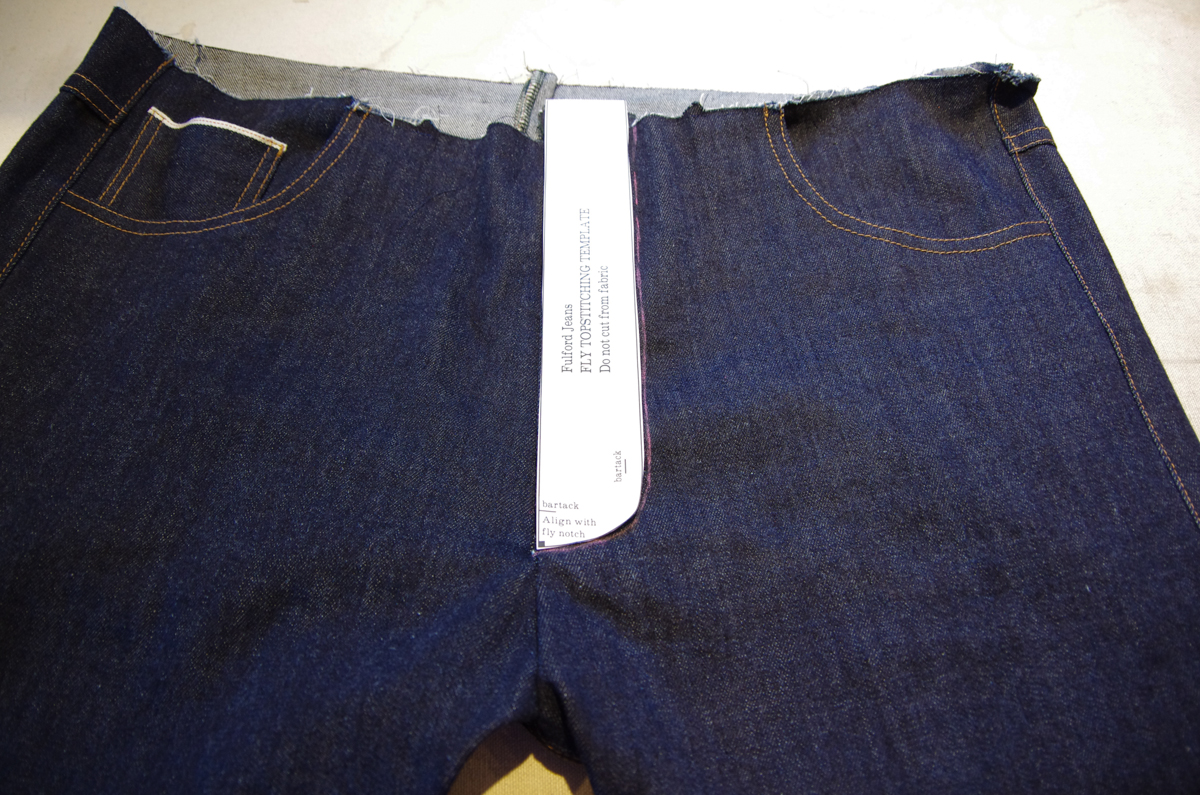
Trace the topstitching guide with chalk. Also transfer the bartack markings.

See how there is an opening below the zipper stop? We will be closing this up by the time our topstitching is complete!

Before we topstitch, fold the zipper shield out of the way. A common mistake when stitching a fly is to accidentally stitch it closed by catching the zipper shield during the topstitching step!

Here is how the zipper shield looks when it is folded out of the way from the wrong side. You can see on the right hand side of the zipper that we will be catching the fly extension and the jeans front only when we topstitch.

Sew the first row of topstitching along the chalk marking.
Backstitch tidily or leave tails on your thread and pull the upper thread through to the wrong side of the jeans and knot the threads. This creates a cleaner look at this visible point but I still prefer to backstitch since I feel it produces a stronger result.

Complete a second row of topstitching 1/4" away from the first row - this second row is closer to center front and lines up with the vertical bartack marking.

With the zipper shield still out of the way, edgestitch along the entire seat seam on the left leg of the jeans (if you were wearing the jeans). This edgestitching should go through the left leg and both seam allowance layers.

Continue the stitching all the way up to the zipper placement notch (just below the zipper stop).


With this edgestitching complete, there is no longer a hole below the zipper stop.

Create a second row of topstitching 1/4" away from the first.

This second row of stitching also extends up to the zipper placement notch.

Finish off the fly by folding the zipper shield back into position.

Create bartacks by sewing a narrow zig zag stitch or by backstitching thoroughly at the two bartack markings. These bartacks go through all fly layers (including the zipper shield) so they keep the shield in position so that nothing can be caught in the zipper!

From the wrong side of the jeans, you can see where the bartacks catch the zipper shield. Please excuse my snarled topstitching thread - as I mentioned earlier in the sew-along, my machine doesn't really like backstitching while using topstitching thread!

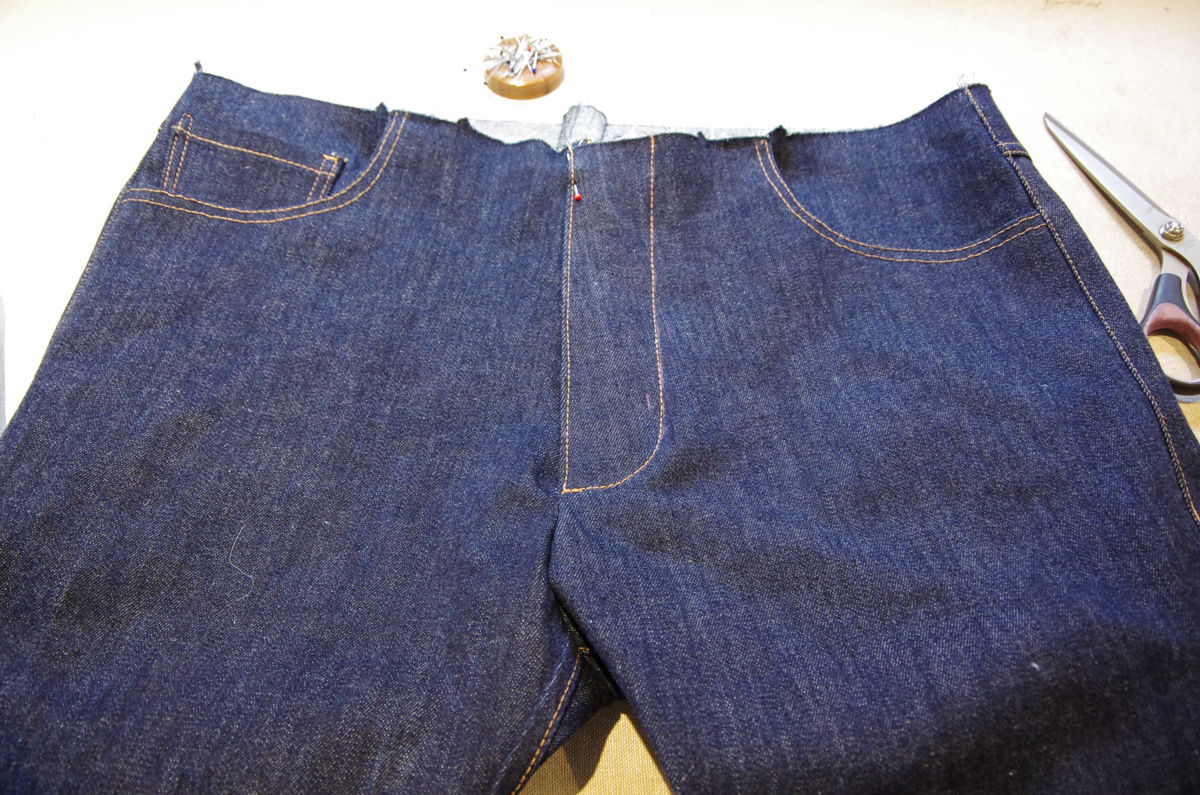
And there we have it, a finished zipper fly! We are almost done our jeans! We will be sewing the waistband on in the next sew-along post.
Jeans Sew-Along: The Seat Seam and Fly Extension

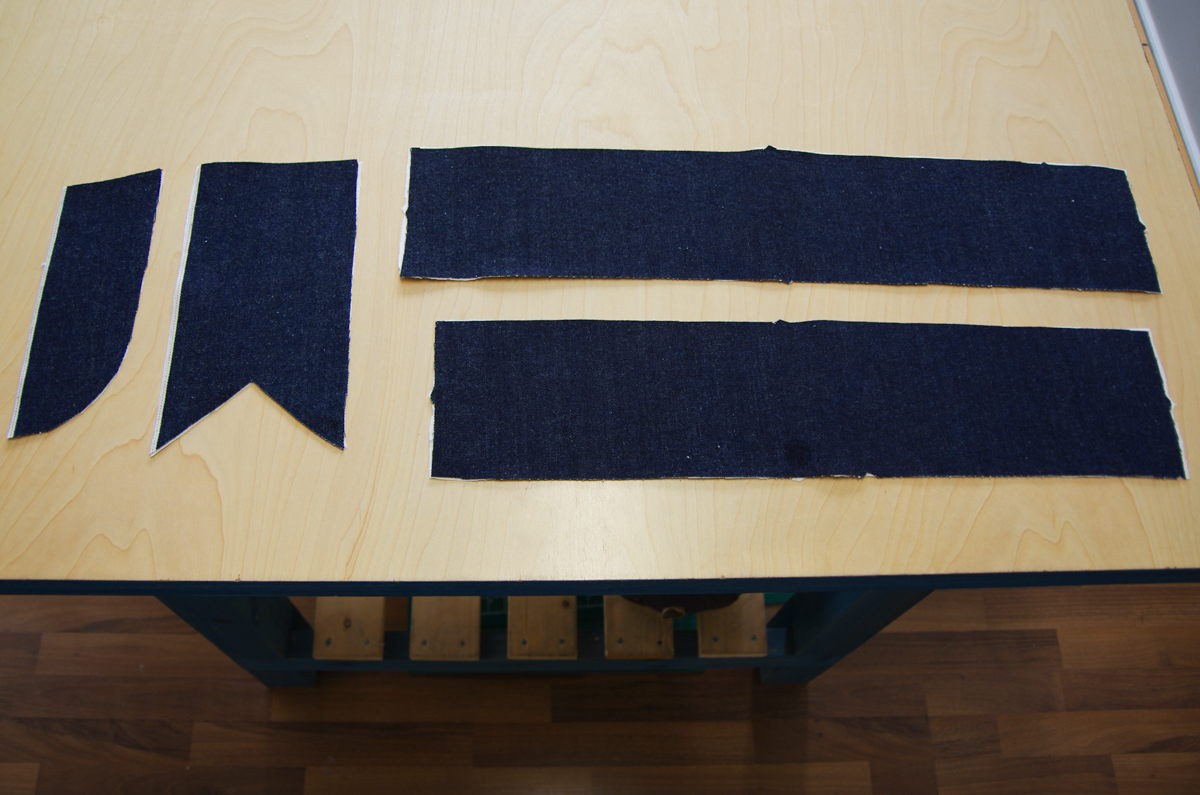
Today we are preparing for the addition of the zippered fly. To do this we will add the fly extension and sew the seat seam. Before we begin, ensure that both jean legs have the zipper and fly notches thoroughly marked.
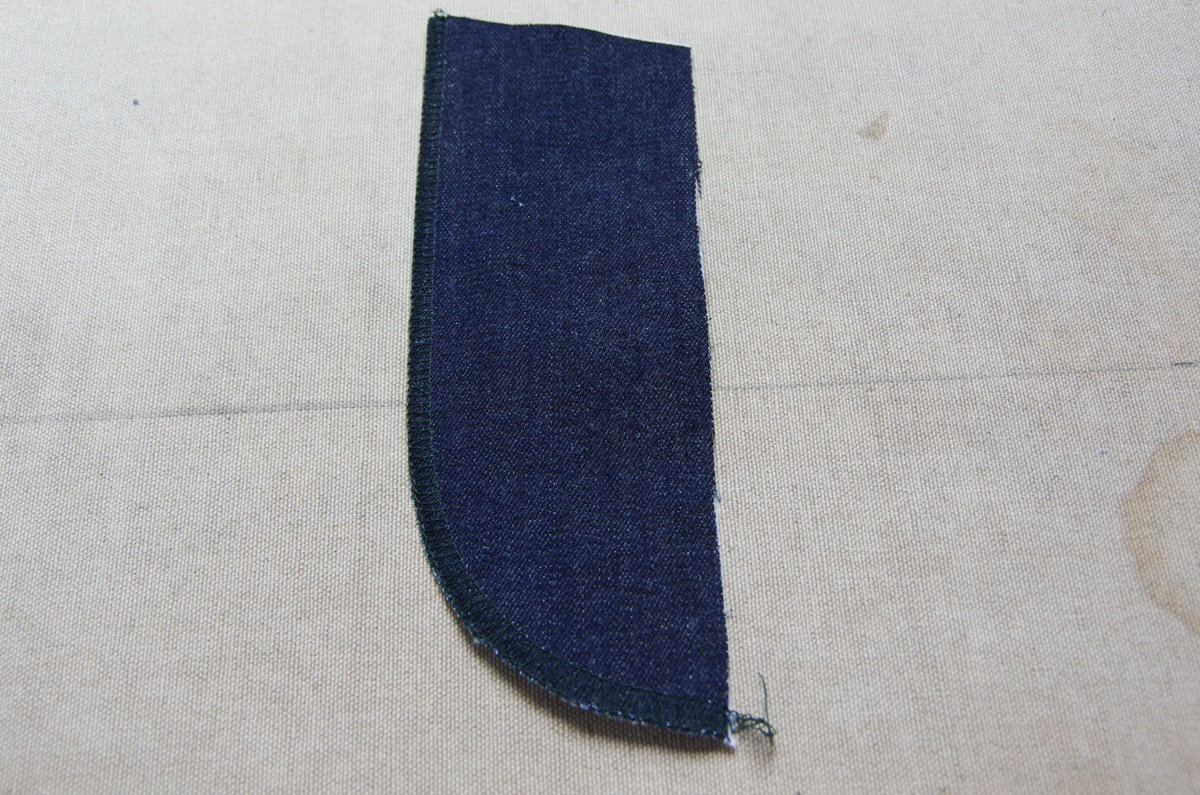
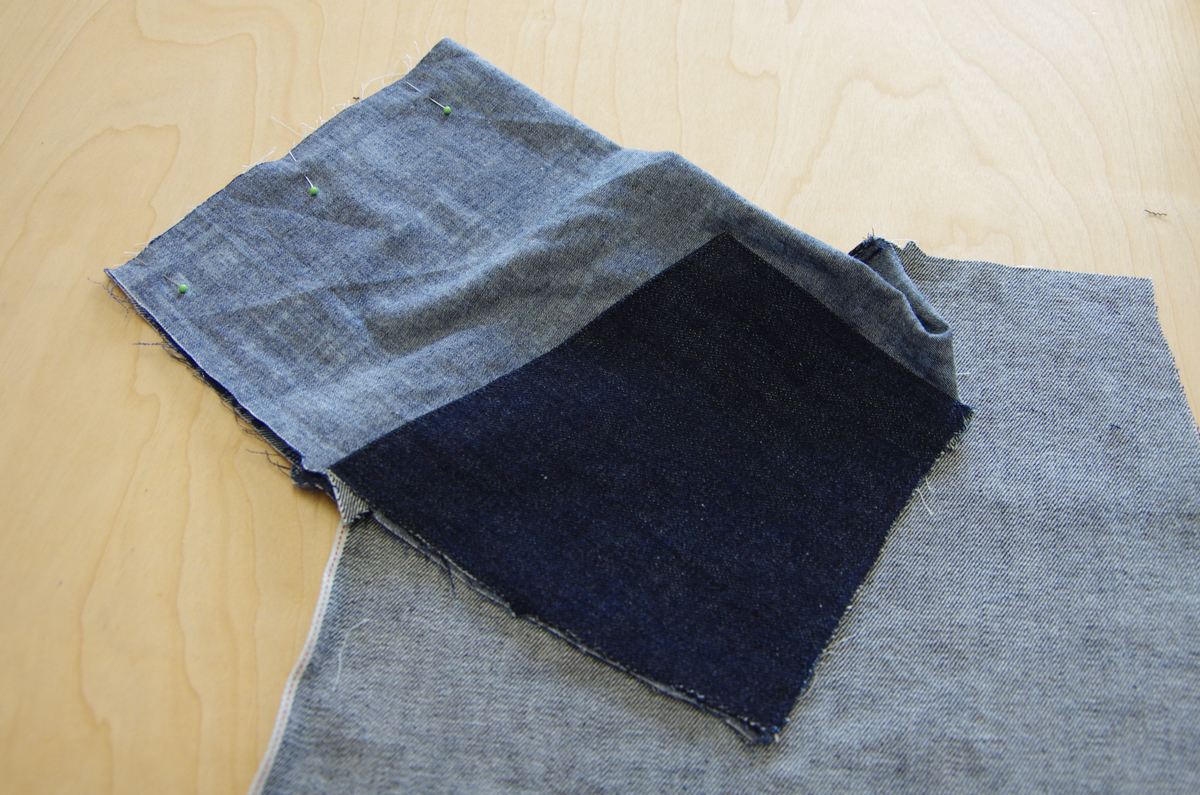
Now we need to prepare the extension. You have cut two extensions (mirrored) but we only need one. Select the extension that matches the left leg (it looks like the photo above). Apply interfacing if you haven't already and finish the curved edge using your choice of a serger, zig zag stitch or pinking shears.
Lay the extension on the left leg with right sides together. The top of the fly extension lines up with the top of the jeans. Pin.
Stitch the extension in place using a 5/8" seam allowance.
Finish the seat seam allowances using a serger, zig zag stitch or pinking shears. Make sure to finish both the jeans front and extension seam allowances during this step.
Press the seam allowance towards the fly extension (or, in other words, press the fly extension away from the jeans front).
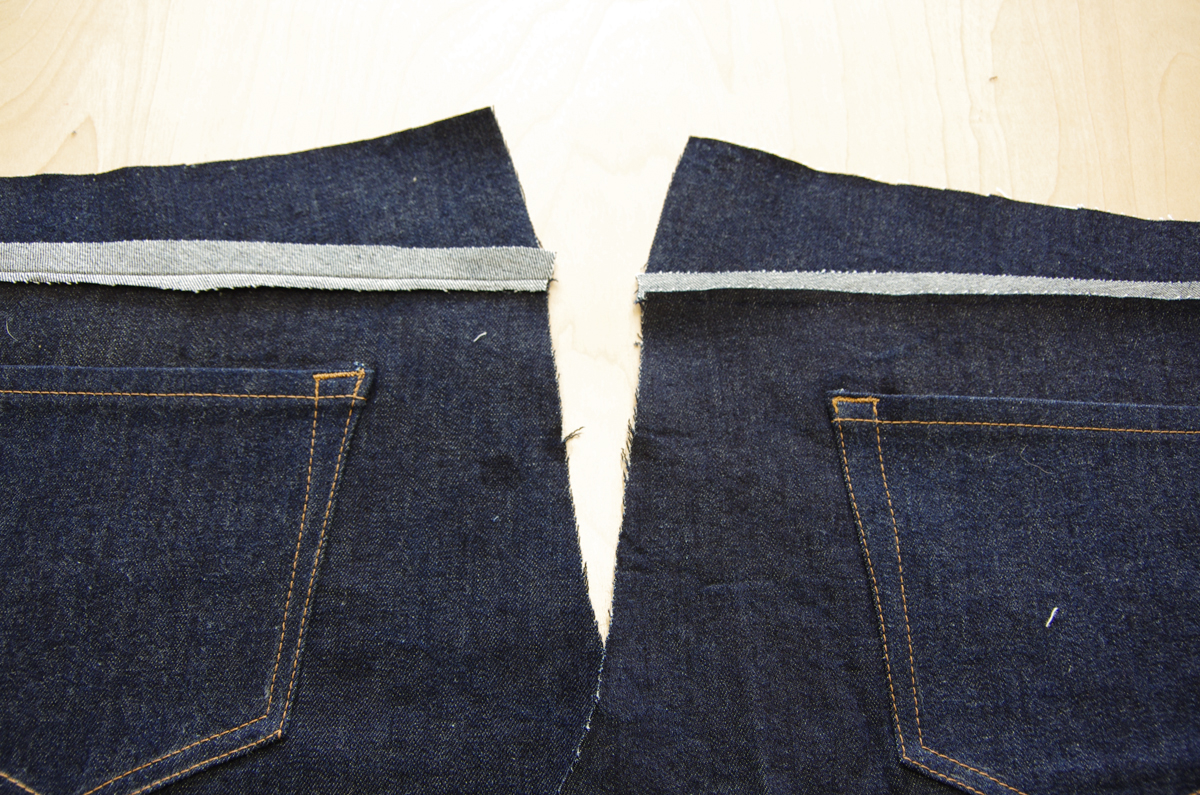
Now the extension has been added, it is time to stitch the seat seam! We will be stitching from the back up until the fly notch (the lower notch). Prepare for this by placing the legs with right sides together. I like to keep my pant legs right sides out and simply place them together as they will look when they are finished (see the photo below). Alternatively, you could turn one leg inside out and place the other pant leg inside of it so that right sides are together and pin the seam that way...whichever method makes more sense to you! I like to skip the step of turning a leg inside out.
Either way, make sure you line up the yoke seams and inseams!
Stitch the seam using a 5/8" seam allowance. Backstitch thoroughly when you get to the fly notch.
Check that the inseams and yoke are indeed lined up. If they are slightly off you can just stitch rip the area around the intersection and ease the two pieces together so they match perfectly. If they are quite a bit off, you may need to re-do the seam!
Once you're happy with the results, stitch the seat seam again to make it extra strong.
In order to allow the seam allowances to be stitched to the left front (this topstitching is completed in a later step), it is necessary to clip into the right front seam allowance at the fly notch as pictured below:

Fold the fly extension to the wrong side of the jeans and press. To keep the extension crisply in place, edgestitch along the extension seam until the zipper placement notch (the upper notch).
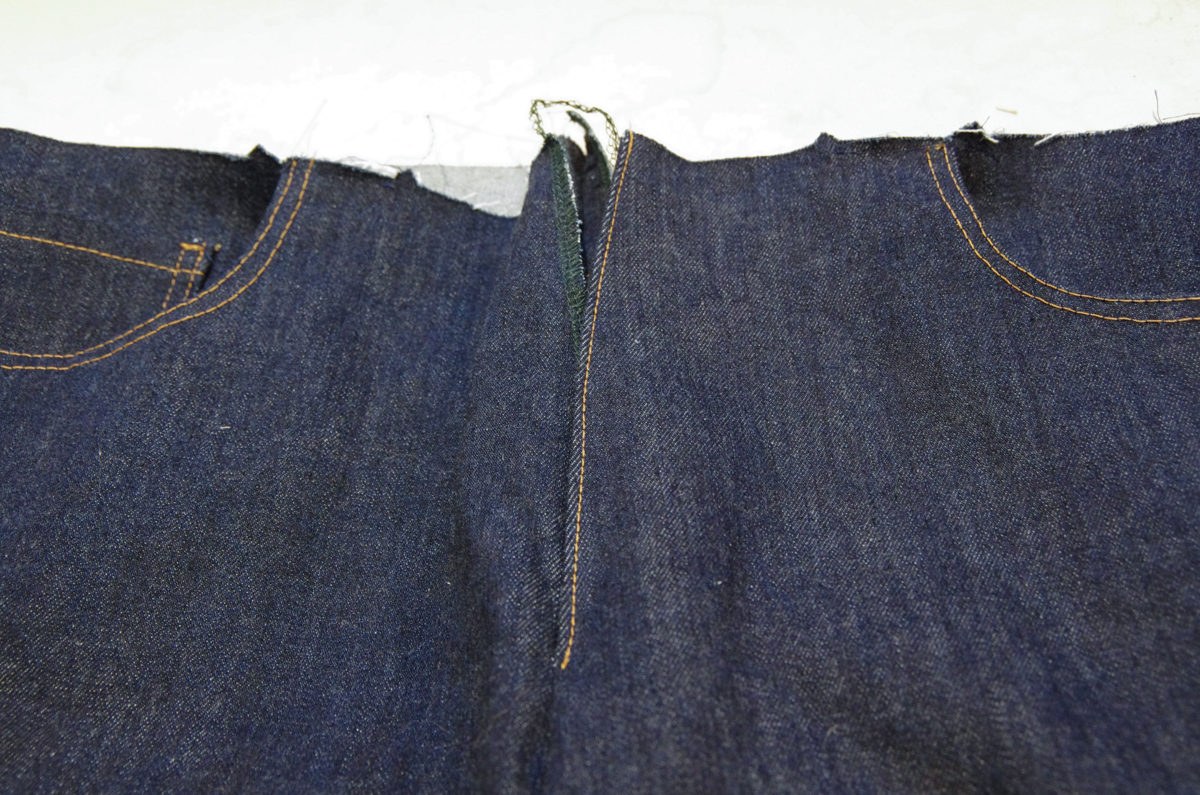
Finish the fly preparations by pressing the right fly seam allowance under only 1/2" (not the full 5/8". This allows you to slightly offset the zipper so it does not peek out from the fly opening.
Our preparations are now complete and we are ready to create the fly during the next sew-along post! Don't worry, we'll take it step by step and by the time it is complete you will be very proud of your creation!
Jeans Sew-Along: Yoke, Inseams and Side Seams
By the end of today's sewing session, we will more or less be able to try our jeans on! Let's get going by attaching the yoke.

The yoke is sewn with a flat fell seam. To begin this seam, place one back and one yoke with wrong sides together. Align the notch and pin the rest, easing the two lengths together. These two different lengths and curves will help to shape the jeans to the curve of the bottom in the same way a dart shapes clothing.
Stitch using a 5/8" seam allowance.

Trim the jeans back seam allowance to 1/4" as consistently as possible and leave the yoke seam allowance the full 5/8".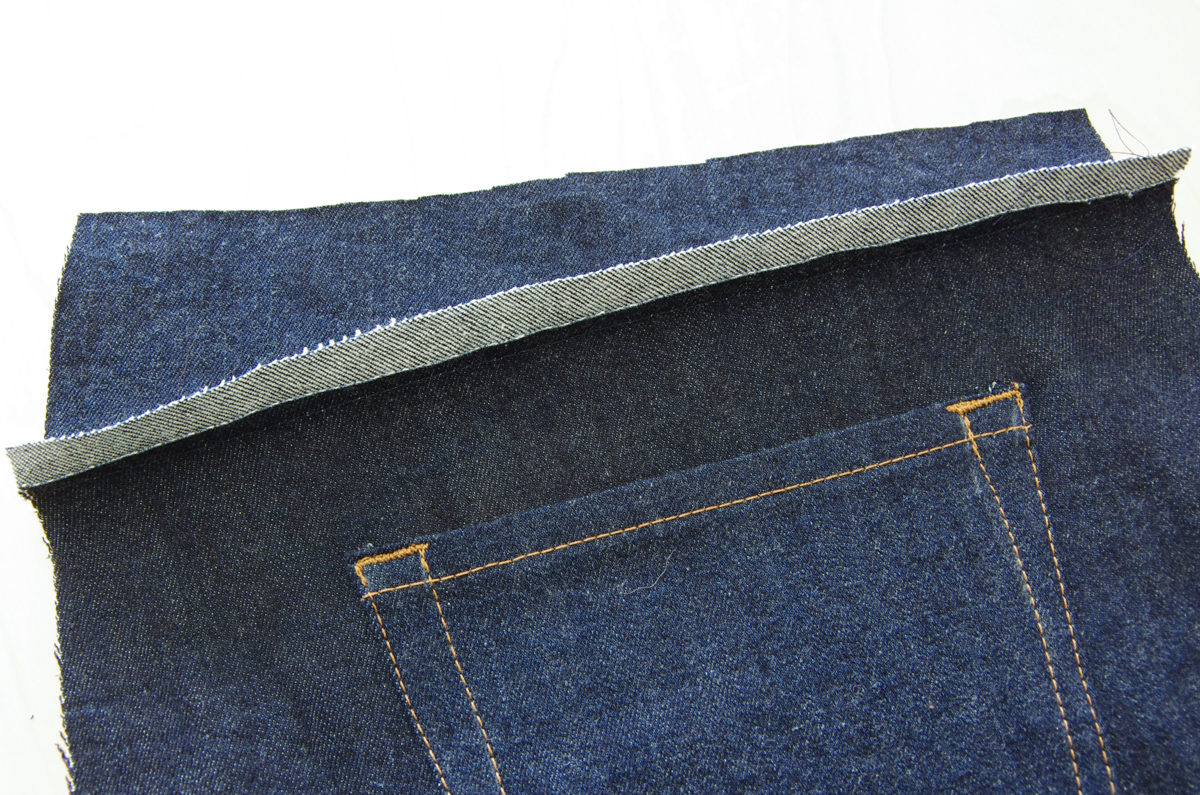
Press the seam open (left in the photo below) and then press both seam allowances towards the yoke (right in the photo below). Pressing in these two stages ensures a nice crisp seam with no tucks or puckers.
Fold the 5/8" yoke seam allowance down so that the raw edge meets the jeans back seam allowance.

Press as you fold.

Fold the whole seam allowance package down towards the jeans back. This will cause no raw seam allowance edges to be visible.

As you can see in the photo below, those raw edges are nicely tucked out of the way!

Pin the seam allowances in place and then edgestitch along the bottom edge of the seam allowance package.
If you used a denim colored thread when originally stitching the yoke seam, you might like to add a second row of topstitching to the top of the flat fell seam (1/4" away from your edgestitching).
Repeat this process for the second yoke and then we are ready to move on to the inseams!

The inseams are also sewn with a flat fell seam. Place a jean back and jean front with wrong sides together and pin along the length of the inseam.

Stitch using a 5/8" seam allowance and then trim the jeans back seam allowance to a consistant 1/4".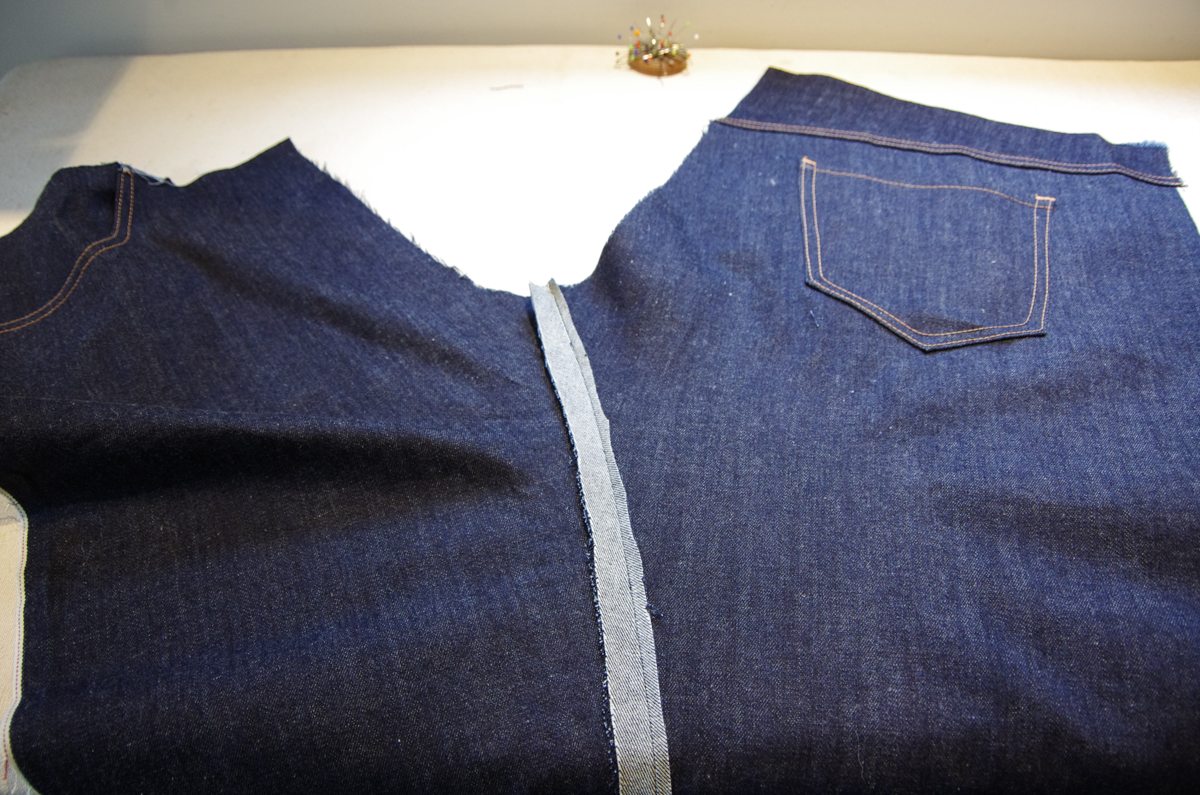
Press the seam open.

And then press both seam allowances towards the jeans front.

Fold the 5/8" seam allowance towards the smaller allowance so the raw edges meet in the middle. Press thoroughly.

And now flip the entire seam allowance package towards the jeans back so all of the raw edges are hidden. Press.


Pin the seam allowances in place.

And then edgestitch to secure them to the jeans back. Depending on your style preference, you could create a second row of stitching 1/4" from the edgestitching. Have a look at the storebought jeans in your closet - some have two rows of contrast stitching and some do not. I find the two rows along the inseam gives a bit more of a workwear or western look to the finished jeans...

...and one row looks dressier.

Ok, the inseams are done! Before we proceed with the side seams, I want to remind you that this is a perfect time to baste together the side seams and seat seam to do one more fitting on your recipient. At this stage it is easy to adjust the shape of the hips, the taper of the wasit, and the width of the legs by taking the jeans in or letting them out within the 5/8" side seam allowance. In the photo below, you can see that I've done this and marked my new shape along the waist and hips. I took the waist in 1/4" and then increased this to 1/2" at the hips all the way to the knees.

If you're ready to stitch the side seams permanently, switch back to a regular stitch length and pin each front and back pair with right sides together. This will be stitched as a regular seam (not a flatfell seam).

Stitch using a 5/8" seam allowance unless your chalk marking indicates otherwise.

Finish the seam allowance with a serger, zig zag stitch or pinking shears.

Press the seam allowance towards the jeans back.

Reinforce a common stress point by edgestitching along the jeans back from the wait down to the bottom of the pocket bag. I feel for the bottom of the pocket bag with my fingers as I stitch but you could also premark the point with chalk or a pin before you begin to stitch. You want to make sure both sides are even!

Wow, our jeans are really beginning to look like something amazing! Sit back and admire all of that detailed topstitching we've created. Next post we will be moving on to the seat seam and fly extension.
Jeans Sew-Along: The Front Pockets
Today's jeans sew-along post includes a fun bit of origami! We'll be stitching our french seamed front pockets. Let's begin by preparing the pocket facings.
If you are sewing the Quadra Jeans, staystitch along the curved edge of each facing using a 5/8" seam allowance.
Clip along this curve to make it possible to press the seam allowance to the wrong side.

Press thoroughly. If you are stitching the Fulford Jeans, press the straight bottom and side of each facing under - there is no need to staystitch or clip because these edges are not curved.
Place the facing on top of the pocket bag with wrong sides together. Pin in place.

Baste around the two unfinished edges and edgestitch along the curved folded edge (Quadra) or along the two straight folded edges (Fulford).
Pin the coin pocket to the right pocket facing (if you were wearing the jeans). You will know you've grabbed the correct pocket bag if the facing is attached to the top left. Use the pocket placement markings found on the facing pattern piece to align your pocket. Above you can see the Quadras photographed first and the Fulfords second.
Edgestitch and topstitch around the pocket.
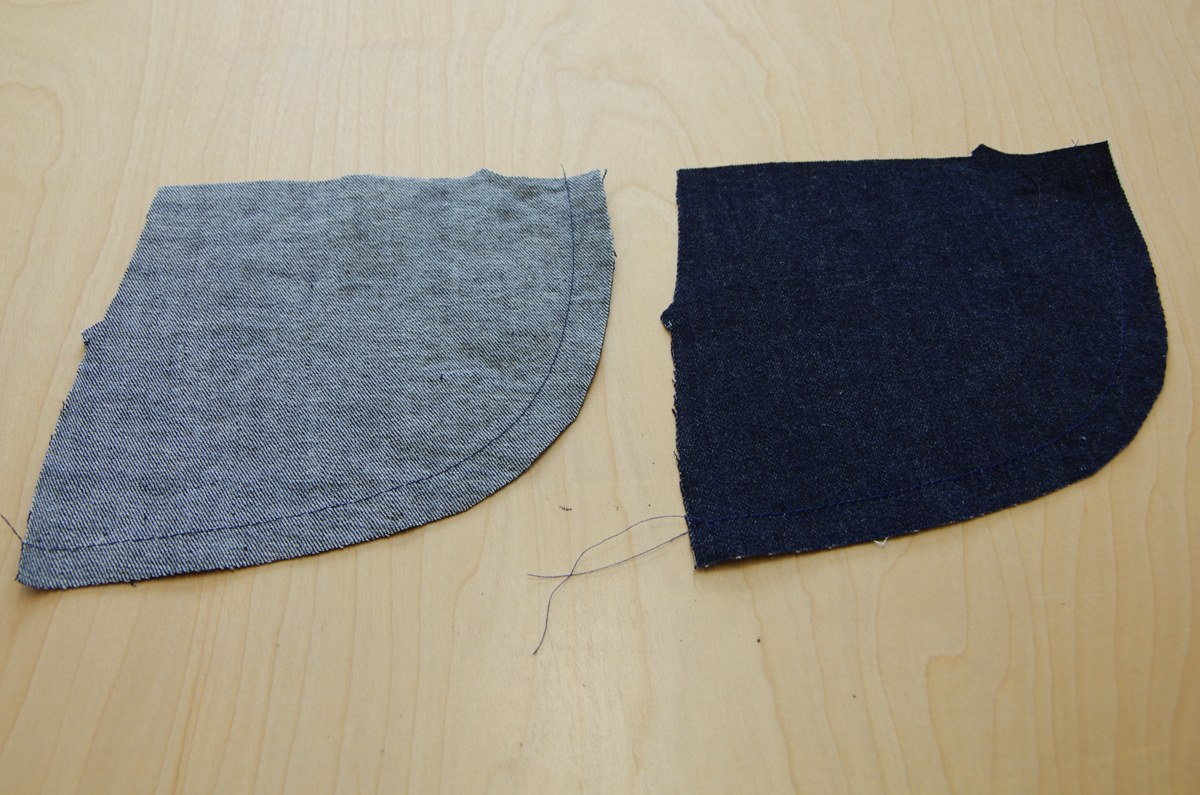
Now we can attach our pockets to the jeans front! Place the pocket on top of the jeans front so that the wrong side of the pocket bag is facing the right side of the jeans. This will mean you cannot see your coin pocket if you've placed the pocket bag correctly. Pin along the curved pocket opening.

Stitch along the curved pocket opening using a 5/8" seam allowance.
Trim the seam allowance to 1/4" or less so that the raw edge will be enclosed by topstitching later.

Open up your pocket bag and jeans so that the seam allowances and pocket bag are together and the jeans front pushed out of the way. Understitch - this means you will stitch through the pocket bag and both seam allowance layers. The stitching is about 1/8" from the original seam. This understitching will prevent the pocketing from being visible from the right side of the jeans and will make the next topstitching steps easier.

Above is how the understitching looks when the pocket is folded to the wrong side of the jeans front.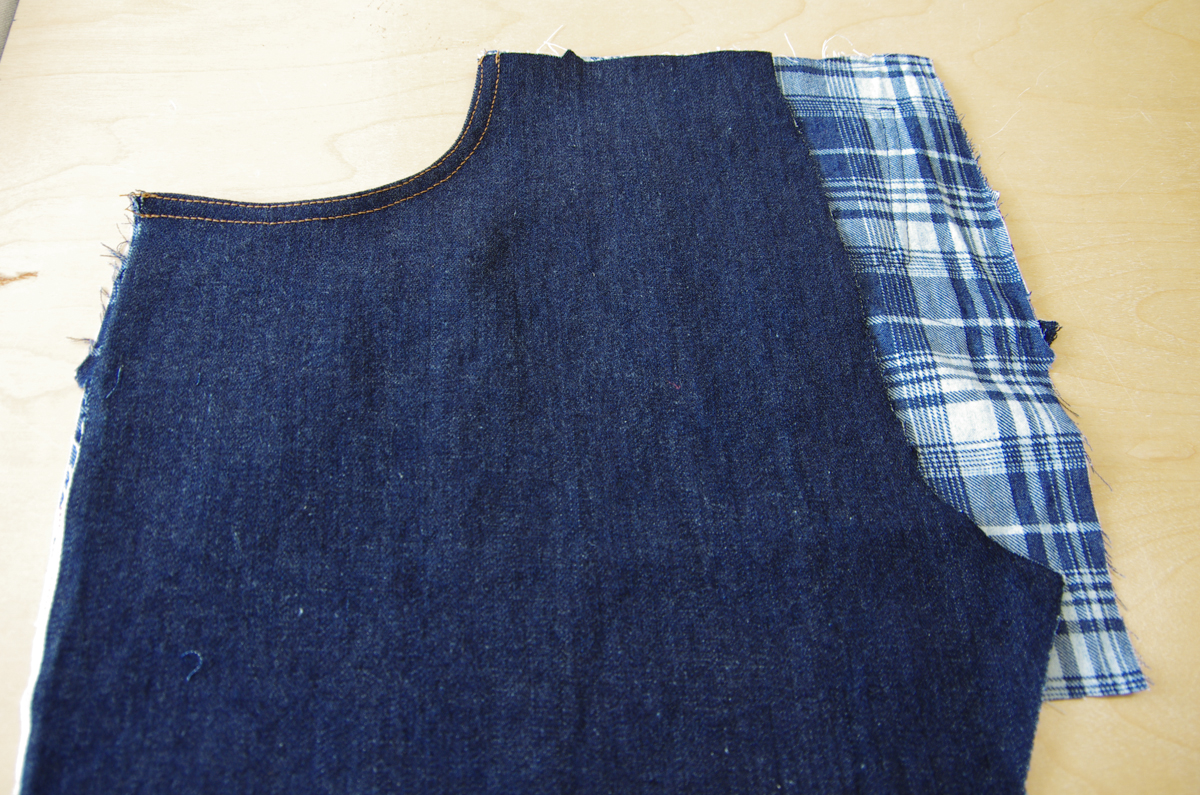
Finish the curved edge of the pocket by edgesittching and topstitching through all layers.
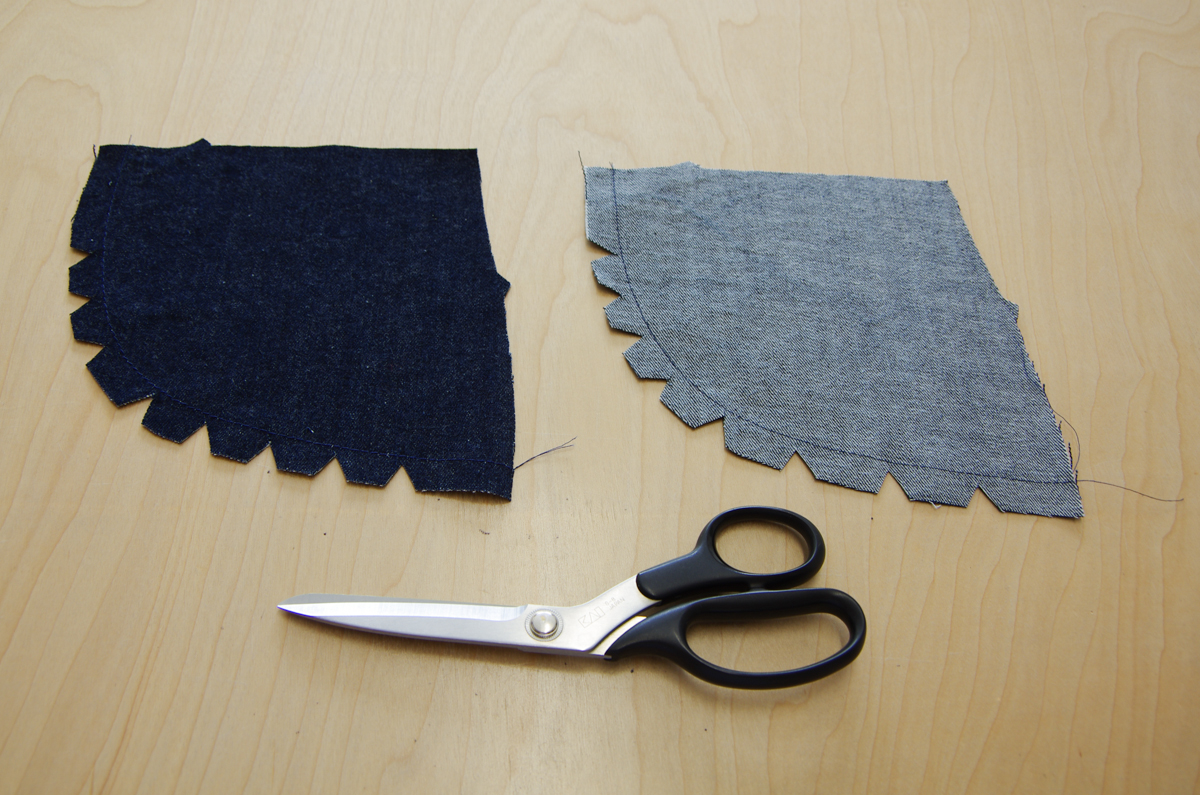
Now that the pocket opening is finished, the next step is to finish the bottom of our pocket with a french seam. If you are sewing the Quadra Jeans your french seam will be slightly curved. If you are sewing the Fulford Jeans your french seam will be straight as pictured.
Fold the pocket bag in half along the marked fold line with right sides together. Make sure the bottom edge of the pocket is lined up and pin. Stitch using a 3/8" seam allowance. The side seam stays free of stitching for now.

Trim the bottom of the pocket so the seam allowance is only 1/8" (pictured on the left above and in the photo below).

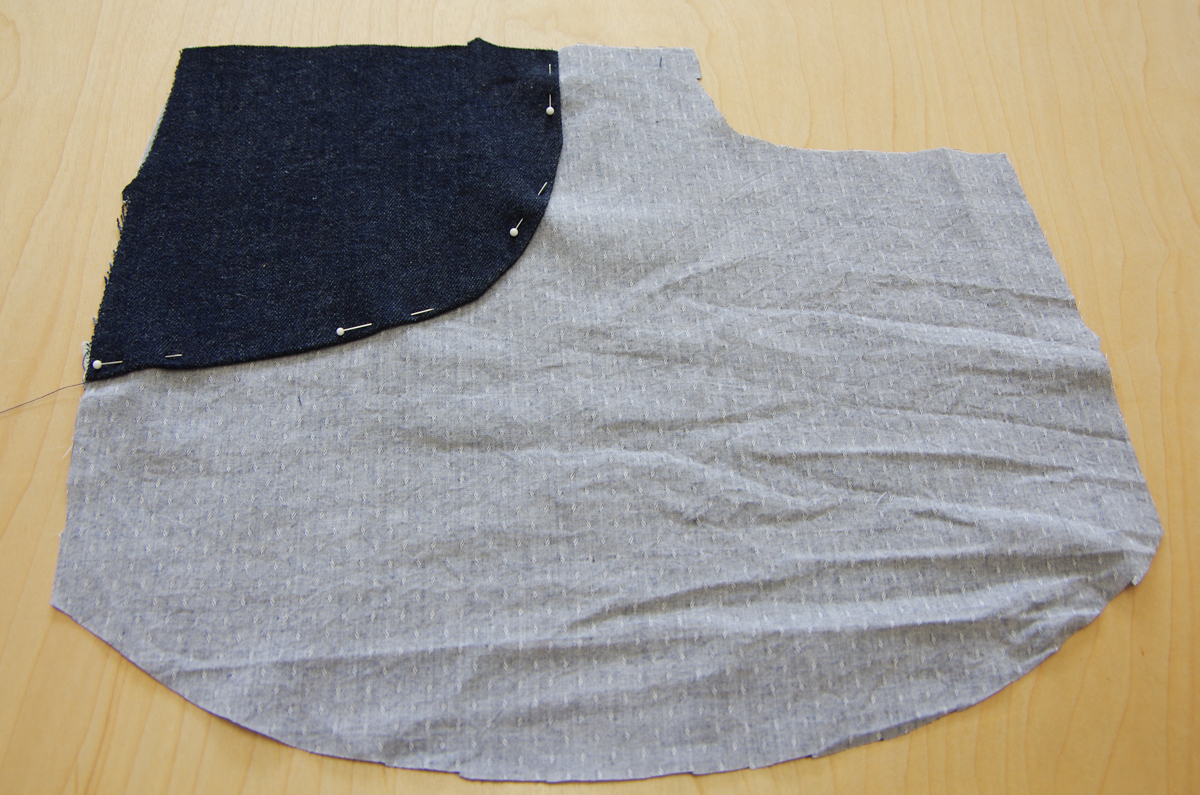
Flip the pocket around so that wrong sides are together and your bottom seam looks finished. Be sure to poke out the corner and press.

Although the bottom of the pocket looks finished, you will notice there is still a raw seam allowance inside the pocket! That won't feel very nice when the wearer puts his hands in his pockets! Close this up by stitching along the bottom of the pocket using a 1/4" seam allowance.

You've now completed a french seam! To prepare the pocket for the next steps (so it doesn't flap around), pin the pocket in place at the side seam and along the top of the jeans.

Baste the top and sides of the pocket to the front of the jeans.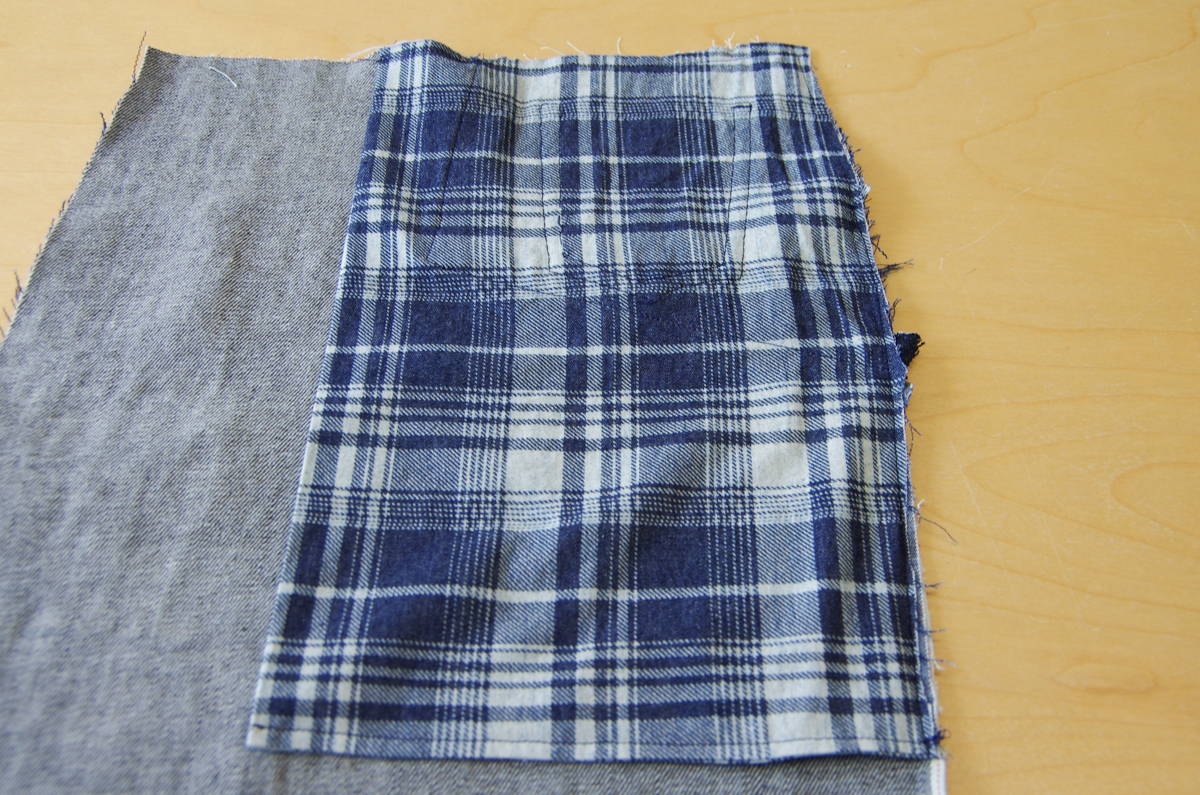
When we go to sew the side seams and waistband later on in the sewing process, the pockets and jeans front pieces will now be treated as one unit. Your front pockets are done!
Next we will move on to sewing the yoke, the inseams and the side seams.
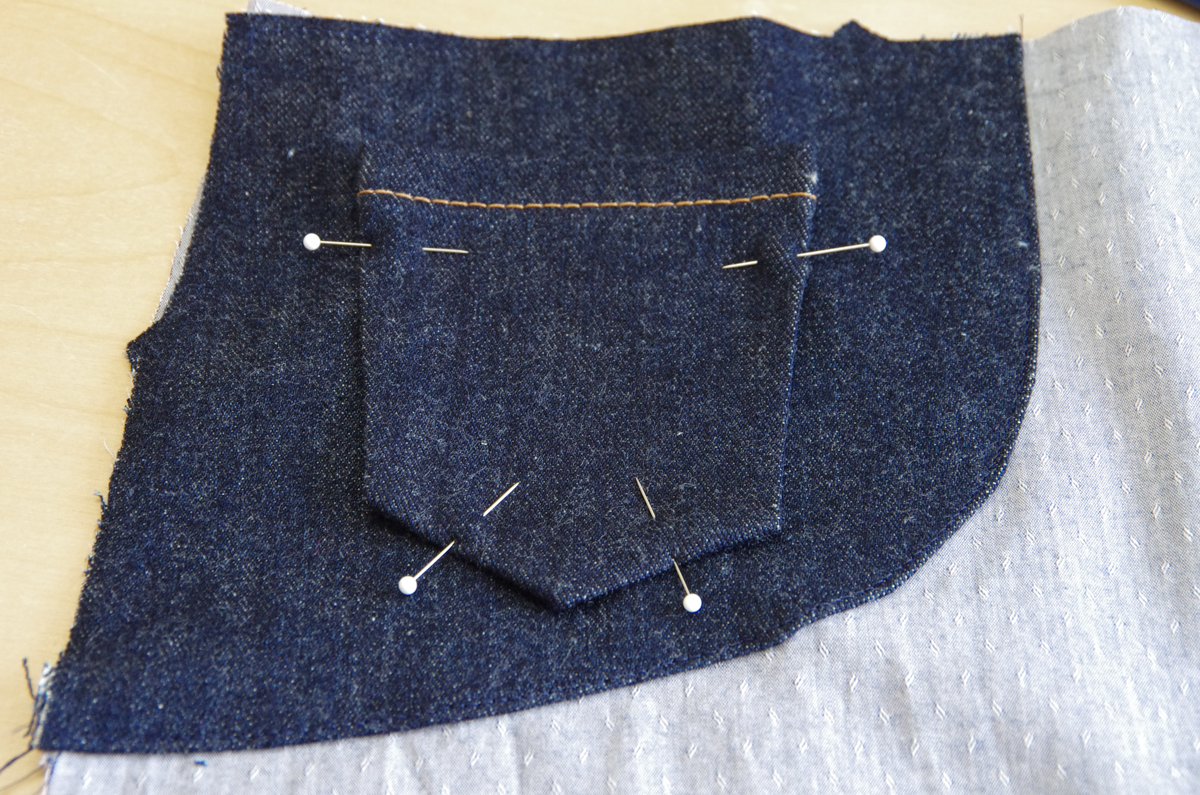
Jeans Sew-Along: Setting up your machine and sewing the patch pockets
Today we begin to sew! Let's set up our machine with topstitching thread so we can complete the first step - sewing the patch pockets.
Load a full bobbin of regular polyester thread to use regardless of whether your needle is threaded with regular or topstitching thread. Most machines create neater topstitching when the thick topstitching thread is only through the needle (and not on the bobbin).
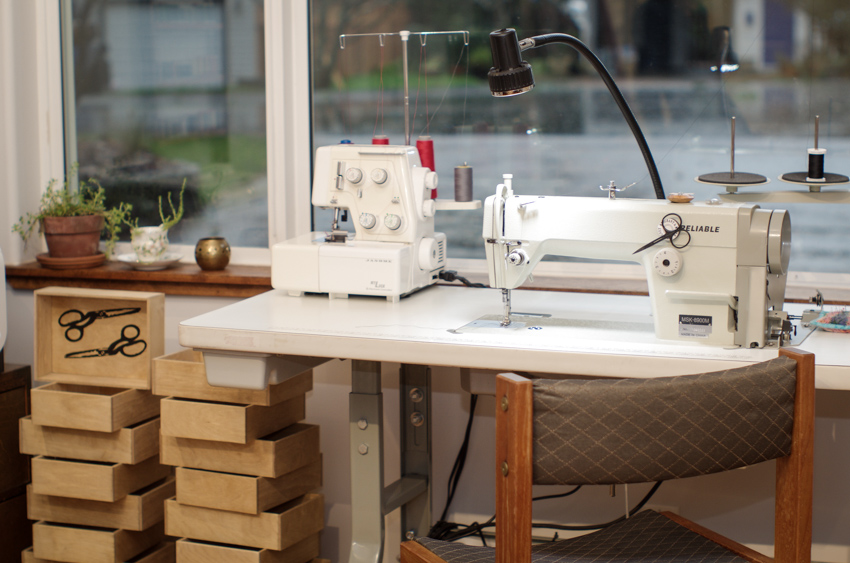
Set your stitch length a little longer than normal. On my machine (the industrial machine pictured above), my normal stitch length is 2.5 but when I topstitch I increase the length to 3.5. I used to only increase it to 3 but noticed that the results look more professional (and similar to storebought) when I use a longer length.

Test out the stitching on a couple layers of denim. Do you see skipped stitches, unbalanced tension or snarled threads? You may need to change your needle, adjust your foot tension, or adjust your bobbin tension. Tilly & the Buttons has a great post on troubleshooting these things that includes a detailed video. A photo from this post is included above.
Is your machine all set? Let's get sewing!
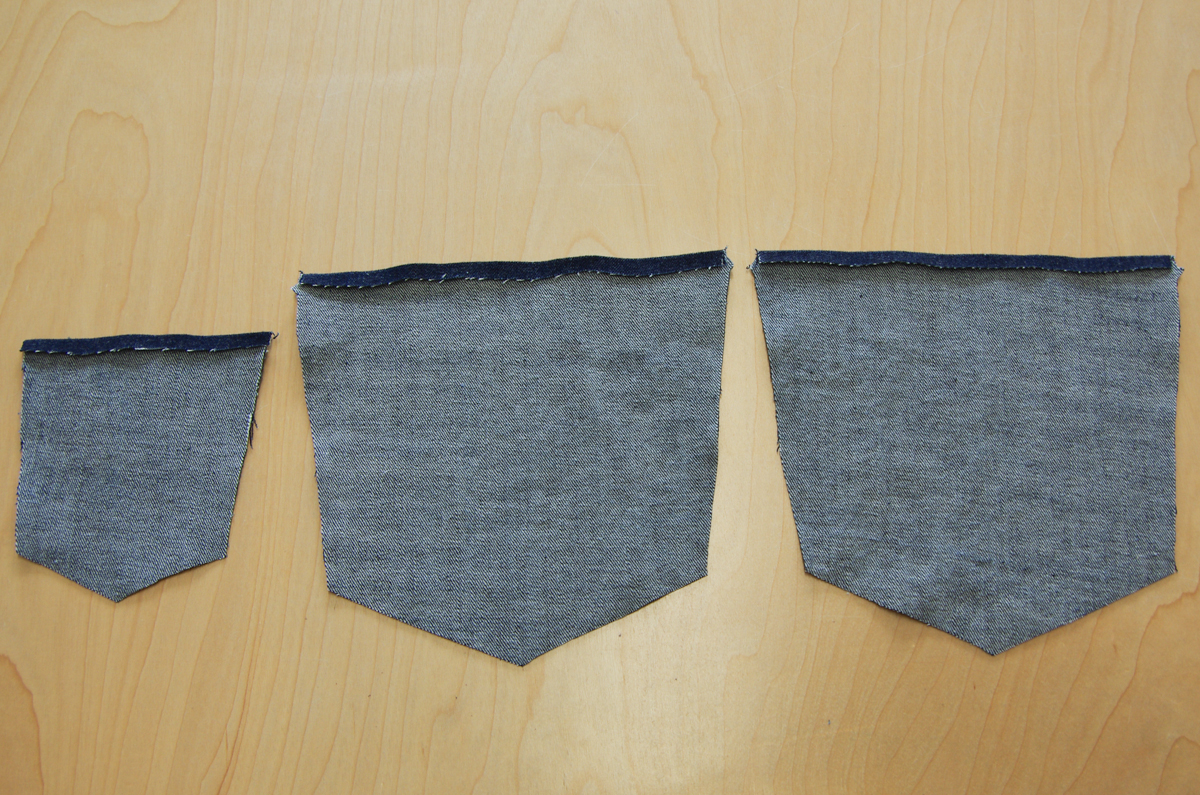
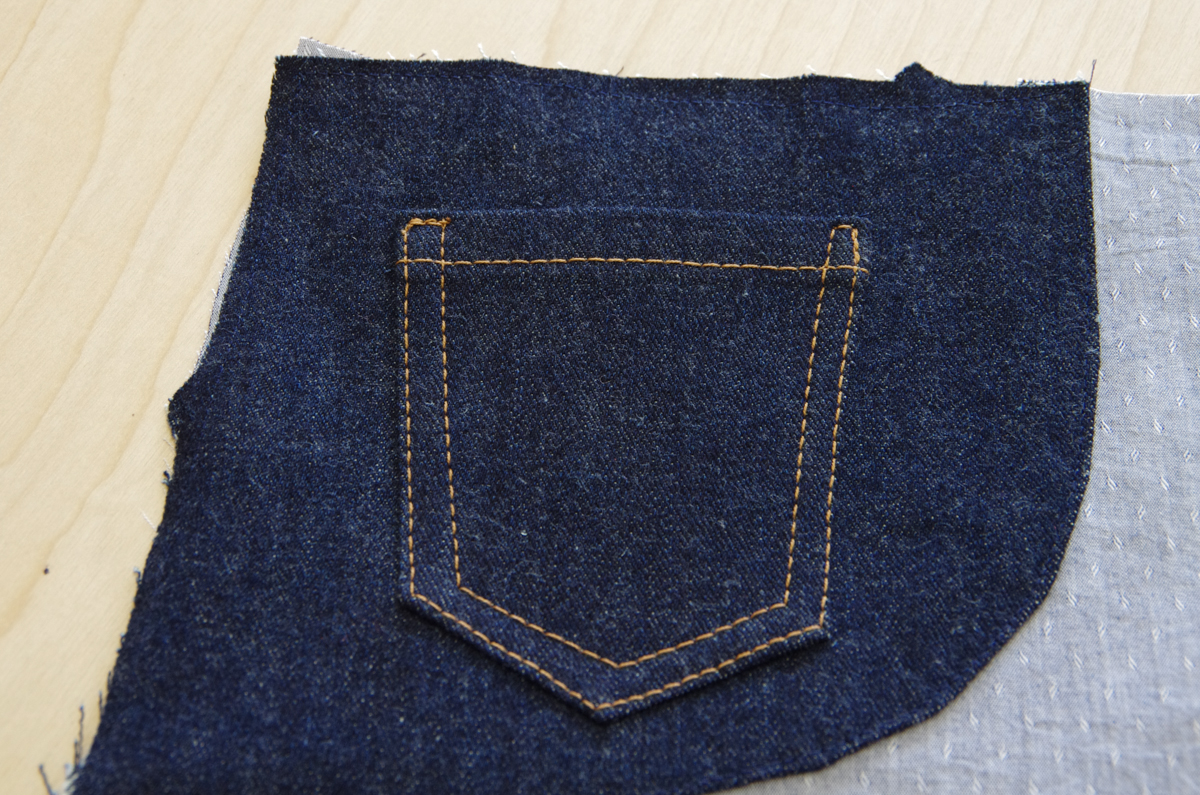
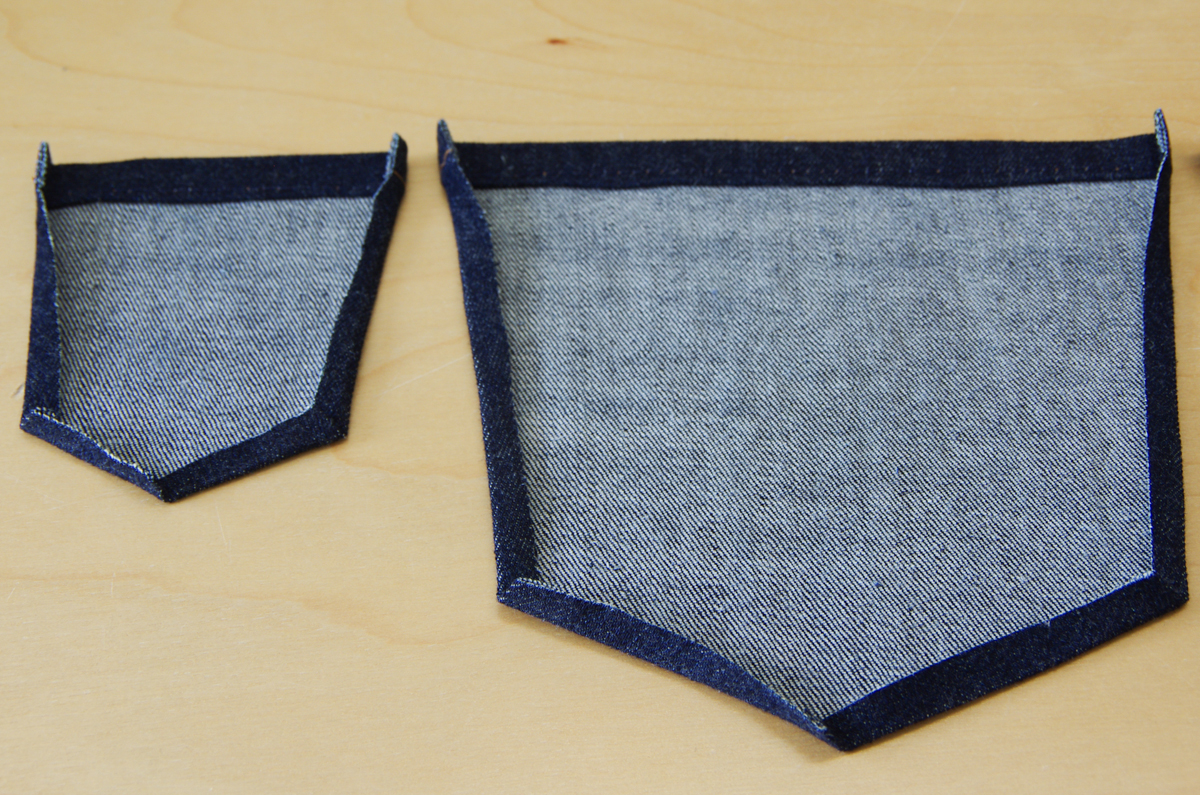
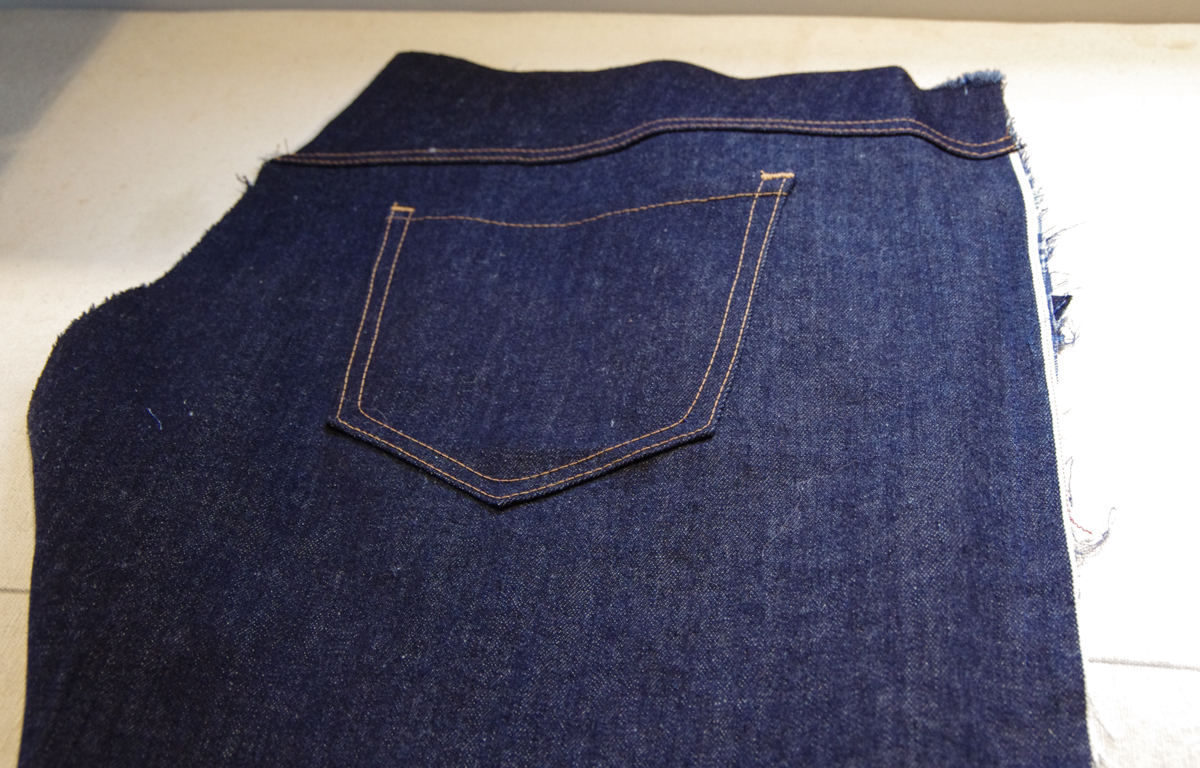
Let's begin by assembling our patch pockets. We'll work on the back patch pockets and the coin pocket at the same time. Press the top edge of each pocket to the wrong side 1/4". Press under again 1/2" to enclose the raw edge entirely.
Edgestitch across the top of the pocket 1/8" from the hem as pictured below. If you are sewing the Fulford Jeans, create a second row of topstitching 1/4" from the edgestitching.

Alternatively, if you are sewing with a selvage denim, you might like to highlight the selvage on your coin pocket! I did this for the Fulford sample by cutting the coin pocket out sideways (so the grain is going across the pocket rather than from top to bottom. I placed the paper pattern piece so it extended 3/4" over the selvage since I would not be hemming the top of the pocket:

Press the remaining pocket edges under using the 5/8" seam allowance.

If you would like to reduce bulk and create a pocket with no raw edges inside, you can trim the seam allowances to 3/8" or less so that they will be enclosed by the topstitching later.
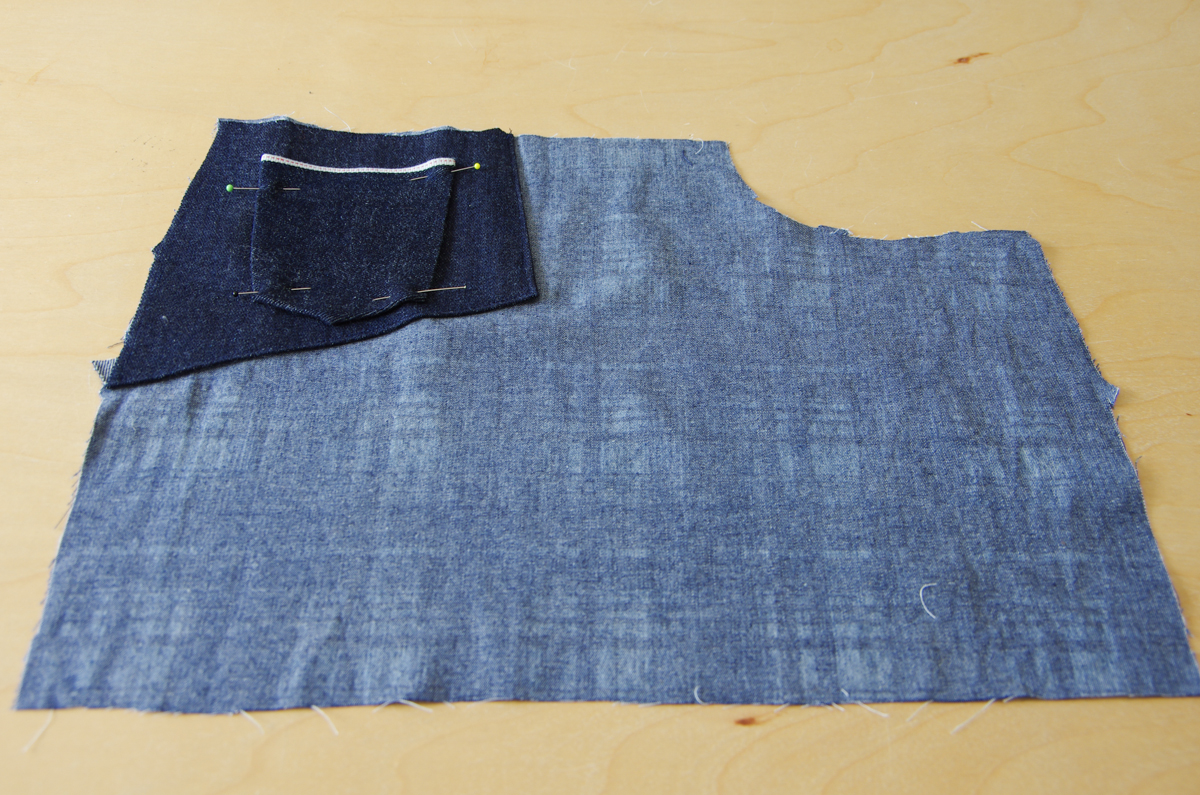
Now we are ready to attach our back pockets to the pants (we will be attaching the coin pocket in a later post when we construct the front pockets).
I like to mark the pocket placement on my jeans back pieces by using pins. Place the fabric pieces with right sides together and place the paper pattern on top. I then push a pin through all the layers at each pocket marking. I then push a pin through the opposite direction using the sharp point of the first pin as a guide.

I now have two pins going through the pocket placement marking.

When I pull the layers apart, one pin stays with the paper and one pin stays with the fabric. Now I add another pin to the top fabric layer so that both back pieces have their own marking pins:

Place the top corners of the patch pockets so they line up with the marked placement points. Pin the pocket in place and then create your topstitching as instructed.

The Quadra Jeans feature tapered stitching along the pocket sides. You might like to mark this with chalk to ensure you taper your topstitching evenly.

The Fulford Jeans do not include tapered stitching so you simply need to keep your second row of stitching an even 1/4" away from your first row.

Finish off both the Quadra and Fulford pockets by placing a bartack between the two rows of stitching. The bartack is a narrow zig zag stitch with very little length. If your machine has trouble doing this or you do not have a zig zag stitch available to you, you can backstitch thoroughly using a straight stitch. The results are not quite as pretty but will still give you the needed strength.

Next post we will move on to our front pockets! See you then!
Jeans Sew-Along: Choose a size and test for fit
Today is the second day of our jeans project - we've selected materials, pre-washed our fabric and now we are ready to choose a size and get fitting!
Both the Quadra Jeans and Fulford Jeans instruction booklets include a handy page detailing how to choose your size. Let's walk through this visually. First, have a look at the page below (or, for a higher resolution and larger text, look in your instruction booklet) and then we will look at photos of Matt measuring himself.

You will notice that we need five main measurements. There are other measurements included in the garment measurement chart but these five are the ones that most significantly effect the fit of the jeans. Begin by measuring the man's waist circumference:

Make sure the waistband is at his narrowest point, or if, like many men, his narrowest point is no longer at his waist, circle the tape measure at approximately naval level. When you purchase jeans in the store they will be listed using this waist measurement size. As we will soon discover, a size 30 jean does not mean that the jean waistband actually has a circumference of 30"! I'll show you why in a moment.
Record the waist measurement in the chart within your instruction booklet. Now lets move on to measuring the hips:

Circle the tape measure around the widest point of the hips and seat. This location can vary for men depending on the shape of their hips and bottom. Again, make sure the tape measure is horizontal. Record this measurement in your instruction booklet as well.
Now that we've collected both body measurements, let's analyse which pattern size the man might match. We will then proceed to collecting garment measurements to firm up our decision.
Matt's measurements are:
Waist: 30"
Hips: 38"
I plan to sew him the Quadra Jeans and so below you will find the Quadra Jeans measurement charts:

The size 30 body measurement chart lists a hip measurement of 37" so Matt is a fairly close match to the size 30 but I might consider grading between sizes depending on how the garment measurements match the size 30 as well.
Let's move on to garment measurements so we can make our decision...these measurements are based on the actual finished jeans and not on the body that fits into them. To measure the inseam, you need to measure from the crotch seam all the way down to the hem with all wrinkles removed from the jeans:

It is more accurate to do this when the jeans are off of the man and laid flat on the floor but it is important to see the jeans on the man too. This is because, regardless of the man's preferred fit of jeans, the fit on their body can differ greatly from man to man: Some men let their jeans sit low on their hips and others pull them up high. Some men like a hem to touch the ground and others like their jeans quite a bit shorter. Does the man wear his jeans so there is a lot of empty room between the jean crotch and his body (wearing ease)? The tape measure should not push up into the crotch when measuring but instead simply measure to the end of the seam. Record this measurement.
Matt's inseam measured about 30" so he may need a tiny bit of length taken off the Quadra size 30 (which have an inseam of 30 3/4"). Since it is only small difference and since the jeans he was wearing are very slim fitting and short legged, I think I would cut out the Quadras as they are and adjust the hem when I baste the pieces together (instead of shortening at the lengthen/shorten line). If the difference were greater (3-5" or so), taking some length off from the line we provide on the pattern would allow you to preserve the shape of legs (important for the tapered Quadras, not as important for the straight Fulfords!). We have a tutorial on how to lengthen or shorten a pattern piece on our website.
Now we will measure the rise of the jeans to determine where the waistband will sit on the man's body. For this garment measurement, you will need to measure the garment on the man. It helps if the man is wearing jeans/pants with a rise that he really likes when you take this measurement so you can compare his ideal fit to the fit of our pattern.

Have a look at the Rise measurement given under the size that most closely matches the man's waist and hips. Measure from the crotch of the jeans (again, where the jeans naturally sit away from the body), up to that number (which is the bottom of the jeans waistband). The jeans Matt wore had a rise of 8 1/2". This is a very close match for the size 30 Quadra Jeans which feature a rise of 8 3/8". This is encouraging news that indicates Matt will probably like the fit of the Quadras! Place a pin or chalk mark or tie a string around the man at the height of the Fulford or Quadra rise to allow you to take the last measurement - the Garment Waistband.

Circle the tape measure around the man exactly where you placed your Rise marking. The tape measure should only be wrapped as snug as the man likes his waistband to fit. If he likes a loose waistband that he cinches in with a belt, you might need to wrap it a bit looser than you usually do. If he prefers to wear jeans without a belt, you might need to wrap the tape more snug to ensure the jeans will stay up unassisted.
Matt's Garment Waistband measurement is 34 1/2" which is a close match to the size 30 Quadra Jeans (which have a garment waistband of 34 1/4"). Now you can see why the finished jeans will not have anywhere near a 30" waist! They will be 4 1/4" larger than that!
Now it's time to pick your size! Keep in mind the following:
- It is more important to match the garment Waistband measurement to our size chart than it is to match the body Waist measurement...the jeans will not be worn at the body's natural waistline so it doesn't matter very much if that measurement is larger or smaller than the size chart due to a belly or an exceptionally tapered waist.
- Choose a size that most closely matches the man's hips and the garment waistband. Know that you may need to adjust the length of the jeans if the inseam measurement does not match your chosen size.
- If the man's Garment Waistband measures between two sizes, you will likely have a better fit if you size down. You will still have plenty of room within the 5/8" seam allowances to let out the waistband slightly if he needs a little more room.
Now that you've selected the closest size, you have three choices to test and adjust the fit as detailed below. Alternatively, you can just sew them up and hope for the best...but I highly recommend taking the time to do one of these options since all of that topstitching makes it difficult to adjust the fit of the hips, legs and seat seam once the jeans are finished. The waist can easily be taken in or let out though due to our two piece waistband (more on that later!).
Here are three fitting options:
- Adjust the paper pattern: Make adjustments to the paper pattern before cutting into fabric to suit the man's inseam length and leg width preferences. This is a good option if tiny changes are necessary but I would not recommend performing too many changes before actually trying something on the man! Perhaps just grade between sizes at the hips or add/remove a bit of length.
- Mock up with different fabric: Cut out the pattern as is using a cheap mock up fabric (any stiff medium weight woven will do!). You can then baste together the pieces quickly and try them on the man so that you can adjust the shape of the lengths, length of the legs, and shape of the seat seam while the mock up is on his body. Transfer the changes to the pattern pieces and then cut into your real fabric. This is a good option if the man's measurements fall across several sizes on our measurement chart and lots of changes will likely need to be made. This allows you to accurately see the fit on the man without any risk of ruining your fabric.
- Baste together the denim: Choose the size that is the most likely match and cut out the jeans in your actual fashion fabric. Baste together the pieces to try on the man. The pattern includes 5/8" seam allowances so it allows you quite a bit of room to play with the shape of the seat seam, the curve of the hips, and the width of the legs. This is a good option if only one measurement differs from our size chart - perhaps the man's hips are quite a bit narrower than our proportions so you will need to take in the jeans along the side seams.
I usually choose option three when sewing our jeans patterns. The last time I did this I snapped a few photos so you could see that I baste together at a later point in the sewing process than you might expect!
You can baste all the pieces together before you begin to sew (as I suggest in the instruction booklet), or, if you feel you will likely only need to tweak the fit in the hips a little and test to see if the waistband feels good on the wearer, you could do what I've done here.
I sew all the jeans details (back pockets, front pockets, yoke), sew the inseams and then stop. I then proceed with the next stage of the sewing process (side seams) with a long basting stitch and the fabric with wrong sides together:
I baste the seat seam as well (I did it right sides together in the photo below but I'd actually recommend wrong sides together so that the seam allowances are easier to see and manipulate when the garment is tried on):

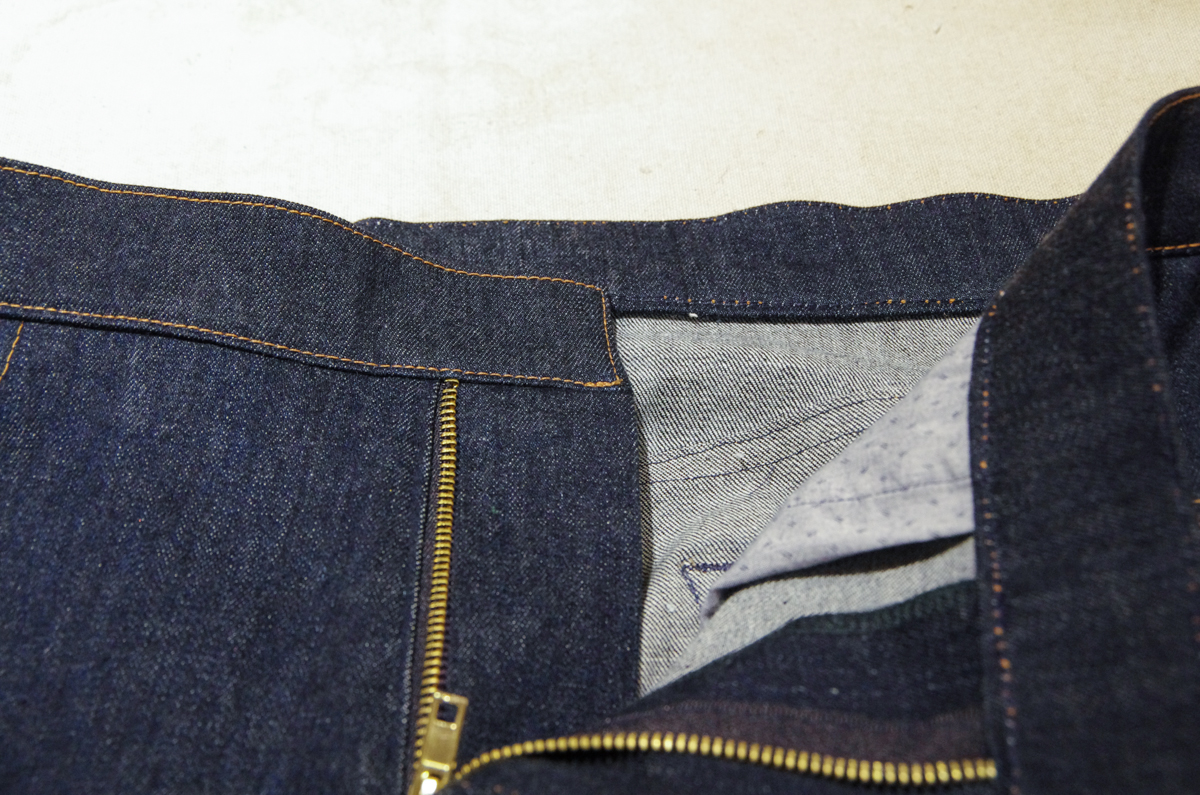
The fly is left open and unfinished. To ensure the waistband can be sewn on accurately I press under the seam allowances. The right side, when the pants are worn, has a 1/2" seam allowance and the left side, when the pants are worn has a 5/8" seam allowance. In the photo below, the allowance on the left will be folded under 1/2" and the allowance on the right will be folded under 5/8".

Lastly, I temporarily attach the waistband. I carefully mark the buttonhole and button and then simply stitch together along the center back seam and then apply it to the jeans. The button marking lines up with the folded edge of the fly and the buttonhole should be set 1/2" in from the folded edge of the fly.

Try the jeans on the wearer and pin or clip them closed so that the button and buttonhole marking overlap. This will give you an accurate feel for how the finished waistband will fit despite having no fly extension, zipper shield or button to do up! Pinch and pin any areas that need taking in or letting out...be careful to avoid over-fitting as the man still needs ease to sit and bend his legs!
If you have questions about fitting your jeans, please email me at info@threadtheory.ca or comment. You can also join our Facebook community where many engaged menswear sewists are quick to offer advice the moment you post!
See you in a couple of days for our next sew-along post! We will setting up our machines and sewing the patch pockets.
Download the Quadra Jeans or Fulford Jeans to join us in this sew-along.
Jeans Sew-Along: Gathering Materials

Today we begin the sew-along for our Quadra and Fulford men's jeans patterns! I'll be walking you through the following topics with the help of many diagrams and photos:
Today (Oct 12th) - Gathering Materials - how to choose fabric and notions.
Oct 19th - Choosing a Size - how to measure the man and select an appropriate pattern size. We'll also discuss options to mock up your chosen size and how to make alterations to ensure a good fit.
Oct 21st - Set up and Patch Pockets - how to set up your machine, apply interfacing, and assemble the patch pockets.
Oct 23rd - Front Pockets - how to construct the french seamed pocket bags.
Oct 25th - Yoke, Inseams and Side Seams - how to sew these flatfell seams and the side seams.
Oct 27th - Seat seam and Fly Extension - how to prepare for fly construction by sewing the seat seam and adding on the fly extension.
Oct 29th - The Fly - I've taken loads of photos for this step and I know you can do it!!!
Oct 31st - Waistband - We'll add the waistband on and discuss additional fitting options at this point.
Nov. 2nd - Belt loops and Finishing Details - how to assemble the belt loops, hem the jeans and apply the rivets.
You'll notice that the sew-along schedule will give you a week to get your materials assembled and then we can delve into fitting and sewing. Before we talk about materials, though, I want to give you a little bit of inspiration by showing you some of the amazing Quadra Jeans that our test sewers made!
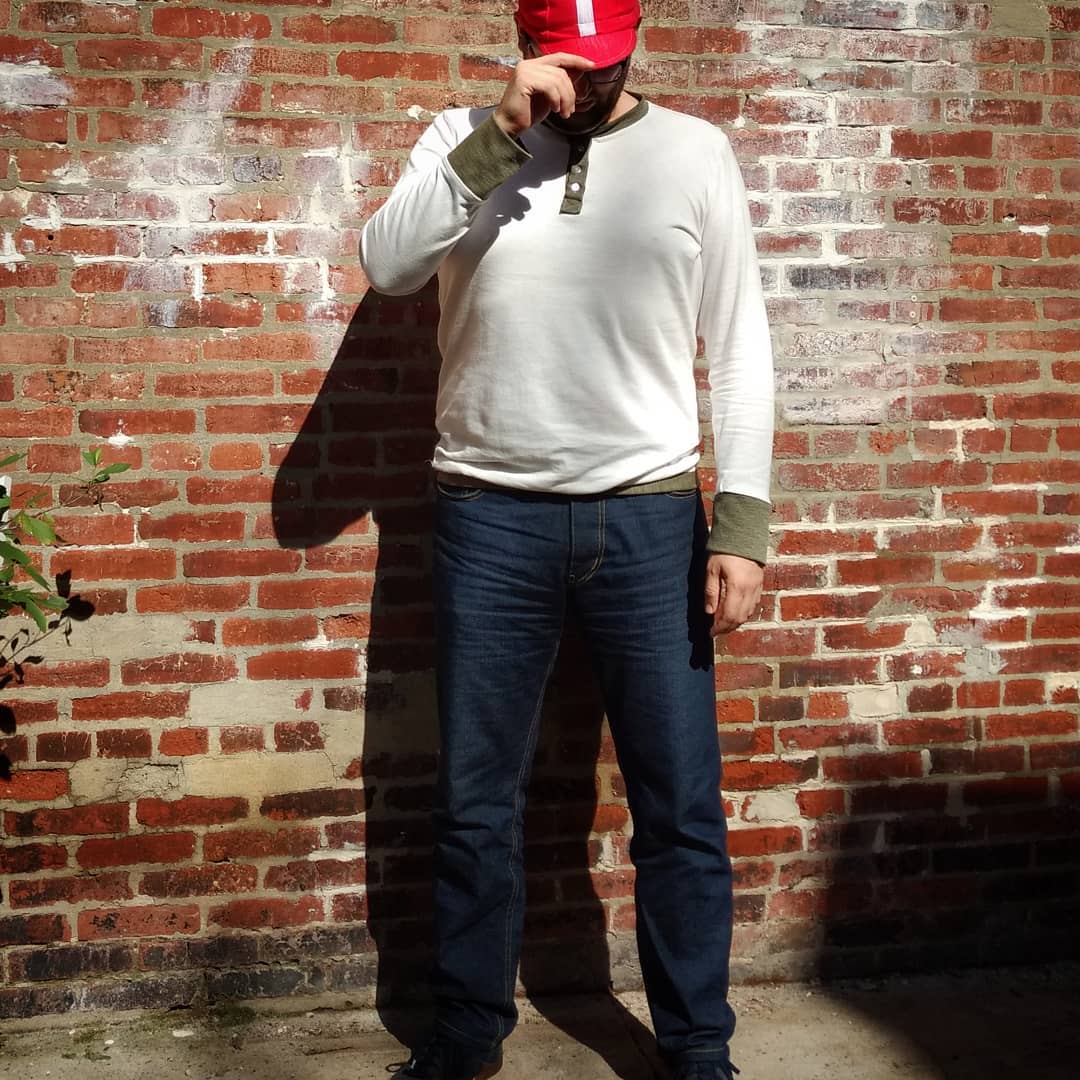
This nicely fitted pair was sewn by Dan for himself - notice how he's paired them with a Strathcona Henley!

Tina really took her time and added thoughtful details to the pair that she sewed. I love the idea of adding a label on top of the leather patch!

Kari sewed this pair for her partner, the dark fabric choice looks very smart paired with a button-up.

And lastly, Zak sewed this Carhartt-colored pair for himself and took lovely photos at Hadrian's Wall in the UK. I travelled to view this wall many years ago when visiting family who live in Manchester so his photos bring back some great memories!
Are you itching to make your own pair now? Let's begin by assembling our jeans-making materials! Looking at the Materials Required section of the instruction booklet, you will see that you need the following:
Self Fabric
This is the main fabric you will use for the jeans. Denim is, of course, recommended, but the jeans look great in a myriad of other fabric choices as well! Try making a wearable mock-up in a readily available cotton twill, corduroy or canvas before investing in denim.
Denim can be tricky to source and can be fairly expensive when you purchase denim of high quality. Fortunately, our jeans patterns can be made using a fairly wide range of denim styles including denim with no stretch or up to 2% elastane content. Look for denims between 9-16 oz. Ensure that your sewing machine can handle five layers of the fabric at one time using topstitching thread since this is how many layers you will be stitching when you add the belt loops to the jeans! Some excellent online sources for denim are listed below. Each link will take you directly to the part of the store where I found denim and other trouser weight fabrics.
Canada
Fabrications Ottawa - a great online shop which includes a stock of Cone Mills US-made S-gene denim in multiple weights! This is high quality denim - the same denim that continuously sells out when Closet Case Patterns launches her limited supply jean making kits!
Blackbird Fabrics - an online shop just across the water from me! Caroline often has a nice selection of denim in stock and occasionally gets in a supply of coveted Cone Mills.
Closet Case Patterns - Heather-Lou is known for her excellent women's jeans patterns. She stocks jean-making kits including all the notions you need and high quality denim. They often sell out fast but you might be in luck snagging a non-stretch kit in particular since these are less in demand than the stretch denims needed for her Ginger Jeans pattern.
Simplifi Fabric - An online shop completely focused on organic and ecologically friendly fabrics! They have a great selection of denims. The 12.5 oz Indigo Blue Hemp and Organic Cotton Denim looks spectacular!
USA
Stylemaker Fabrics - An organised selection of denim in various weights and amounts of stretch.
Britex Fabrics - They have a few very well priced Japanese selvage denims that are worth a peruse!
Fancy Tiger Crafts - A nice array of denims from various manufacturers - all well labelled so you can compare the differences. I like the US made bull denim choices in particular. Bull denim is dyed after weaving to produce a uniform colour (whereas regular denim features an indigo warp thread and white weft thread).
Harts Fabric - A comprehensive selection of quite affordably priced denims. I especially like the look of the wide denim which would save a lot of fabric when cutting out men's larger sizes.
UK
Merchant & Mills - A large range of high-end denim very suitable for men's jeans - you might like to make a mock up first due to the price point of these quality fabrics!
Empress Mills - Some very affordable denims in a variety of weights. A great way to test out a pair of jeans without a huge investment!
Croft Mill - Another selection of affordable denims and some interesting choices including prints, pre-washed, broken twill weave, extra wide etc.
Like I mentioned before, if you would like to try out one of our jeans patterns before cutting into your high-end denim, why not sew up a pair in a more affordable cotton twill or corduroy? You'll likely find a selection of trouser weight materials at your local fabric shop but, in case you don't have a shop near you, here are some excellent online options:
Blackbird Fabrics - Currently there is a nice 8.5 oz Cotton Chino Twill in stock in various colors. While this is half an ounce lighter than I recommend within the instruction booklet, it would make a great jean alternative for summer and it would be nice to practice topstitching on something a bit more light weight.
Stylemaker Fabrics - A US based online shop - there is no end to the options here! You can search their "Pants" section and browse many pages of corduroy, twill, bull denims in many colors, suitings of all sorts and more.
RayStitch - A UK based online shop with a large selection of interesting fabrics. I enjoyed perusing the Heavier Weight Wovens sections for all sorts of unique options for pants.
Pocket Lining

This is a great opportunity to use a scrap of fun quilting cotton but any strong and thin cotton or cotton blend will work nicely. Above you can see a beautiful Jedediah Pants progress shot by Duane of MainelyMenswear. He's chosen a kente cloth print for his Jeds. Similar accent fabrics can be used for our jeans patterns.
Have a look at store bought jeans and you will see the pocketing is actually quite thin. I usually prefer a quilting cotton weight so that the pocket bags are not a weak point in terms of wear. I've also used scraps of shirting from past Fairfield Button-ups and scraps of flannel from past Eastwood PJS (shown below) with great success!

Interfacing
Choose a medium weight fusible that adheres to your denim or chosen self fabric securely. The interfacing will be used for the Fly Extension, Zipper Shield and Waistband Pieces. It can be black or white since thick denim will not allow the interfacing to show through to the right side!
Other Supplies

A no-sew jeans button measuring 1/2"-1". We stock several types of jeans buttons in our shop.
Six pocket rivets - these are optional if you are using a fabric other than denim since you could also just bartack very securely at these pressure points but I don't think rivets are optional if you are sewing with denim. They are essential to create the classic strength and appearance of jeans. We have several types of rivets in our shop as well.
Thread - you will need regular polyester thread (which is stronger than cotton) to match the colour of your denim and thicker topstitching thread in a pleasing contrasting colour. Some of our test sewers successfully sewed their entire jeans using Gutermann Extra Strong Thread which is not quite as thick as topstitching thread. This allowed them to skip the hassle of re-threading their machine each time they needed to topstitch. My machine is never very happy when sewing with thick thread (it binds up when I backstitch) so I prefer to switch back and forth to ensure that my seams are strong and backstitched securely before I topstitch them. We will be discussing all sorts of tips and tricks for tidy topstitching later on in the sew-along!

An optional 3 X 2 1/2" decorative label - Most store bought jeans feature a leather-like label on the back waistband. I love adding my own blank label as a way to draw attention to the fact that my jeans are not branded! You can stitch a real leather label to your jeans or you can add a washable paper one. We carry these in our shop for $2 CAD. They are comprised of the same material that brands like Levis or Wrangler uses for their labels - this washable paper stands up to machine washing and drying at any temperature.

A metal toothed zipper - if you can not find the size recommended in the instruction booklet, a longer zipper will do just fine! I will be showing you how to shorten the zipper during the sew-along. We carry 7" and 8" jeans zippers in our shop. Oh, and don't be concerned about the width of the zipper tape! The pattern pieces are marked so that you will be able to place your zipper correctly regardless of the width of your zipper.
Before we continue with the sew-along, make sure to pre-wash your denim. I recommend washing it with a cup of vinegar on fairly high heat to set the indigo dye and pre-shrink/pre-soften the denim...unless, of course, you are a denim enthusiast who wants to sew up a pair of raw denim jeans! In that case, you'll want to keep them stiff and saturated with dye by avoiding washing at all! You can read about that whole philosophy here (be prepared to be lost down a bit of a rabbit hole!).